Last updated on January 2nd, 2024 at 03:05 pm
FL Studio is one of the most popular DAWs (Digital Audio Workstations) out there used by Electronic Music producers, as well as Hip-Hop, Pop, Dance, House, Hardstyle producers, and others.
It already comes with a lot of built-in virtual instruments as well as audio processing plugins, but it’s definitely lacking in some of those areas, which is why I created this article.
Here I will list a huge range of the plugins that you can use in FL Studio, be it paid or Free VSTs, including drum machines, synthesizers, pitch correction (as well as real-time pitch correction), EQs, compressors, and more.
So, without any further ado, let’s get started!
LowEnhance
Specifically designed to process the low-end of your tracks in an easy manner.
Bass Master
Best synth Plugin for treating pumping and great-sounding bass lines.
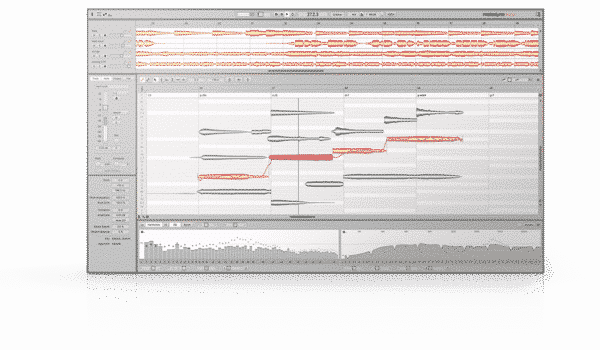
Melodyne Essential
Best pitch-correction plugin currently out there that also works as a De-Esser.
Things to Consider before Buying VST plugins for FL Studio
Depending on what edition of FL Studio you have (Fruity, Producer, Signature, or All Plugins Edition), you will have access to a different number of plugins. For example, only the Signature and all Plugins Editions come with the Pitched plugin (Pitch-Correction), and the same goes for a transient processor, chorus, etc.
All of the Stock plugins available in FL Studio, be it delay, kick drum, bass sounds, software synthesizers, etc., are quite good and generally don’t need to be replaced by something better.
However, you might be interested in being able to reach for a plugin that offers something unique in terms of sound processing, or maybe it has a better visual interface.
All of the plugins I’m going to list here, both the paid and free ones, are excellent choices and can be used in the music production process to create amazing tracks.
List of the Best FL Studio VST Plugins
Here I will be providing you with a list of the absolute best VST Plugins for FL Studio and I will also include a large variety of them, such as synthesizer VSTs, Drum Machine VST Plugins, Piano VSTs, as well as many other instrument VST plugins, and there will also be audio processing ones such as Compressors, EQs, etc.
Top Recommendation:
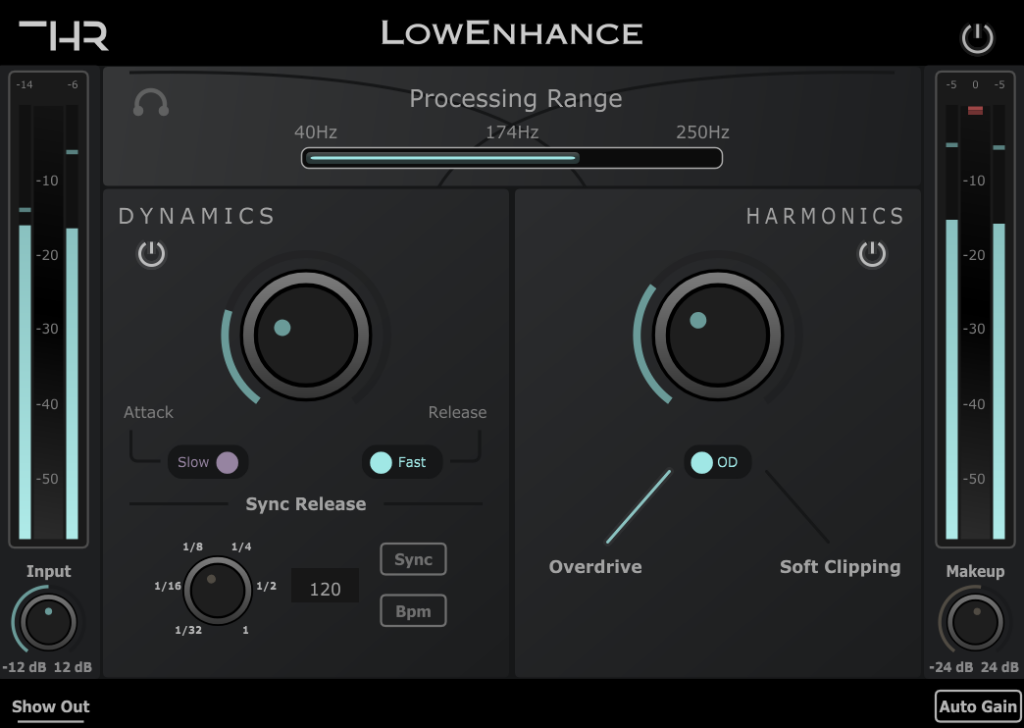
THR LowEnhance
Specifically designed to process low-end quickly!
Price: $39.99.
The THR LowEnhance compressor was designed specifically to process the low-end of your tracks and mixes with the idea of making the whole process as simple as possible, helping you work at a faster pace without having to fiddle around with dozens of plugin parameters.
Its automatic gain makeup functionality works extremely well and lets you to dial in the needed compression without having to worry about the output volume, and contrary to other compressors, it doesn’t only take into account the threshold and ratio in order to calculate the makeup, but also attack and release times.
FL Studio doesn’t come with a lot of compressors, and the ones it ships with don’t have auto-gain, and while that may not be that big of a problem on its own, it can definitely slow you down, especially when working with 40+ tracks.
In order to keep things simple, only fast & slow attack and release times are built in, which should cover most of your needs, but in addition to that, the LowEnhance features tempo-sync functionality, which sets the release time to 1/8th noters, 1/4 notes, etc., based on the project’s tempo.
THR LowEnhance also comes with a distortion module that lets you choose between two types of distortion (Overdrive and soft clipping), and the output volume also gets automatically compensated so that you don’t have to manually set it.
Some audio recording software, such as Audacity, don’t notify the plugin about the project’s tempo, which is why you can also set the tempo manually in the plugin to achieve the same results.
Lastly, THR LowEnhance allows you to select the exact frequency range you want it to process (from 40Hz and below, up to 250Hz) so that you can accurately affect the sound how you want to, and it also lets you solo that frequency range (or band) to have a more thorough listen.
User Interface: The LowEnhance was designed to look and feel simple. It offers simple controls that do what they are supposed to and all of this in an intuitive manner.
Character: While LowEnhance can sound quite mean and dirty when the saturation is cranked, I wouldn’t say it naturally adds character (unless you’re adding saturation, of course) since the compressor itself has a very clear sound that doesn’t add any coloration.
Distinctive Features:
- Automatic gain makeup.
- Compression plus distortion modules.
- Tempo-synced release.
- Low filter band that lets you adjust the specific frequency range to process.
Uses: LowEnhance, as the name implies, was designed to make adding compression and saturation to the low-end as simple of a process as possible: It can be used to add thump and power to you kick drum, help your bass guitar sit better in the mix, or to add some grit and power to your synth lines.
Lastly, LowEnhance comes with a 7-day free trial, so make sure to give it a try!
Find out more about LowEnhance here.
So, let’s get straight into the list of the best FL Studio VST Plugins:
Best Synthesizer VST Plugins for FL Studio
Although FL Studio’s strength mainly lies in producing electronic music, hip hop, etc., where a lot of synths are used, unless you get the “All Plugins” edition then you will probably need to get a couple more. So here are the ones I like the best!
All of these synthesizers are fantastic, they can do FM Synthesis, subtractive synthesis, and even emulate hardware synths, and they are fantastic for creating your own sounds.
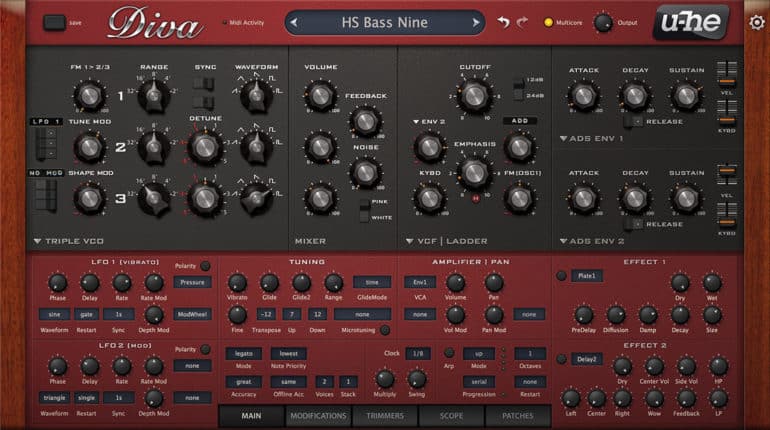
Diva by U-He
Super Powerful emulation of Vintage Hardware Synths!
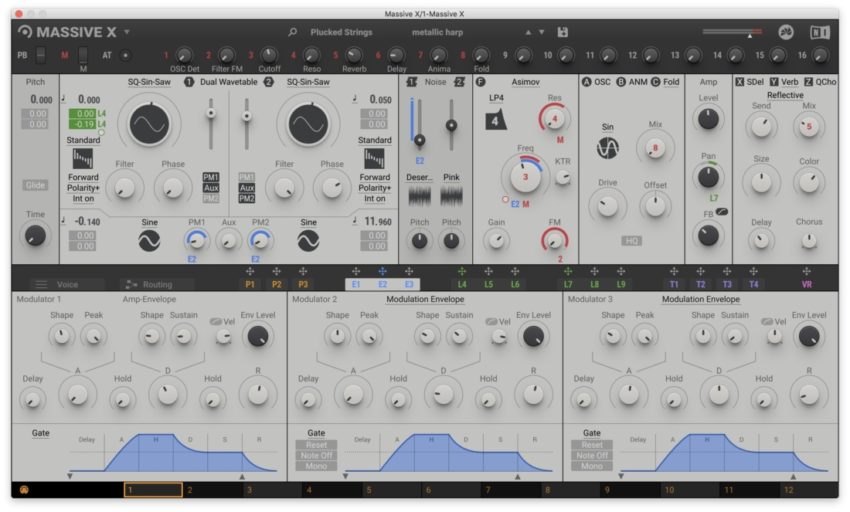
Massive X by Native Instruments
One of the most powerful synths out there!
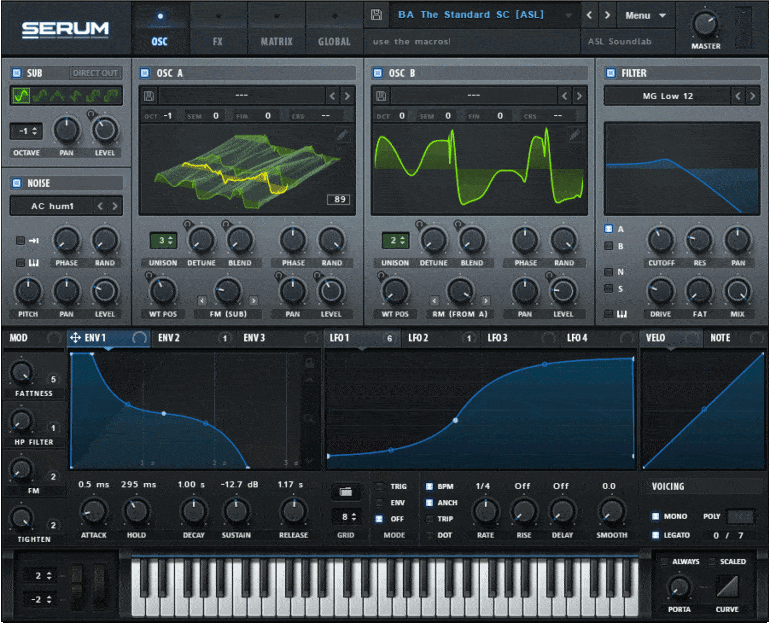
Serum by Xfer Records
One of the best-known Synthesizer VSTs!
Best Bass VST Plugins for FL Studio
While you can definitely use the synthesizer plugins I just listed to create deep pumping bass lines, the ones that I’m going to list in this section are specially designed to do this, and do it they can!
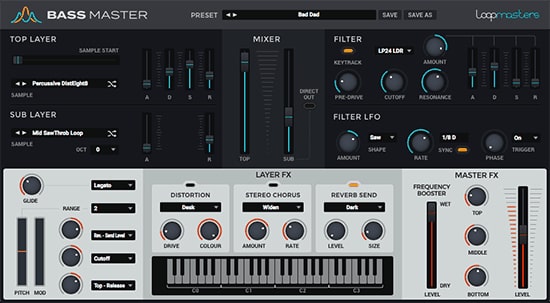
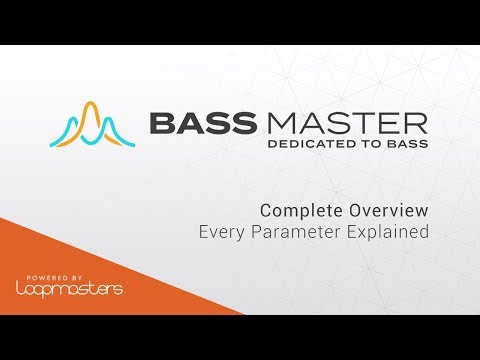
Loopmasters Bass Master
Best Bass Plugin for EDM!
Bass Master is a strictly bass-oriented virtual instrument that was created by Loopmasters and like most modern VST plugins, it is compatible with all VST and AU plugin hosts out there.
Creating great basslines that sit well in a mix can be a bit complicated, and this is usually achieved by layering different synths and samples manually.
Luckily, Bass Masters helps with this tremendously since it blends two layers, the Top- and Sub-Layers, together.
It is a very simple plugin to use and getting a good sound out of it doesn’t take too much time or skill.
Bass Master is a sample-based instrument that features a total of 217 actual bass sample “waveforms” that serve as the sound source for both layers.
Now, Bass Master comes with over 350 mix-ready presets, which means that dialing in a tone is pretty damn easy.
The onboard filter offers 13 filter types: including a range of low-pass, band-pass, and high-pass models, ladder filters, and a comb filter.
Three effects are also included; Distortion, Stereo Chorus, and Reverb.
As far as customization goes, Bass Master probably offers more than you could even ask for, plus it sounds absolutely fantastic.
Get Bass Master here: Pluginboutique.
SubBoomBass 2 by Rob Papen
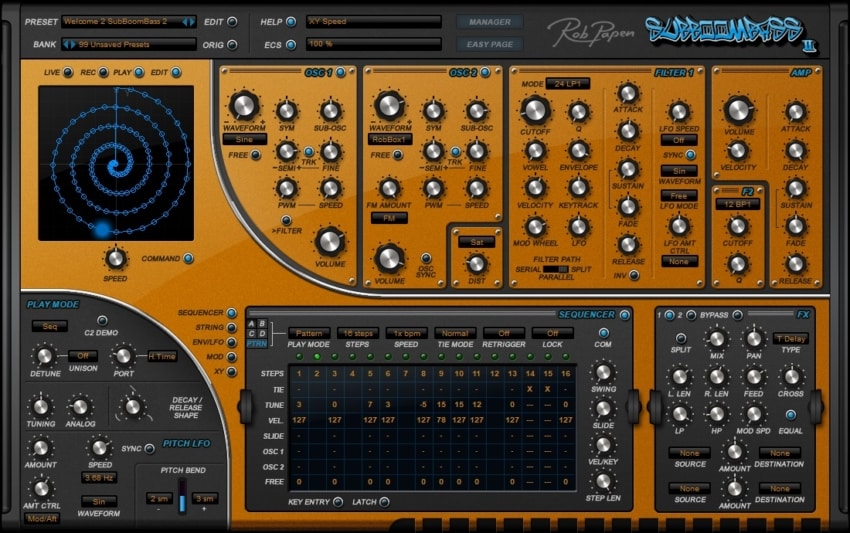
If you know anything about bass synths, then you probably heard of Rob Papen, who has created other famous synths such as the Punch and the Predator.
SubBoomBass 2 is the successor of the SubBoomBass I and has received an Interface makeover for more comfortable use and control of all the features, which are a lot.
It still has its analog-modeled waveforms onboard which were obtained directly from pitched-down samples of instruments, and the sound color has been expanded with new spectrum waveforms.

With this synth you will have access to a high number of high-quality presets that should get you going in no time, allowing you to create a deeper and richer low-end in a matter of minutes.
Additionally, an “Easy Edit” mode is also featured in this synth;
What this allows you to do is reduce the overwhelming number of controls in order to make the workflow easier and faster.
Lastly, it features a distortion stage, amp section, two filters, a step sequencer, a modulation section, and an effects unit.
Demo Track:
SubBoomBass 2 gives you access to great-sounding deep basses that immediately sit well in the mix, and it’s a plugin you should consider if you’re a serious dance-, hip-hop, or any other kind of electronic music producer.
Get SubBoomBass 2 here: Plugin Boutique, Reverb, Sweetwater.
Best Drum VST Plugins for FL Studio
Drum plugins are essential for music production. Most people using FL Studio aren’t that interested in actual acoustic drum kits but rather virtual drum machine VSTs, so here are my two top recommendations:
Battery 4 by Native Instruments
Best Drum for Electronic Music and Hip-Hop.

Native Instruments is one of the best-known names in the software- as well as hardware-creation business.
They are the creators of the best-selling guitar amp simulator, Guitar Rig.
Battery 4 is a drum sampler that has a lot to offer; a huge library of samples, 143 top-quality kits, and it’s very easy to use.
Battery 4 focuses mainly on electronic and hip-hop production, which is why I wouldn’t recommend it to anyone who wants to produce pop- or rock music, but if you are interested in Electronic music, hip hop, or any of the music styles that are usually produced on FL Studio, then Battery 4 is one of your best bets.
Features
- Lightning-fast workflow for maximum creativity
- Supercharged library for electronic and urban styles
- Inspiring effects, intuitive routing, and sidechaining
Get Battery 4 here: Native Instruments.
Synthwave Drums V2 by BeatSkillz
Best retro 80s sound Drums!

Synthwave Drums V2 is a resurgence of the 80s drum style that brings you all the popular drum machine sounds as well as dry and processed versions that sound exactly like the records of those years, and especially like the movies of those days.
It features a total of 63 kits with twelve sounds each and they all sound phenomenal! I absolutely love that “Stranger Things” vibe you get from it.
As far as ease of use goes, Synthwave Drums V2 is unmatched: The interface is extremely simple with just a couple of pads as well as a few knobs to control the sound, but that’s about it, and if you’re unsure of where to start, then you could choose one of the 100 included presets.
Not only that, but this is one of the most affordable plugins on this list and one of the greatest retro-sounding drum plugins ever created.
Features
- 12 drum samples per kit
- 63 drum kits
- 100 presets
- Effects such as reverb, pitch, volume, pan, release
Get Synthwave Drums V2 here: Pluginboutique.
Best Pitch-Correction Plugins for FL Studio
Vocals are considered to be the most important element in the entire mix when we’re producing music and in today’s music industry, you can’t just produce music without correcting the pitch of the vocals since they need to be perfect.
So here are the two best pitch-correction plugins that I’d recommend getting:
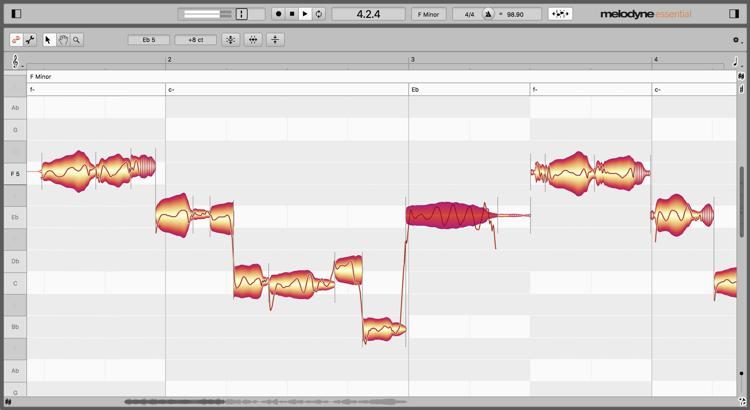
Celemony Melodyne
The Industry Standard Pitch-Correction Plugin!
Melodyne is by far the most-used pitch-correction plugin out there and it’s an industry standard as far as vocal processing and pitch correction goes (most people think that AutoTune is the best pitch-correction plugin, but Melodyne is the one designed to do this and to go unnoticed, whereas AutoTune is generally used as an actual effect).
What sets Melodyne apart from most of the other pitch-correction plugins available on the market is that it can process the sibilance and breath sounds with extreme ease and accuracy, when most plugins can’t do it at all.
It will automatically detect both and let you reduce how much of either of them can actually get through and be heard.
What’s interesting is that when you stretch a note or change its pitch, the sibilance will not be affected by this; it won’t change the pitch because humans can’t do that, and when stretching a note, it will only stretch the vowels.
You can, however, stretch breathing sounds, but not change their pitch.
Melodyne was designed with the intention of being able to process vocals without affecting the human side of things, in other words, it’s able to change the pitch and correct other important things that might be going on in the track without de-humanizing it or making it sound unnatural.
Melodyne not only works as a pitch-correction tool, but it’s probably the best De-esser currently available since it will automatically detect sibilance and allow you to lower it, remove it completely, and even boost it in specific parts of the song, which also adds creative possibilities to the mixing process.
As far as pricing goes, they do vary quite a lot depending on which version of Melodyne you want to purchase, ranging from $99 all the way up to $699.
You can find each version here;
- Melodyne 5 Essential: Pluginboutique, Reverb, Sweetwater.
- Melodyne 5 Assistant: Pluginboutique, Reverb, Sweetwater.
- Melodyne 5 Editor: Pluginboutique, Reverb, Sweetwater.
- Melodyne 5 Studio: Pluginboutique, Reverb, Sweetwater.
Waves Tune Real-Time
Best Pitch-Correction Plugin for Live Performances!
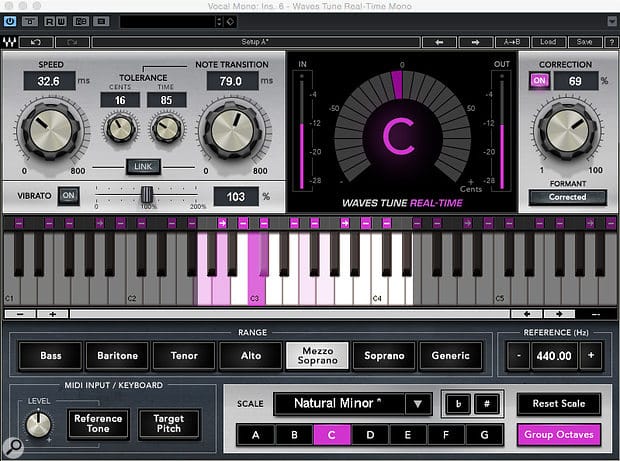
Tune Real-Time by Waves, as the name implies, was designed to be used both in the studio as well as during live real-time performance to make the vocalist sound as good as possible by applying pitch correction to the performance instantly, be it drastic or subtle.
You can use it during the recording phase as well, and this is especially useful when trying to keep the vocalist confident since they will hear themselves singing better, and this will ultimately end up yielding better results.
Like all pitch-correction software out there, it lets you control the speed at which the plugin will snap the note to the right pitch as well as how precise you want it to be.

You can also select the range of the singer’s voice, such as “Bass”, “Baritone”, “Soprano”, etc. as well as the scale, such as chromatic, major, and minor.
You can also delete certain notes/ranges from the detection circuit by simply dragging with your mouse on the plugin’s keyboard, which the plugin won’t then correct.
This is really useful during a live show because low rumble could be picked up by the mic, or the higher frequencies generated by the guitars could also be picked up, and to avoid unwanted sounds/noises you can simply tell the plugin in what frequency range it should work.
When you select a key, a “minus” sign will appear on top of the notes that are not part of that scale, and what’s really interesting about this plugin is that if the singer hits one of those notes, it will naturally correct automatically to the closest note that’s on the scale.

However, you can tell the plugin to also correct upwards or always correct downwards when those notes that are not part of the scale are hit by clicking on those minus signs and selecting either the right- or left arrow.
If the vocalist always sings a C# instead of a D, you can use this feature to let the plugin know to always shift up to D instead of going down to C, etc.
The Waves Tune Real-Time is extremely powerful and probably the best Auto-Tune plugin for live performances and recording, plus it’s quite simple to use!
Get Waves Tune Real-Time here: Waves Website, Reverb, Sweetwater.
Best Orchestral, Strings, and Choir VSTs for FL Studio
If there’s one type of sound that really helps productions to be taken to the next level, it’s got to be orchestras (as well as strings and choirs on their own).
High-quality orchestral libraries are the ultimate tool and there aren’t any available in FL Studio, so this part of the list can actually be quite useful to you.
Garritan Personal Orchestra
Best Overall Orchestral Library!

If you’re in need of a full all-encompassing orchestral VST library, then Garritan Personal Orchestra is for you.
This software instrument comes with 500-plus sounds, including woodwinds, brass, strings, percussion, choir, keyboards, and harps, that you can use to craft solos, duos, trios, and quartets, chamber groups, ensembles, sections, and full-blown symphony orchestras.
It runs on the ARIA player, which means that no additional software is required to get it up and running fast, and it’s a very easy-to-use library that’s great for putting together quick ensemble sections, allowing you to crank out demos in no time.
Get Garritan Personal Orchestra here: Reverb, Sweetwater, Amazon (digital download card).
Best Service The Orchestra Complete 2
Extremely High-Quality full orchestra!
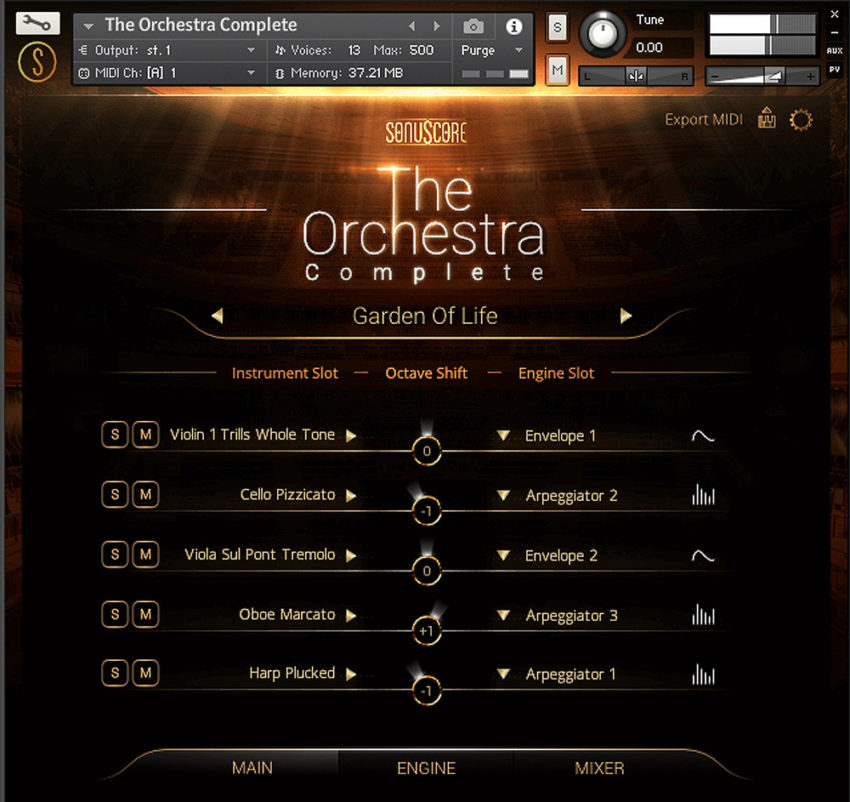
The Orchestra Complete 2 is a full 80-piece orchestra. At the center of TOC2 is its Ensemble Engine, a cutting-edge tool with powerful arpeggiators and dynamic motion envelopes. With this orchestra VSTi, you can create complex arrangements with simple chords for quick, efficient realization of your musical ideas. This virtual instrument includes 475 playable orchestrations and patterns, MIDI export, and an intuitive preset browser.
TOC2 is designed to be simple and easy to use and mainly aimed at those who are trying to complete projects on a tight schedule, allowing you to throw compositions together that also sound great in a matter of minutes.
You will need to already own or purchase the Orchestra Essentials in order to use this one, however, but the upgrade is well worth it.
Get TOC2 here: Best Service, Reverb, Sweetwater.
Analog Strings by Output
Unconventional sound, making it different from other strings libraries!

The Analog Strings library features two strings orchestras, vintage synths, and unconventional elements for sound design that it uses as its audio source, which means that it differs from the traditional orchestral string libraries quite a lot.
It is important to note that Analog Strings is a KONTAKT Instrument that features a two-layer playback engine; however, you don’t need the full version of KONTAKT since it will run on the Free KONTAKT Player.
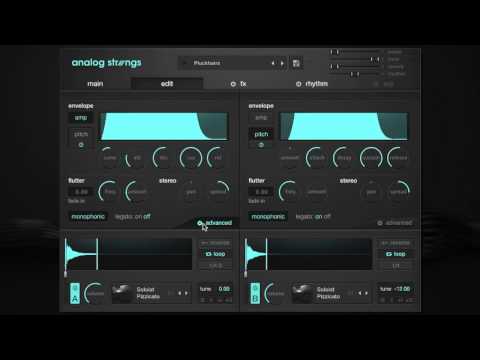
Some of the unconventional sounds it has to offer are a plucked piano, tape echoes, and guitar resonance, and all of the available presets, which are 500, can be accessed through the menu and searched by category.
In addition to the presets, Analog Strings comes with a set of tools, such as step sequencers, effects like reverb and delay, modulations, a dual arpeggiator, and more, to help you shape the sound to your needs.
Lastly, you also have the ability to use soloist patches of recordings of contrabass, cellos, viola, and violin.
Get Analog Strings here: Pluginboutique, Best Service, Sweetwater.
Strings Ensemble by Native Instruments
Extremely realistic-sounding Strings Library!
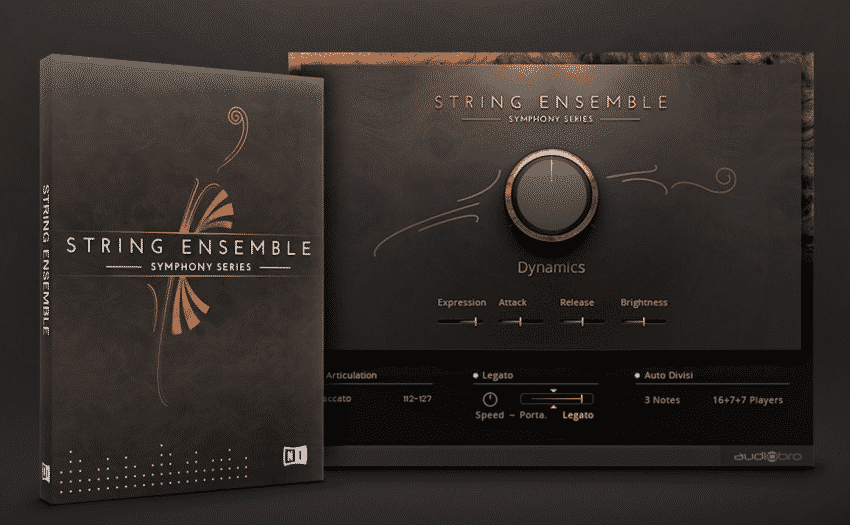
Of course, since this is a Native Instruments library, it runs on both Kontakt and the free version of it, Kontakt Player.
The String Ensemble is a 60-piece string section, featuring close to 75.000 samples, and recorded at Studio 22, Budapest.
Its interface is super clean and intuitive to use, plus the sound is simply extraordinary, as with all NI libraries.
String Ensemble offers advanced performance control for clarity and realism, such as:
Auto Divisi; All instruments were recorded as separate A and B divisi sections, which offers a way of arranging accurate and realistic performances for all articulations.
True Polyphonic Legato and Portamento: All sections feature true polyphonic legato and portamento, with up to eight-voice automatic voice-leading in real-time.
If you’re looking for a realistic-sounding strings section, you can’t go wrong with this one.
It is available in two versions; The Symphony Essentials, which is a smaller stripped-down version, and the Symphony Series.
Get the Strings Ensemble here: Native Instruments,
Hollywood Choirs By Eastwest Sounds
Best choir library overall and tailor-made for film music!

Being the highly successful successor to the “Symphonic Choirs” library, Hollywood Choirs is a choir library intended for film, hence the name. You have absolute control over a full choir with dramatic dynamics – soft and lyrical, to epic and overwhelming.
Hollywood Choirs gives you an excellent way to transform the quality of your cinematic compositions or simply provides you with another powerful resource to build outstanding productions.
One outstanding feature is the “WordBuilder” engine, which lets you type in any sort of word or phrase and hear it being performed in real-time in unison by the entire choir, and if you need to get things going quicker you can always reach for their 781 phrases preset.
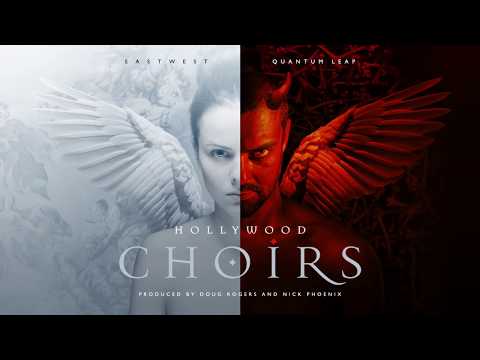
The built-in English, German, Italian, Spanish and Latin phrases give you a wide range of artistic potential, and you can string them together to effortlessly achieve an imposing result in minimal time.
Of course, this plugin comes with all the essential tools to shape the audio, such as attack, decay, sustain and release, as well as adjusting the choir vocal articulations, vowels, pitched, and non-pitched consonants.
Get Eastwest Sounds Hollywood Choirs here: Best Service, Reverb, Sweetwater.
Olympus Choir Elements ($69)
Best Choir Library under $100!
Olympus Choir Elements is a powerful virtual choir instrument for Kontakt, Komplete Kontrol, and S-Series keyboards that offers 63 different voices with all major vowels such as Ah, Ee, Eh, Ei, Ih, Mm, Oh, and Oo.
You’ll find sustains, staccato, and marcato, with pp-ff dynamic layering and intelligent round robin.
It sounds absolutely phenomenal and extremely realistic, much like the choirs you hear in some scenes of epic movies.
Additionally, it features a fully Automatable UI, allowing for full- and easy control over the performance.
Every preset has access to over 50 integrated convolution reverb impulses and a full 3-band Equalizer. Many presets also have an optional vibrato feature to simulate molto forte.
The Vowelmaster preset provides live sustain and staccato switching for any vowel for each section, with layer blending and stacking, dynamic shaping, and total performance control.
Also, it features Soundiron’s FX rack which allows you to tweak the sounds to your liking.
All in all, I think that the Olympus Choir Elements is the best Choir library you can get for under $100.
Get Olympus Choir Elements here: Pluginboutique, Best Service.
Best Piano VSTs for FL Studio
Pianos are also not features in any FL Studio edition, so here are the ones that I thought you might be interested in:
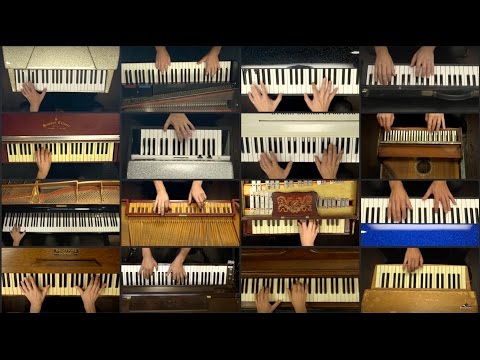
Keyscape by Spectrasonics
Most Versatile Piano Library (500 sounds from 36 Pianos)!
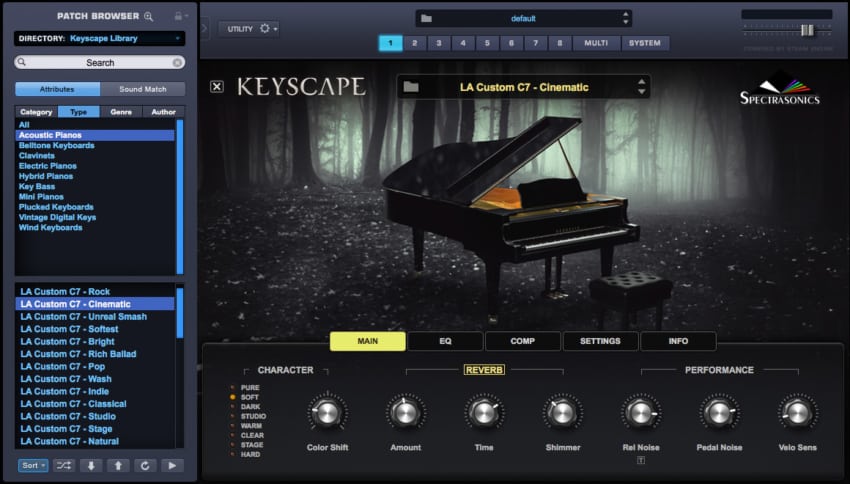
Keyscape is one of the biggest and most versatile piano libraries in existence.
It features a total of 500 sounds from 36 different pianos like upright pianos and grand pianos, as well as electric and digital pianos, clavinets, and various different keyboard types.
Take into consideration that you will need 80GB of free hard drive space as well as a powerful computer for it to work.
So, make sure to check the computer specifications that they recommend before purchasing it.
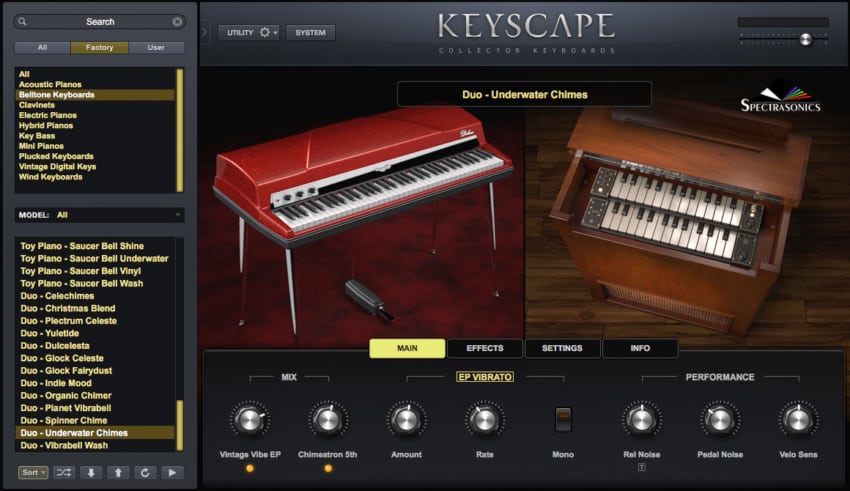
One interesting feature about Keyspace is the “Hybrid Duo Sounds”, which lets you combine two of the instruments to create something entirely new; Like combining a grand piano with a church organ, and more.
What I like about this library is that it sounds extremely realistic, and they managed to accomplish this by allowing all the imperfections of each instrument to stay in the library instead of cleaning them up, since all the quirks of each instrument make them what they are.
You can even adjust these imperfections, like mechanical noises, pedal noises, and many more.
In addition to this, you can shape the tone to your liking thanks to the built-in custom controls, which you can use to add effects, control the microphone placement, and more.
Lastly, Keyscape also integrates fully as a satellite instrument with Omnisphere 2, allowing for some extra functionality, like Live Mode, Stack Mode, Multitimbrality, and more.
Keyscape by Spectrasonics is available in AAX, AU, and VST formats and works on both Windows and Mac on 64-bit systems.
Listen to Keyscape here;
Get Keyscape here: Best Service, Sweetwater.
VSL Vienna Imperial
Goes lower than most traditional Pianos!
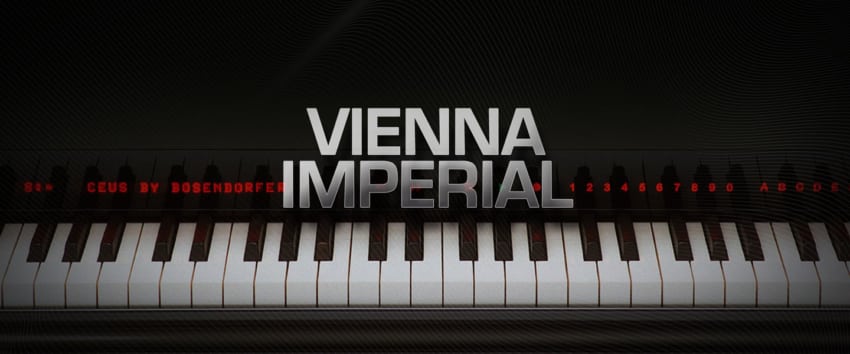
The Vienna Imperial library by VSL is recorded on the Bösendorfer Imperial 290-755, meaning that it has nine extra notes below the lowest A note on traditional pianos, and it’s the largest piano sample library ever created with 1.200 samples per key, providing you with precise sampling detail.
This library is considered to be one of the most realistic ones currently available in the world, and it features pedal-up and pedal-down notes in up to 100 velocities, comprehensive sympathetic resonances, and multiple release samples.

As far as the interface goes, it comes with a Basic View, which lets you choose between three recording positions (close, player, and audience), as well as an Advanced View, which gives you quick and easy access to more control options such as convolution reverb, EQ, pedal noises, sympathetic resonances, stereo width, MIDI sensitivity and more.
This library also lets you choose between different microphone perspectives, including player and audience perspectives, as well as built-in effects such as Reverb and also an EQ.

All of this lets you control the sound in a very specific way to fit your needs, and this is also why this sample library is probably one of the best ones you can get, even considering the price.
It is also a fantastic sample library to use for orchestral music, contemporary pop, rock, and even jazz songs since it can easily sit within any mix.
The Vienna Imperial library offers a total of 69.663 samples in a 46GB pack, and it works on both Windows and macOS on 32bit and 64bit systems.
Listen to the VSL Vienna Imperial library here;
Get VSL Vienna Imperial here: Sweetwater.
Best EQ VST Plugins for FL Studio
Fruity Loops Studio already comes with a lot of high-quality audio processing plugins, and EQs are definitely a part of those, but if you want something a little more high-end or just to try something different, then here is the EQ you should try.
FabFilter ProQ
Most Powerful Dynamic EQ out there!

This is an Equalizer plugin that will be easy to learn while still providing unparalleled sound quality, even if you slightly overdo it in the beginning, which we all tend to do.
Pro tip: You should always cut the frequencies that you don’t like before boosting the ones that you feel need boosting.
This way you avoid unnecessary frequency buildup.
Also, with this plugin, you will be able to see what you are doing to the sound since there is a visual frequency panel right behind the equalizer, and this is really useful for beginners.
Get Fabfilter ProQ Here: Pluginboutique, ADSR Sounds, Reverb, Sweetwater.
Best Compressor VST Plugins for FL Studio
Compressors are essential for adding punch and sonic glue to your mixes, and here are the ones that I think you should consider trying out!
FabFilter Pro C2
Most in-depth Compressor!

Not only is this one an excellent compression plugin for giving your drums some punch, getting a more upfront lead vocal, adding “sonic glue” to your mixes, etc., but it’s also a great mastering Plugin since it certainly works well on the master bus as well.
One of the things I like about this plugin is its real-time metering display since it will give you a visual representation of what is going on with the sound and how compression is being applied to it.
Accurate level meters show the exact peak and loudness values, and the large side-chain EQ controller makes it extremely easy to filter the trigger signal in any way you like.
Additionally, it features 8 different compression styles; Clean, Classic, Opto, Vocal, Mastering, Bus, Punch, and Pumping.
Lastly, this compressor also includes interactive MIDI Learn, undo/redo and A/B switch, and more.
Get Fabfilter Pro C2 Here: Pluginboutique, Reverb, Sweetwater.
Tokyo Dawn Labs TDR Kotelnikov GE
Most Cost-efficient Compressor!

Contrary to most compressor plugins in existence, the TDR Kotelnikov GE doesn’t try to emulate any existing hardware compressors, quite the opposite in fact.
Named in honor of Vladimir Kotelnikov, who was a pioneer of digital sampling techniques, this plugin is purely digital and uses complex algorithms to provide the best control possible over the dynamics with minimum added color, which is something you may or may not like.
You have access to two different versions of the plugin; the free one and the “Gentlemen’s Edition” which costs $44.
What sets Kotelnikov apart from most other compressors is its “Frequency-Dependent Ratio”, which allows you to set a different compression ratio depending on the frequency (not available in the free version).
A similar feature is the “Low Freq Relax” that allows you to configure a high-pass filter for the side chain, which makes the compressor react less to those lower frequencies such as kick and bass, and this one can be found both on the free and premium version of the plugin.
In other words, when using the “Low Freq Relax” feature, you are effectively lowering the threshold on the lower frequencies.
Another feature is the Ying and Yang controls, which add harmonics to the lower and higher frequencies respectively.
Lastly, when processing stereo channels, you also have the option to only process the Sum or Difference channels, otherwise known as the Middle or Side, and you can even use two instances of this plugin to compress the Mid and Side independently.
This plugin clearly does a hell of a lot of things and does them right, and for only $44, or even free, I honestly can’t complain.
Get TDR Kotelnikov GE Here: Pluginboutique.
Best Reverb VST Plugins for FL Studio
The included reverb plugins in FL Studio are actually great and I never see myself reaching for another one since they are super visual, which is something I like. But if you want to try out new ones or need a reverb VST that does something specific, here are the ones I’d recommend:
Valhalla Room
Most Cost-efficient Reverb Plugin!
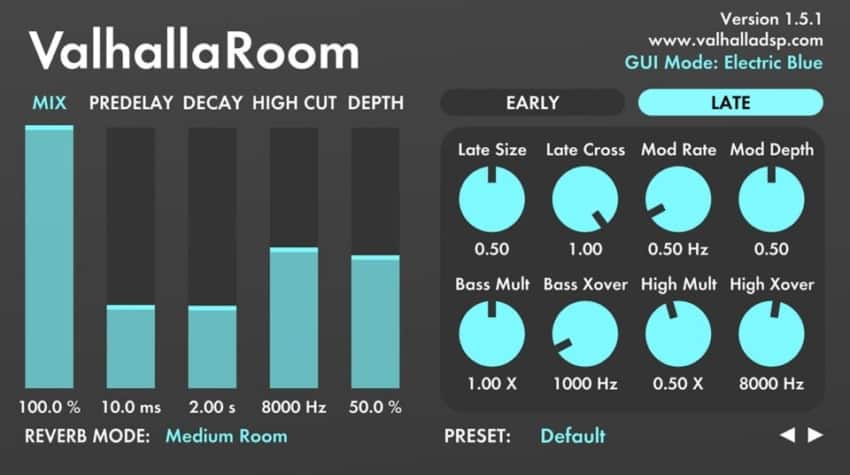
Valhalla Room is a Digital Stereo algorithmic reverb that every producer should at least consider.
It’s absolutely fantastic for film scoring, and you may not know this but Valhalla Reverb has been used in many of the best movies out there!
Additionally, it’s a tool used by composers to give their orchestras a big sound, which is what I’d recommend it for mostly; Creating a huge sound for your Orchestras, strings, pianos, and more.
What Valhalla Reverb excels at is Simplicity and overall Effectiveness, since it only features a handful of controls, such as; Predelay, High Cut, Depth, and Decay, and you can mix the Early and Late reflections, making it easy to dial in the room size.
Lastly, it also features different modes, such as; Normal Room, Large Room, Dark Chamber, etc.
In terms of cost-effectiveness, Valhalla Room cannot be beaten. It’s a beast of a plugin, so check it out!
Get Valhalla Room here: Valhalla DSP.
Spring Reverb by Softube
Simple Spring Reverb (Great bor Guitar)!
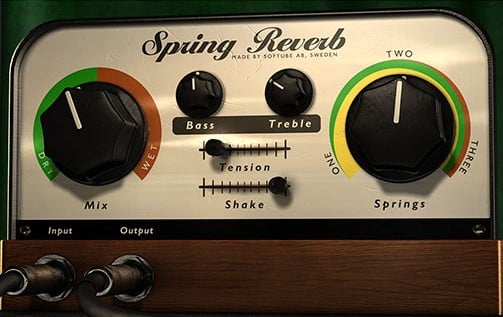
Softube is known for creating excellent plugins, some of which are even free like the One Knob Saturation plugin that I absolutely love.
Their Spring Reverb plugin is an emulation of an authentic vintage-style spring reverb that should not only give the sense of space to your productions but character as well.
One feature is the automatable “Shake” control, which will let you shake the virtual springs around and create a cool thunderous spring effect.
The other controls are; A Mix knob, a One-, two-, and three spring selector, a spring tension control, and a tube driver simulation with Bass and Treble controls.
Guitar Track with Spring Reverb Off
Guitar Track with Spring Reverb On
It is full of character, super easy to use, and it even looks great, plus, it’s super cheap!
Get Spring Reverb here: Pluginboutique.
Best Delay VST Plugins for FL Studio
Similar to the reverb section, FL Studio does offer some high-quality Delay plugins, but here are a couple of additional ones that you can try!
Echoboy by Soundtoys
Absolute best Delay plugin out there!
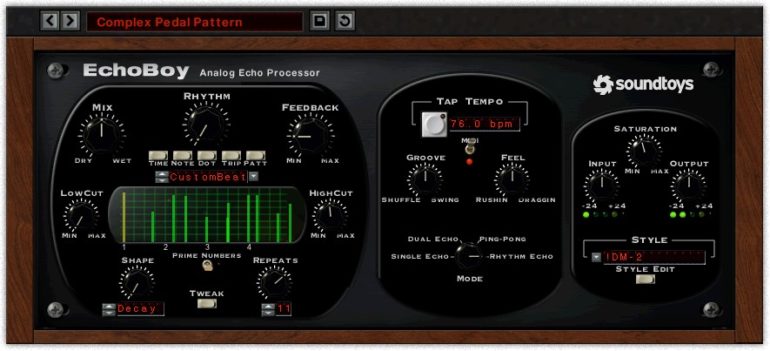
Echoboy is definitely one of the best premium Delay plugins available on the market, if not THEE best.
It combines 30 echo styles that are modeled on iconic vintage gear and adds some extra features on top of them.
You can create almost any delayed sound you want with it thanks to all the editing options available.
Despite not being a hard plugin to learn and use, Echoboy offers a ton of different great-sounding presets that you can start with and then move on from there (it’s worth noting that scrolling through the presets isn’t instant, which can be a bit annoying).
Basically, Echoboy is one of those Delay VSTs that serves as a really useful mixing tool for adding vintage effects as well as warmth, and it also offers the best emulation of classic delay effects, albeit with a little of its own character.
If you really need a good Delay with loads of customization options, you might want to take this one into consideration.
Get Echoboy here: Pluginboutique, Reverb, Sweetwater.
Tube Delay by Softube
Warm Analog-sounding delay!
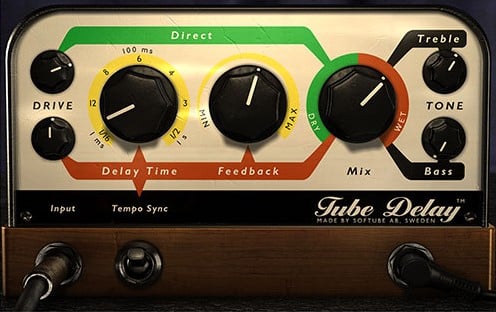
I absolutely love Softube since they are the creators of the Saturation Knob which I always enjoyed quite a lot and you can find that one in my list of the best free saturation plugins.
Even though I think Tube Delay is absolutely fantastic because of its unique saturated tone, I don’t think it’s for everyone.
Since it has such a unique character to it, it probably won’t work for every single mix.
This is why I would recommend it only if you know that you want a warm analog sound and a slightly saturated-sounding delay.
Get Tube Delay here: Pluginboutique.
Best Saturation VST Plugins for FL Studio
Saturation is used in music production to give the audio signal a warm analog sound, and they are very often used in the mastering phase.
Here is the high-quality saturation plugin that I’d recommend:
J37 Tape by Waves Audio
Best budget saturation plugin that also works for mastering!
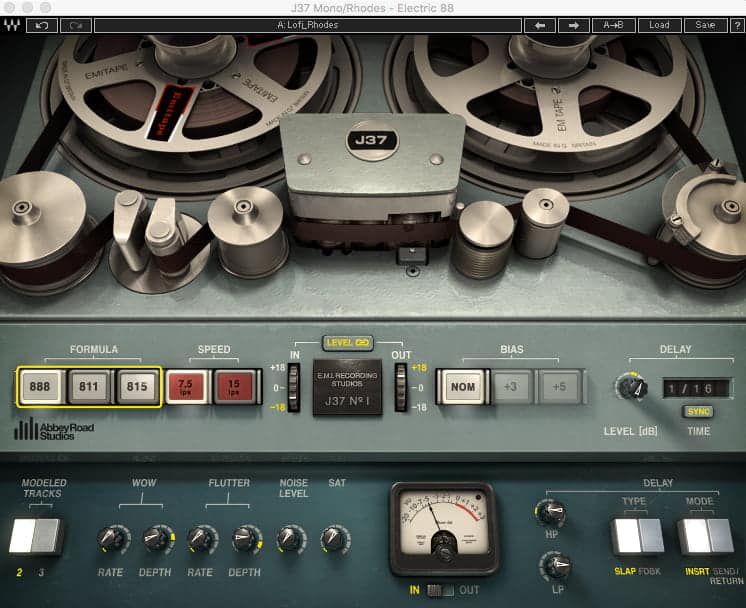
Studer’s first-ever multi-track tape machine was the J37, it created the lovely saturation sounds on classic albums such as Sgt. Pepper’s Lonely Hearts Club Band. Waves and Abbey Road Studios have teamed up to create an accurate emulation at an affordable price.
J37 Tape’s GUI keeps the vintage reel-to-reel look. You can adjust the wow, flutter, bias, and speed of the tape machine. J37 also offers 3 different eras of EMI tape: 888 (the early 60s), 811 (mid 60s), and 815 (early 70s).
J37 Tape is available as a 64-bit VST3 for Windows and Mac.
Get J37 Tape here: Waves Website, Reverb, Sweetwater.
List of the Best Free VST Plugins for FL Studio
In this section, I will include Free Plugins for FL Studio users and music producers, both VST Instruments as well as effects.
Here you will be able to find Free Synthesizers, Drums, Pianos, Orchestral libraries, Pitch-Correction plugins, EQs, Compressors, Saturation plugins, and much more.
So let’s get started!
Odin 2 by TheWaveWarden

Odin 2 is a 24-voice polyphonic hybrid synthesizer that offers endless modulation capabilities and features three different oscillators (8 different oscillator types and three different engines) as well as filters, five effects such as delay, chorus, flanger, phaser and reverb, four envelopes and LFOs, as well as an arpeggiator and a modulation matrix, and even an X/Y controller.
In addition to this, it also comes with a lot of presets already included.
What makes Odin 2 stand out is that you can one of the oscillators as a source within another oscillator, and you can draw your own waveform and import that into another oscillator, which allows you to create some powerful and interesting sounds quite quickly.
Check out all of Odin 2’s ins and outs as well as how it sounds here:
Out of all the free synthesizers on this list, I have to say that Odin 2 is by far the most powerful one, although not the simplest one to use.
Download: Odin 2.
Dexed by Digital Sub Urban

Dexed is a Free multi-platform and multi-format frequency modulation Synth that is based on, or closely modeled to, the Yamaha DX7.
It isn’t the simplest synth to use and there is definitely a learning curve to it, but I honestly think that it’s well worth it to do the effort and learn it properly, especially considering that it’s a free plugin.
It is also a MIDI cartridge manager for the DX7 meaning that any of the .syx files in the cartridges will be available from the “Cart” window.
You can access this directory by pressing the “Cart” button and then the “Show Dir” button.
Download: Dexed by Digital Sub Urban.
Drumatic 3 by e-phonic (Windows Only)
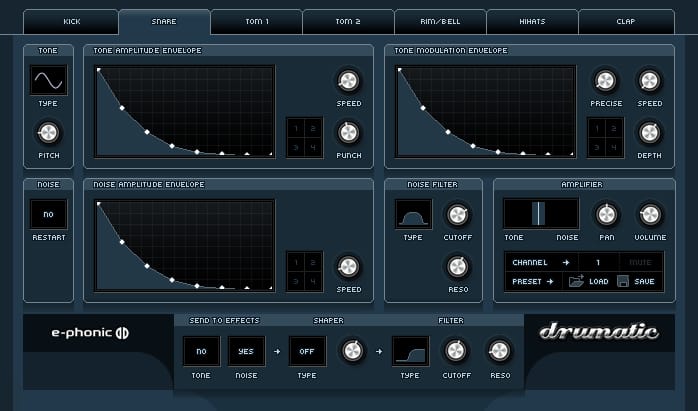
Drumatic 3 is a virtual analog drum synthesizer. All sounds are 100% synthetic and allow for huge flexibility and variation.
It sounds pretty good, just remember that the sounds are nowhere close to a real acoustic drum kit, but that’s the whole point of it.
Some additional features come in the form of graphical envelopes for amplitude and modulation and a simple effects section that includes distortion, a bit crusher, and a filter.
The available sounds are Bass drum, Snare drum, Handclap, 2 Toms, Hi-hats, and a Rimshot / Bell.
Download: Drumatic 3.
Urban Beats by Native Instruments

If you’re familiar with KONTAKT (link to a list of a Kontakt sample library) then you might have heard about their drum machine called “Urban Beats”, which is mostly aimed at hip-hop and R&B producers, but it does still work pretty well for electronic music, house, techno, etc.
In order to get Urban Beats, you’ll have to download Komplete Start, with is Native Instruments’ free software bundle that comes with a lot of additional instruments, effects, loops, and samples.
Urban beats offers five instruments and a selection of drum loop production kits, consisting of drum loops, single loop tracks, and individual slices.
You can create whole new grooves or select pre-programmed ones, or by step-sequencing patterns in the Groovebox mode.
Lastly, you can control the Gain, Saturation, Reverb, and Delay, and take advantage of a resonant filter as well as convolution.
This is a great one to get if you want more free VSTs in addition to Urban Beats.
Download: Urban Beats.
Monastery Grand by MeldaProduction
Sampled from a piano in a monastery in Pilsen, this virtual instrument has been designed with pop & rock productions in mind, and this is probably the best free piano plugin I have ever tried.
It comes with about 3GB of samples all recorded with 3 microphones (and you can select which mic sound you want or mix the ones available).
One important note, however, is that this plugin requires you to download the MSoundFactoryPlayer, also by MeldaProduction, in order to be able to use it. Luckily, there’s also a free version of that available, so no big issues there.
The plugin offers three distinct panels, Piano, Effects, and Globals, and these allow you to control the overall sound & tone, as well as add effects (reverb, delay, compressor, and an enhancer) to the piano.
You can also EQ or add harmonies, and what’s even more impressive, and even weird, is that you can enter the “Creative Mode” which essentially changes the piano sounds into completely different- more experimental ones.
This is by far the best free piano VST on this list since it’s got a very realistic sound and a lot of options to tailor that sound to your liking, making it an extremely powerful plugin that I’d highly recommend trying out.
Lastly, make sure to check out some of the other freebies that MeldaProduction offers since they have a ton of free VST plugins on their site that you can get.
Download: Monastery Grand.
Spitfire Audio Soft Piano
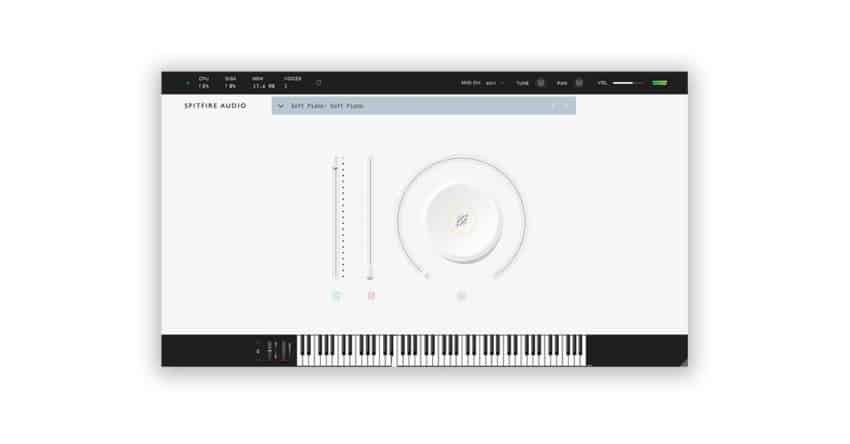
Spitfire Audio has launched LABS which is a free instrument-sample library in VST, AU, and AAX formats available for all Operating Systems.
All of the plugins sound terrific and it comes as no surprise that their Soft Piano Plugin also does sound that way.
All of the samples were recorded at Air Edel Studios using an array of high-quality microphones and they achieved the “soft” sound by placing a thin strip of felt between the hammers and the strings, which is what also makes it sound extremely warm.
What stands out about this plugin, which could also be considered a bad thing, is its limited number of controls; It has two sliders for expression and attack, as well as an additional knob for reverb.
If you’re looking for a bright-sounding piano or one that allows you to fine-tune its sound, then I think you should go with the previous one on this list. But if a soft and warm sound is what you’re going for, the Soft Piano may be the best one on this list at that.
Download: Spitfire Soft Piano.
The Free Orchestra by Project Sam

Project Sam is behind Symphobia, which is one of the best-rated libraries for film scoring, video games and TV, and they created the Free Orchestra library which contains bits and pieces of all of their paid products.
What struck me the most about this free library is how great it sounds as soon as you load it up; there is little to no tweaking required.
Now, it runs on KONTAKT (6.2. or higher), but luckily it works in the free version which can be beneficial to you if you’re interested in using KONTAKT but don’t want to purchase the premium version just yet.
Parameters such as envelope controls, effects, octaver, and reverse make this library very versatile to use.
All in all, if you’re a beginner dipping your toes into the whole orchestral world and are looking for one with a simple interface, this entry-level library could just be what you need.
Download: Free Orchestra.
BBC Symphony Orchestra Discover by Spitfire Audio

Here’s another great addition by Spitfire. The BBC Symphonic Orchestra Discover actually sells for $49, but you can fill out a form and they will send it to you after 14 days for completely free.
This library is clearly aimed at beginners since it is very simple to use and straightforward, plus it already comes premixed into one mix signal which gives you less control over it but makes things easier if you’re just starting out.
It features a total of 33 instruments and 47 techniques, and thanks to Spitfire’s new mode switching technology, you can share and collaborate with fellow composers, regardless of which edition they own.
Download: BBC Symphonic Orchestra.
Graillon2 (Pitch-Correction)
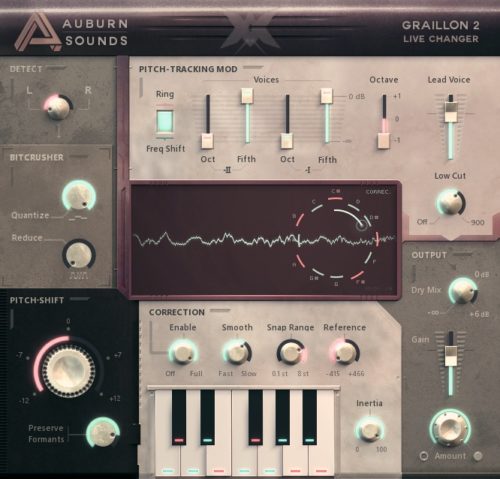
The first thing you will notice when looking at Graillon2 is the way its interface is designed;
It has this vintage vibe to it which is just fantastic to look at, plus it is designed in such a way that makes it easy for you to navigate through the settings.
It is a very visual plugin since it has a display where you can see the notes that are being played as well as where Grallion2 is snapping/correcting them to.
This plugin is specifically designed for vocals and the pitch-shifting can be smoothly adjusted from minus 12 to plus 12 semitones.
One cool feature is the “preserve formants” knob which, in theory, helps you preserve the tone and characteristics of the vocal track while shifting the pitch.
In some cases, this ends up creating some issues, so make sure to play around with these settings to see what happens.
The speed knob is also pretty useful since it helps the notes “stick” a little longer, reducing the pitch correction jumps.
Grallion2 also allows you to choose how fast or slow the snapping occurs, which is done by adjusting the “smooth” knob.
By adjusting the controls on the “bit crusher” section, you should be able to achieve some interesting growl- and bit crushing sounds.
The typical controls such as dry/wet, low-cut, and output level adjustment are also included.
Lastly, the Pitch Correction module offers MIDI control.
If you like the vintage look on this plugin and you need a good all-rounder, then Graillon2 may be the one for you.
There is one important note though: It’s not completely free but rather “freemium”.
Basically, you won’t get its full functionality unless you buy it.
With the free edition, you only get the “pitch shifting” and “pitch correction” features.
If you want the full version then it will set you back about $25, or you may also consider Melodyne 5 Essential.
Download: Graillon 2.
MAutoPitch (Pitch-Correction)

Melda Productions is a renowned audio plugin company that created other free plugins such as the MRing Modulator, the MFlanger, MTremolo, and more.
You can find all these plugins in another post I wrote about the best Free Modulation Plugins, should you be interested.
Even Deadmau5, who is a very famous electronic musician, uses these plugins, which is a clear testament to their quality.
MAutoPitch comes with the typical pitch correction features such as depth, detune and speed.
However, it also includes some additional controls such as a dry/wet knob, a width knob that will allow you to control the stereo spread, and the keep- and shift-formants knobs.
It also provides you with a visual display of what notes are being detected by the plugin.
Even though it does have some amazing features and is definitely worth using, there are some cons to it:
First of all, the free version comes with a banner on the bottom that is a bit annoying to look at.
Also, the pitch correction isn’t the best overall since there’s some unintentional snapping to unwanted notes occurring at times, even after you set the notes and the scales perfectly and all the settings are in place.
Lastly, MAutoPitch also includes a limiter, which should help you keep your sound from clipping.
All in all, it’s a great free plugin that could make a great addition to your arsenal!
Download: MAutoPitch.
MEqualizer by Melda Production (EQ)

The MEqualizer is a great 6-band EQ that’s very easy to use and features 7 filter types for each band, integrated tube saturation, and harmonics control.
This plugin also includes a spectrum analyzer for advanced visualization.
Sadly, you can’t just download it on its own since it’s part of the MFreeFXBundle, but the good news is that you will have access to over 20 free high-quality plugins which are included in this bundle like;
The MCompressor, MFlanger, MAutoPitch, MAutoPan, and many more.
All the free plugins that Melda Productions have to offer tend to have more features than most other freeware plugins, as well as an innovative interface, and in general, they will be enough for most situations when shaping the input signal.
The only con about their free plugins is that they come with a display ad on the bottom, but you truly are getting a fantastic set of plugins for free.
If you like Melda Production and want to try another EQ that they have to offer (more built-in features and better overall), then check out the MEqualizerLP.
Download: MEqualizer.
Saturation Knob by Softube (Saturation)

The saturation knob is literally a one-knob plugin that allows you to add some warmth and shimmer to the vocals, guitar, and any other track you’d like.
Just don’t go overboard with the saturation, if it starts sounding distorted, dial it back down a bit unless that’s what you’re going for.
One huge issue I have with this plugin is not the plugin itself, but all the hoops they make you jump through to be able to use it, like registering with iLOK.com, etc.
While no other plugin beats the Simplicity of the Saturation Knob, it’s also a tad limited. If you find yourself needing something a little more powerful, then I’d recommend Saturate by Eventide. It’s definitely a step up, both in quality as well as in the number of built-in features and advanced controls, etc.
Download: Saturation Knob.
MJUC Jr. by Klanghelm (Compressor)
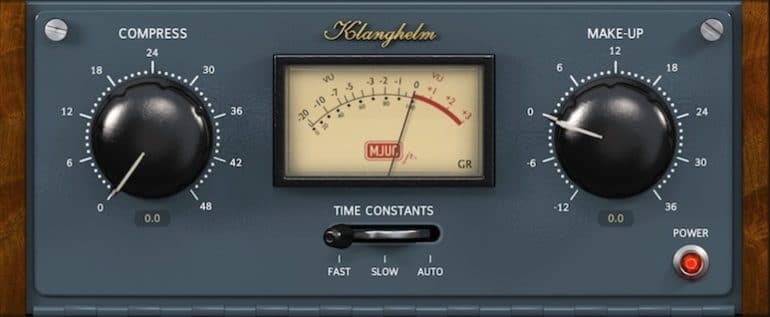
With just two basic controls, “Compression” and “Makeup”, the MJUC JR. makes controlling the dynamics of the song extremely easy.
Also, there’s the three-position timing switch which not only controls the attack and release of the unit, but also the slew rate of the transformers and the timing of the other parts of the circuitry that are directly influencing the generated harmonics (saturation).
As far as simplicity goes, the MJUC Jr. just can’t be beaten, and it’s one of my favorite free compression plugins of all time.
Download: MJUC Jr.
MConvolutionEZ by MeldaProduction (Reverb)

As the name implies, this is a convolution reverb designed to be simple to use. It’s worth noting that there’s also a premium version of this plugin available, the MConvolutionMB, which comes with a lot more built-in features.
While the interface itself may not be the most eye-catching you’re ever seen, the reality is that it sounds amazing (probably way better than many paid plugins as well).
If offers an immense range of impulse responses for rooms, halls, guitar cabinets, plates, churches, and a lot more, which gives you a lot of versatility at the time of adding the effect.
Sadly, it doesn’t offer as much control over the signal as some other convolution reverbs do, and you only get a Dry/wet knob as well as one for Widening, and HP & LP filters.
Download: MConvolutionEZ.
Valhalla SuperMassive by Valhalla DSP (Reverb and Delay)

Although Valhalla Supermassive is actually meant to be used as a Reverb VST, it’s also got an amazing delay section built-in that completely blows other dedicated free delay plugins out of the water.
It features a total of 14 reverb/delay modes and a bunch of presets (from faster attacks, shorter decays, and high echo density all the way to lush reverbs that build into repeating patterns).
Even though it’s also meant to be used as a Reverb, SuperMassive is also an excellent free delay that you should absolutely try.
Download: Valhalla Supermassive.
How to Install VST Plugins in FL Studio
Here are the steps you need to follow in order to install and access the new plugins:
- Install the plugin (it’s recommended to install them in the default folder for your OS, such as \Image-Line\FL Studio\Plugins\VST). If the plugin doesn’t have an installer, copy the .dll file to said folder.
- Open FL Studio and Scan for new plugins via the Plugin Manager (It’s recommended to click on “Verify Plugins” as well since this sorts them correctly).
- Now you can fin the new plugins in your Browser under Plugin database > Installed > Effects > New and Generators > New.
And that’s really it! You’re now ready to produce music using your new plugins!