Last updated on December 31st, 2023 at 06:05 pm
Audio Interfaces are essential for any type of music studio; Pro or just a regular bedroom one.
Now, when you are new and you’re just starting to get interested in audio engineering equipment, it’s completely normal to get lost and not have a clue of what every piece of gear does.
Since Audio Interfaces are one of the places where people get hung up the most, I decided to create a beginner’s guide where I explain how they work, what features they usually provide, how to connect them to your PC, the best ones for beginners, and some other frequently asked questions.
Let’s get started!
What is an Audio Interface?
An Audio Interface works as a translator between your analog equipment (Microphones, guitars, etc.) and your PC, converting the analog signal into a digital one that your computer can understand, to be able to record it to a DAW, or any other recording software.
Important things to consider;
Sound Quality
If there’s one thing that’s important when recording music, it’s the quality of the sound.
Audio Interfaces help with this in many ways, but probably the most important factor are the preamps, or preamplifiers, because they take the incoming signal, which is usually pretty low, and increase the level to a point where it’s usable.
Now, if the preamps aren’t good, they still will be able to increase the signal’s level, sure, but the audio quality won’t be anywhere near of what the actual source sounds like.
Another hugely important factor is the analog to digital and digital to analog conversion of the audio interfaces.
In short, an Audio Interface takes the incoming analog signal and converts it into a digital one so that your computer can “understand” it.
You can see why analog to digital conversion plays a major role in sound quality, right? If the conversion isn’t accurate, the sound will suffer quite a bit.
Having said that, most budget Audio Interfaces have more than decent A/D conversion, but when it comes to the preamps, the cheapest Interfaces usually come with ones that aren’t even decent.
This is why I will list a couple posts about some affordable Audio Interfaces that don’t have this issue later on.
Lastly, Digital to analog conversion is the same process but the other way around; The digital signal gets converted into an analog one and fed to the speakers/headphones.
Moving on…
Number of Ins and Outs

The number of inputs and outputs an Interface is capable of providing is hugely important since it should be one of the deciding factors on whether or not you purchase one or the other.
The number of inputs is simply the amount of analog input jacks (XLR, ¼” TRS, etc.) the interface has.
The higher the number, the more instruments/microphones you can connect directly to it.
In most cases, beginners only need two inputs; One for a vocal microphone and another one for an instrument.
As far as the outputs go, they usually have jacks for you to connect speakers/monitors, and also headphones.
Be careful when choosing audio interfaces, because some are labeled as having 12 inputs, when in fact they only provide 8 or 10 analog ones.
This is because MIDI and S/PDIF (Digital Ins/outs) are also counted, but this doesn’t mean that you can connect 12 actual microphones to it. So, take that into account.
Having said that, if you need loads of inputs then it might be wiser to just get a mixer with a built-in audio interface.
If you don’t know the difference between a mixer and an audio interface, make sure to read this whole post I wrote on that topic.
MIDI I/O
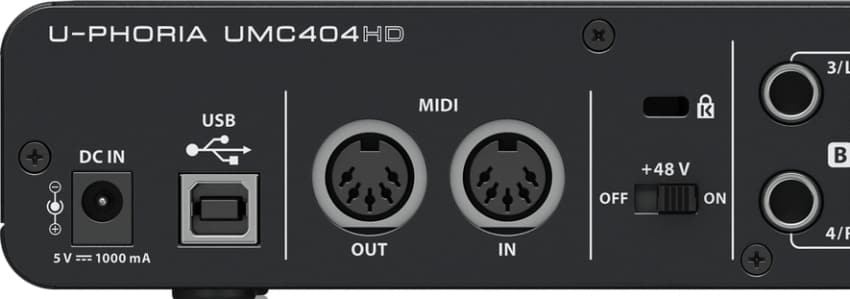
MIDI stands for Musical Instrument Digital Interface, and it’s one of the most important tools any musician and producer can ever use.
It’s basically a communication standard that lets digital music gear communicate with each other.
Some people tend to think that MIDI transmits an Audio signal, when in fact it only transmits information in a digital form.
MIDI is used to play virtual instruments like drums directly inside your DAW; You can feed the information to your DAW using a MIDI keyboard or by simply editing the MIDI file yourself note by note inside the recording software.
When it comes to budget Audio Interfaces, you don’t usually see many that include MIDI I/O, but there are a few that have MIDI, which I will also link later on.
If you want to be able to produce music easily and without too many complications, MIDI can really come in handy here, so I think that getting an Interface that includes it can be highly beneficial.
Phantom Power
I suppose that most of you reading this won’t know what phantom power is, however it’s absolutely crucial to have an Audio Interface that can supply it.
In short: Phantom Power is simply a way of transmitting DC voltage from the interface to the microphones, usually condenser microphones, to allow them to work correctly.
Condenser microphones have active electronics inside of them that need outside current to work, and the audio interface can supply it from their preamps all the way through the XLR cables to the mic.
Every modern Audio Interface today comes with a Phantom Power supply, but just in case make sure to pay attention to this to avoid unpleasant surprises.
If you want to know more about phantom power, I wrote an entire post on that subject which explains everything there is to know about it.
But make absolutely certain that the interface you get can supply 48v of phantom power.
Sample Rate and Bit-Depth
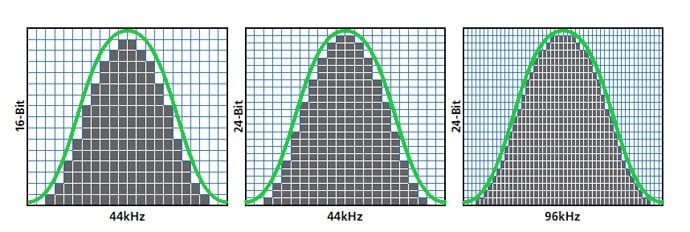
Remember earlier that I told you that the analog-to-digital conversion was an extremely important factor in audio quality? Well, there are two really important specifications when talking about analog-to-digital conversion which are; Sample Rate and Bit-Depth.
Sample rate is simply the number of samples of audio carried per seconds, measured in Hz or kHz.
In other words, it’s the number of times your audio interface takes a snapshot of the analog signal you’re recording each second.
For example, 44100 samples per second can be expressed both as 44100 Hz or 44.1kHz, and the sample rates used today range from 44.1kHz all the way to 192kHz.
Basically, what this means is that the higher the sample rate, the more samples per second there are and the higher the audio quality will be… in theory.
I say “in theory” because there’s no real reason to go over 44.1kHz or 48kHz because there’s just no audible difference…
However, since there are more samples taken per second, this means that the size of the audio file will be much larger and it will take up a lot more storage.
So, what I’m trying to say here is that if you see an Audio Interface marketed as being able to record at 192kHz, this doesn’t really benefit you at all, in fact it only makes the files take up more storage without any audible difference in sound quality.
Bit depth, on the other hand, tells us at what resolution the audio is being recorded at, or in other words, how accurate the sound captured actually is.
Higher bit recordings will capture a lot more information about the sound that is being recorded, yielding an overall better representation of the source.
The two usual bit-depths that are used are; 16-bit and 24-bit, and I would highly recommend using 24-bit for a better sounding recording.
Too Complicated?
One easy analogy to understand all of this this is to think about both the sample rate and bit-depth as the frame rate and resolution of video cameras.
The sample rate would be similar to the frames-per-second on a camera, meaning that the higher the frame rate, the smoother the image.
Bit-depth would be rather similar to the resolution in the sense that recording at 720p would have less detail while recording at 4k would have more detail.
Moving on…
Direct Monitoring
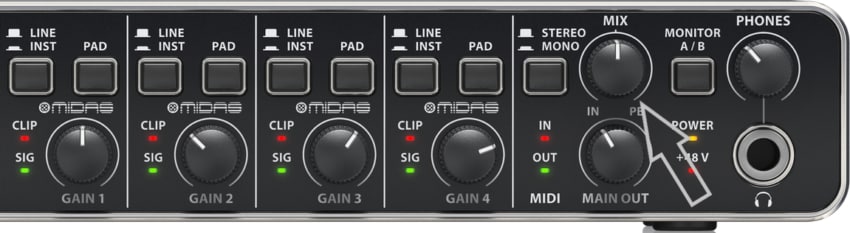
You should always check if the Interface you’re about to purchase comes with a direct- or zero-latency monitoring feature.
Since the whole process of converting the analog signal to a digital one, then sending it through your DAW, adding effects, etc. and then re-converting it to analog to hear it through the speakers/headphones actually takes some time, you will have to deal with some latency issues.
In some cases, the latency isn’t even noticeable, but there are other times where you won’t be able to record or play because the latency will be too distracting.
Here is where the direct-monitoring feature comes in; When turned on, you’ll be able to directly hear the signal coming into the interface, and not the one coming back out of the PC.
This way you can bypass the latency generated by the processes inside the PC and you won’t have to deal with any latency at all.
Example: Imagine you’re recording a guitar and you’re running an amp simulation software, if you turn the direct-monitoring feature on you’ll only be able to hear the dry guitar signal, without any effects or anything.
If you turn it off, you’ll be able to hear how the signal is being processed, in other word you will hear the amp simulation do its thing, but this may add latency.
The name of this feature varies from manufacturer to manufacturer, but most of the time it’s called zero-latency monitoring, direct-monitoring, or mix control.
How to Connect the Audio Interface to your Computer?
The connectivity of audio interfaces varies quite a bit.
However, it’s important for you to know which type of connectors they use, and depending on which ones your PC supports, you can then choose an interface based on that.
FireWire
Firewire is completely outdated and obsolete, but there are some older audio interfaces on the market that are still being sold even though they have this technology.
I would not recommend investing in FireWire since most PCs don’t support it anymore, plus like I said, it’s outdated.
USB
The vast majority of audio interfaces feature USB 2.0 connectivity, which is more than enough for any small audio interface that doesn’t need to transfer loads of simultaneous data.
Plus, every PC out there supports it.
There are also interfaces that support USB 3.0 and USB-C, but no beginner will ever need so much bandwidth.
Thunderbolt
You will be able to find thunderbolt connectivity in some higher-end audio interfaces, and it’s the fastest connectivity available for interfaces.
Now, like I already mentioned, you should stick to USB 2.0. There’s just no need to get anything more powerful.
Best Audio Interfaces for Beginners
Now, I mentioned that the most important factor on whether or not you should choose a certain audio interface or not, is the audio quality.
This is why I wouldn’t recommend that you go for the cheapest of the cheapest audio interfaces, like the Behringer UM2, because as far as audio quality is concerned, it’s not the best…
Here are some articles I wrote where I compare loads of Interfaces. All of them are affordable, sound great, and even come with free software downloads.
- Scarlett 2i2 vs UMC 204HD
- Scarlett 6i6 vs UMC 404HD
- Scarlett 2i2 vs Audient iD14
- Best Audio Interfaces under $300
Here’s a quick roundup of the ones I like the most with their number of inputs and outputs, if they have MIDI or not, etc.… just in case you don’t want to read through all those posts I just linked.
| Name | Description | Price |
| Behringer UMC 204HD | 2×4 interface, MIDI I/O, and excellent for the price. | Amazon |
| Focusrite Scarlett 2i2 | 2×2 interface, no MIDI, great sound quality. | Amazon |
| Behringer UMC404HD | 4×4 interface, MIDI I/O, most cost efficient interface of all. | Amazon |
| Audient iD14 | 2×2 interface, no MIDI, best audio quality, can be expanded to 10 inputs. | Amazon |
| Audient iD4 | 2×2 interface (1 mic, 1 instr), no MIDI, excellent sound quality. | Amazon |
How to get the most out of your new Interface
Learning music production is already pretty complicated, especially when you’re new and don’t know where to start.
I wrote a huge post about some courses that are worth enrolling in in order to accelerate the learning process without having to spend a fortune on music schools.
Some of the courses on Skillshare can even be done completely for free during the free trial period that they give you, so make sure to check those out!
Conclusion
An audio interface is essential for any studio, and in order to get the best audio quality possible you should also consider investing a bit more than the bare minimum.
Any of the interfaces listed earlier are excellent…
However, the one that I absolutely recommend, which is also the one I currently own, is the Audient iD14 since it’s got the best sound quality of all, the instrument input sounds absolutely fantastic, and it can be expanded to up to 10 inputs.
I hope this information was useful.
Have a wonderful day!