Last updated on December 31st, 2023 at 06:06 pm
Portable recorders are fantastic, they are extremely versatile, and you can use them wherever you want without the need of a power supply or a PC.
The Zoom H2n and the Tascam Dr-40 are two very affordable and well-known recorders, sharing similar features and similar price tags.
But which one should you choose? I own the Zoom H2n and I’ve also used a Tascam Dr-40 for a couple of months, since a friend was kind enough to lend it to me.
So, after giving both of them extensive use I think I can give you my opinion on which one I think is the best recorder overall.
Basic information about the Zoom H2n
The Zoom H2n has de capability of recording from the front, the back and full surround sound.
You can switch between these configurations through rotating the knob on the top.
It has four positions:
The XY position; Which only records from the front, using two microphones that are in an XY configuration.
Most of the times you will be using this configuration.
The MS position: The microphone elements are stacked on top of each other, one facing to the back of the H2N and the other two to the sides.
This creates a wider stereo image which you can control by making the side mics more or less sensitive.
Then you have the surround sound options, which are two:
The 2-channel surround: Which combines all five microphones of the Zoom H2n to create a stereo image and records it into ONE Stereo track.
The 4-channel surround: This configuration also combines all five microphones but creates two separate stereo tracks, one with the two front mics (the XY ones) and another track with the back ones (MS).
A really nice feature is that it can be connected to your PC via a USB cable, which not only allows for quick data transfer, but also lets you use the Zoom H2n as an Audio Interface with the ability to record directly onto a DAW.
The recording formats availableare: From 44.1kHz/16bit all the way up to 96kHz/24 bit. Except in 4-channel surround mode, this one doesn’t support 96kHz/16-24bits.
MP3 is also available, should you want your recordings to take up less storage space.
Built in compression and limiter, as well as low cut!
You can control these options directly from the H2n’s menu, allowing for 3 separate kinds of compressor presets and 3 of the limiter presets.
The low cut is an 80Hz high-pass filter.
This all comes in handy while recording a rehearsal or a live band, especially the limiters since it’s hard to set the gain properly while in the middle of practice.
Just throw on the limiter and you won’t get any clipping. Only use limiters and compression in really loud situations.
It might kill your sound a bit though, that’s why when recording on my own, I don’t use any of the built-in effects.
Should I need compression, I do that afterwards in the DAW.
Recording functions
Auto Record will allow you to automatically start recording after the sound level surpasses a certain threshold.
Pre Rec: Turning this option on will always record, deleting everything that is being recorded but keeping the last two seconds of it.
Once you press the record button it will add those 2 seconds to your recording.
Spatial Audio: By connecting it to a 360-degree camera, you can use your H2n as a 360-degree VR microphone for live streaming on Facebook and making 360-degree video for YouTube.
How does it perform
The Zoom H2n isn’t the best recorder you will ever find, it’s not as good as the Zoom H6 for instance, but when taking its very affordable price into account I honestly don’t think we can’t complain too much.
The sound quality is great, it’s super easy to use, the battery lasts forever, and with all the different recording patterns, you can really record whatever you want.
If you plan on recording under windy conditions, make sure to use a deadcat windscreen like this one which you can get on Amazon, otherwise all you will be able to hear are plosives.
They are extremely cheap, so make sure to get one since it’s absolutely essential.
Solo recording
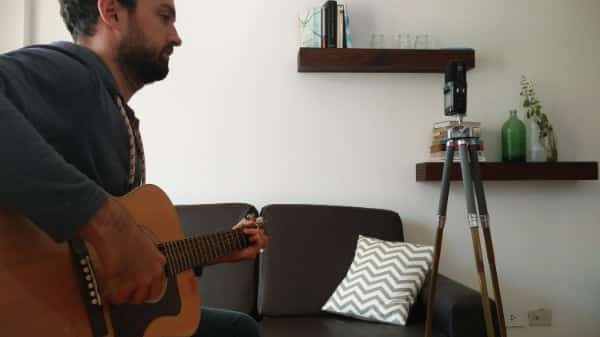
The Zoom h2n is fantastic for recording vocals and acoustic guitar, it’s mainly what I use it for.
You can use both the X/Y and Mid-Side pattern configuration, it depends on what sound you are going for and, the quality you get is surprisingly good.
Ensemble
Let’s say you have three musicians, one is positioned in front of the recorder while the other two are positioned at the sides.
With Mid-Side you will be able to record them all perfectly, plus you can emphasize or de-emphasize certain parts of the song, by increasing or lowering the volume on the side mics.
By this I mean that if the musician standing in the middle has to play a solo, by lowering the side mics a bit, you automatically make him sound more present and stand out.
X/Y can also work, but Mid-Side is the best one for this method in my opinion.
Podcast/meeting
In this particular case, if you have many guests, or if it’s just two but you are sitting on opposite sides of the table, go with any of the surround options.
You could add some compression mainly to keep the level the same, since it will not only compress the volume spikes but also raise the very low sounds.
But doing this in post is more desirable.
Live band or rehearsal
One important tip for recording bands, especially when they are extremely loud is to; go to the comp/limiter options and choose the Drum compressor.
After that, turn the gain all the way down to zero… yes, ZERO.
This is a great trick for loud situations, which won’t get your tracks distorted and they will always sound good.
Mid-Side decoding plugin
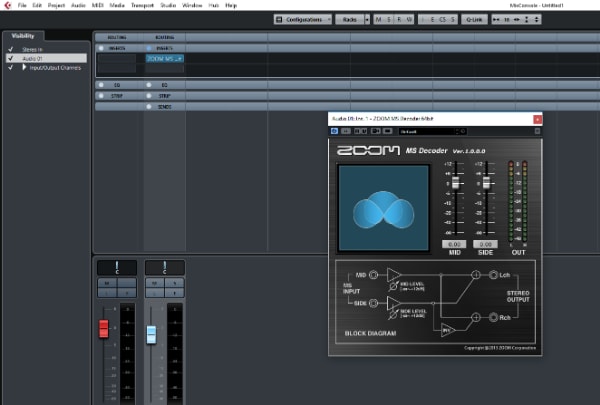
This is a cool plugin you can download from the official Zoom H2n site, it allows you to adjust the stereo width of the Mid-Side recording you just did.
It’s fairly simple to use, only two faders, one for the Mid microphone’s volume and one for the side ones.
There is a visual representation to the side, showing you how much of a stereo image you are getting.
If you want to be able to use this plugin, then you will need to record in “RAW” mode.
This will allow you to control the stereo width.
What comes in the Box?
- The Zoom H2n Recorder
- 2gb SD card
- 2 AA Batteries
- Cubase LE and WaveLab LE download codes
There’s a bundle you can buy which comes with a windscreen, storage case, tripod, etc. But don’t buy it, all the components are really cheap.
If you need a Windscreen, get this one on Amazon and also get a better tripod.
The one that comes with the bundle is short and unstable.
Features
- Five built-in condenser microphones with XY, M/S and 2- / 4-channel surround pattern
- Various Compression and limiter options
- Auto- and Pre-recording function
- Variable speed playback (50%-150%)
- Low-Cut
- Normalize and Divide Functions
- USB 2.0 (to transfer files and also works as Audio Interface)
Find out more about the Zoom H2n here:
- Zoom H2n: Amazon, Sweetwater.
Tascam DR-40
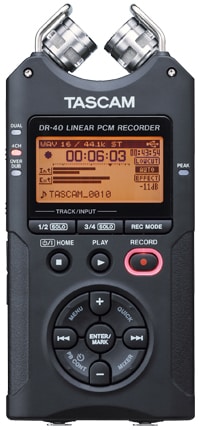
The first difference between these two is not only the total number of microphone capsules included, but also the patterns that are available.
Like I explained earlier, the Zoom H2n has 5 condenser Microphones and can be configured to record in X/Y, Mid-Side and Surround…
Well, that is not the case with the Tascam DR40.
It only has two condenser cardioid microphones which can be moved around independently from each other, being able to record in A/B (which gives a nice stereo image) and X/Y positions.
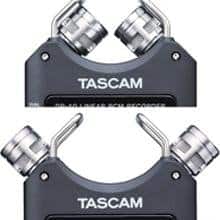
It also provides two XLR inputs on the bottom, which can provide phantom power, should you want to connect two extra microphones.
It offers four different recording modes:
- The standard mono/stereo using either the on-board or XLR mics.
- And the Dual, Four-channel and Overdub modes.
Each channel has its own parameters/effects:
- Dual has the “Peak Reduction, auto level or Limiter” Option
- Four-channel has a Delay
- Overdub has “Separate” and “Mix” options
The biggest con when compared to the Zoom H2n is that it can’t be used as an audio interface. This is an absolute tragedy.
Update: The latest version of the Tascam DR40 is the DR40x, which does come with the audio interface function, so get that tone.
Recording on to an SD card and then importing it to your DAW is pointless if you have the other option available.
This function would be an amazing addition to the DR-40, sadly, it’s not available.
One of the pros about the Tascam DR-40 is the Dual recording mode, which the Zoom H2n doesn’t have.
It records at the volume that you dial in, but simultaneously at lower gain, 12dB to be precise.
This is great because should the first recording be too loud and clip, then you have a backup one that doesn’t sound distorted!
The recoding formats available are: BWF and WAV at 44.1k/48k/96kHz, 16/24-bit and MP3 from 32kbps all the way up to 320kbps.
In addition to the effects I described above, which apply to each channel, it also comes with 3 low-cut filter presets, 40Hz, 80Hz and 10Hz.
Also, a couple of reverb setting are available.
The XLR Inputs
Having two extra XLR inputs really comes in handy.
If you already have two microphones and cables, then this recorder can be a good addition to your arsenal.
If you don’t however, purchasing this recorder and then those extra mics and cables will be pricey.
How does it perform
Just like the Zoom H2n, the Tascam DR-40 isn’t the best recorder out there, but it does what it’s supposed to.
The recording quality is good, the battery also lasts a long time (in my case it lasted a lot more on the Zoom H2n).
The interface is fairly intuitive and easy to use.
Since the included microphones only allow the use of two different patterns, X/Y and A/B, this recorder ends up being a lot less versatile if only the included components are used.
The capsules on the DR-40 aren’t the best at handling wind noise, so make sure to get a Deadcat windscreen.
The internal speaker is very low quality, but it’s mostly used just to verify if you did record something.
To check the actual quality of the recording you should use headphones.
Solo Recording
If you plan on doing some acoustic guitar plus vocal recordings, or any other simple task like that, then you will be just fine with the X/Y config.
The sound quality is great, and everything is easy to set up.
Recording an ensemble
Here it gets a bit trickier.
Since the two patterns you can choose are only X/Y and A/B, you have far less options for recording an ensemble.
The only good way would be to use the X/Y pattern while the musicians try to stay within a range that the microphones can pick up.
However, if you have some extra microphones lying around, then just use those through the XLR inputs and problem solved.
Podcast/Conversation
In this case, the Zoom H2n wins by a lot, since it can do surround recordings all by itself, without any external microphones.
Recording a Rehearsal or Live Band
In this case I’d also recommend the Zoom H2n, not only because of the added mic patterns but also because you have more compressor/limiter options.
The Tascam DR-40 has a Limiter and peak reduction functions, but on the H2n you have more and better ways of doing this.
What comes in the Box?
- The Tascam DR-40 recorder
- 2gb SD card
- 3 AA Batteries
I would definitely recommend that you purchase this bundle on Amazon, since it only costs a bit more than the Tascam Dr-40 and comes with a higher-capacity SD card, headphones, tripod, and many more accessories.
Features
- Built-in condenser microphones with XY or AB positions
- 2 x XLR Combo jacks feature microphone and line input
- Phantom Power
- Dual Recording
- Overdub recording (record over alongside a previous take)
- Peak reduction and limiter
- Pre-recording function
- Variable speed playback (50%-150%)
- Low-Cut
- Playback level align function (levels the tracks volume to be reproduced properly)
- Stereo Reverb effects
- USB 2.0 (only to transfer files)
Find out more about the Tascam DR40 here:
- Tascam DR40: Amazon, Sweetwater.
Conclusion
Which one you get comes down to your own needs.
If you already have external microphones and cables, you could use them with the Tascam DR-40.
Otherwise it will end up costing you a lot more!
However, I personally prefer the Zoom H2n, which you can find on my Recommended Gear page.
The patterns you get just from the included capsules will work for every recording you could ever need.
If you don’t have extra microphones lying around, get the Zoom H2n, no questions asked, and even if you do, I still think it’s the better choice.
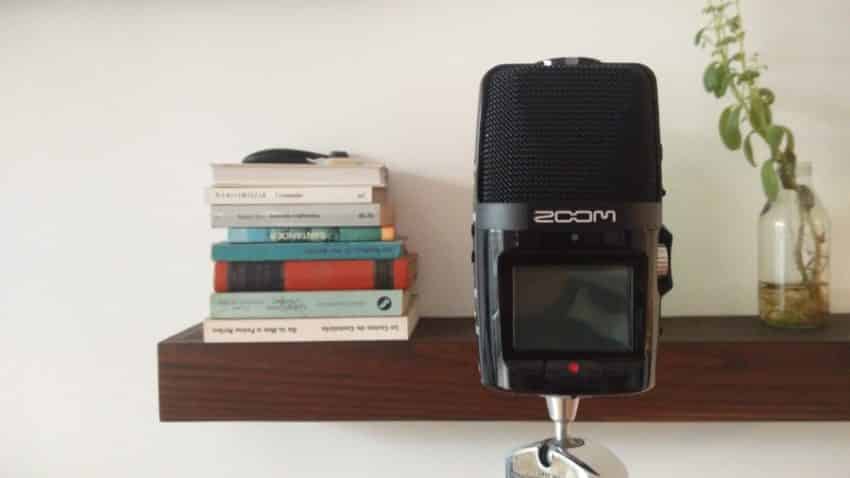
Plus, with the Zoom H2n you don’t even need a tripod (I still recommend having one though), since it’s designed to be able to stand vertically on any surface.
With the Tascam DR-40 on the other hand, you will need a tripod, no way around it.
I hope this information was useful! See you on the next one.