Last updated on February 27th, 2020 at 04:01 pm
So, you’ve been wondering how to get the most out of your Zoom H2n right? Maybe you tried recording with it but didn’t really know how and where to place it, on which settings, etc.
I did a lot of research and also recorded lots of songs on that recorder, so I hope to be able to teach you how to record vocals and Guitar using only the Zoom H2n.
We will be going over which pattern you should be using, as also the placement of the microphone, since both of these are the most important part.
Also, I will teach you how to set up the EQ settings and what other plugins I use to make it sound a lot better!
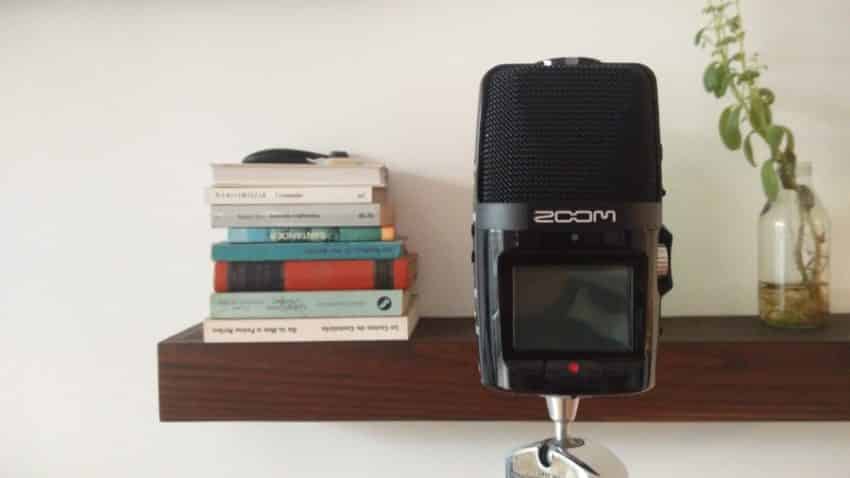
Basic information about the Zoom H2n:
Like many other portable recorders, the Zoom H2n has de capability of recording from the front, the back and full surround sound.
You can switch between these configurations through rotating the knob on the top. It has four positions:
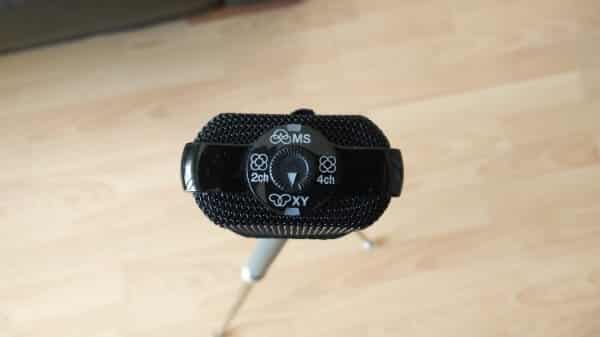
The XY position; Which only records from the front, using two microphones that are in an XY configuration. Most of the times you will be using this configuration.
The MS position: The microphone elements are stacked on top of each other, one facing to the back on the H2N and the other two to the sides. This creates a wider stereo image which you can control by making the side mics more or less sensitive.
Then you have the surround sound options, which are two:
The 2-channel surround: Which combines all five microphones of the Zoom H2n to create a stereo image and records it into ONE Stereo track.
The 4-channel surround: This configuration also combines all five microphones but creates two separate stereo tracks, one with the two front mics (the XY ones) and another track with the back ones (MS).
Now the question is…
Which pattern should you choose?
This post is about recording Vocals plus Guitar, or simply Guitar. So, I will mainly go over those points but later-on I’ll add a couple of pointers on other kinds of recording possibilities, should you want to record a whole band, for instance.
So, to answer the question….
I would only go with the XY setting. This is because you only want to capture the guitar plus your vocals, and since you will be right in front of the microphone, it’s best to only pick up the audio in front of it, so to avoid unwanted background noises.
Now that you selected the right pattern, it’s time to set the gain properly…
Gain settings:
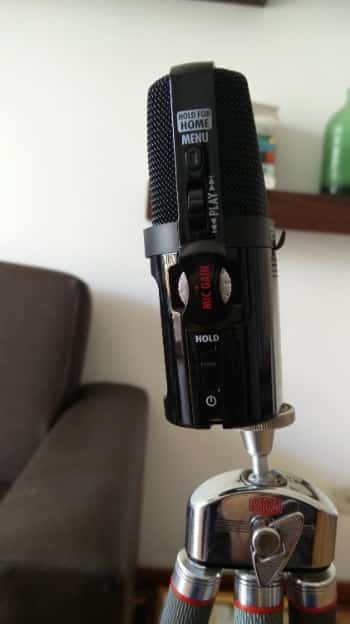
The Zoom H2n’s Gain Knob is on its right side, and goes from 0 to 10.
Setting the gain basically means, how sensitive you want the microphones to be…the higher the gain, the more sound they will pick up.
This part is fairly straight forward, but absolutely crucial! You don’t want the gain too high, otherwise you will get digital distortion, also known as clipping, which believe me…you don’t want.
Also make sure that the gain isn’t set too low.
Why is this important?
Well, if the gain is too low, this means that to get the right volume, you will have to boost it in the DAW (Digital Audio Workstation), which may give you a lot of hiss and noise.
The best way…
Basically, try and get the gain as high as possible, without ever clipping it! This will get you the best sound quality possible.
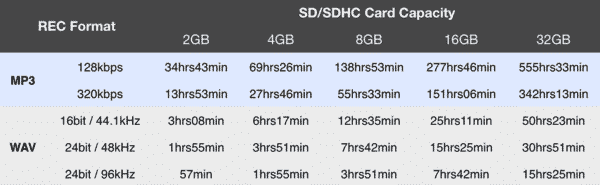
Which file format should you choose?
The Zoom H2n can record both in WAV and MP3 formats.
I only use WAV, since it will give me the best sound quality. The WAV format can be in 16- bit or 24- bit, with sampling rates of 44.1, 48 or 96kHz. Personally, I’ve always used 16- bits/44.1kHz.
But you could use any of the other two options. Just know that the higher the sample rate, the more space it will require, and since it ships with a 2gb card, you will run out of space in no time.
If you still don’t have the Zoom H2n make sure to check my recommended gear page.
Now let’s get into the fun part…
How to place the Zoom H2n correctly:
Ok, so now you have chosen the polar pattern, set the gain properly and decided which file format you are going to use. So now the question is, where to put this damn thing to get the best sound possible.
Of course, if you are doing voice-over work, you place it as close as you can to your mouth! But we are talking about recording guitar plus some vocals.
First and foremost, this microphone is great for recording acoustic guitars, since the XY pattern configuration is basically the same pattern that recording engineers use in the studio, but with two pencil condenser microphones.
So now the question is, how do we angle the Zoom H2n to emulate this as closely as possible, just like they do for studio recordings.
How to record only Guitar:
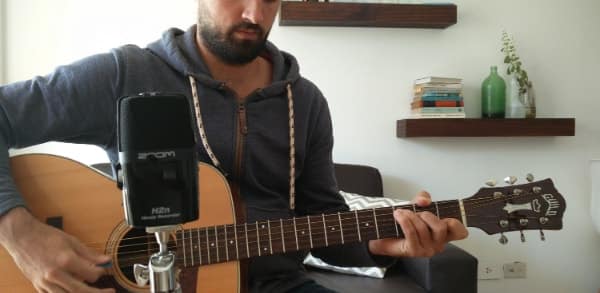
The best way to achieve this is by placing the Zoom H2n about two feet away from the guitar, at the fret-boards level, pointing towards the 12th fret.
This means, since the microphones inside the H2n have a 90-degree pattern, one will face towards the body of the guitar, while the other one will be facing the neck, effectively picking up every possible sound.
Note: From how these pictures were taken, it looks as if the microphone is a lot farther that it actually is. I placed it about 50cm away from the guitar.
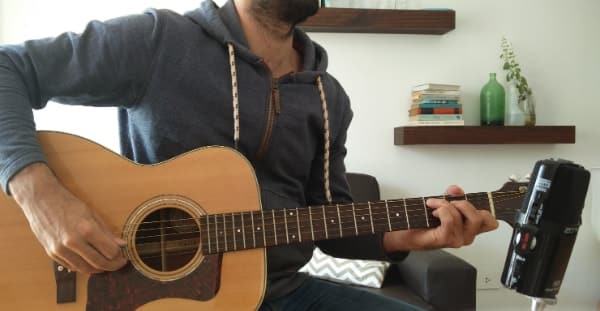
The second way, which I normally don’t use but which can sound really nice is, placing the microphone parallel to the fretboard, basically on its side and again it should be at the same height as with the first example, facing the 12th fret and about two feet away from the guitar!
Try them both out and see which one you like the most.
A third and unconventional way…
Let’s say you want to record a song for a YouTube video, of course the microphone shouldn’t be in the middle of the shot…. No one wants to see a video where the microphone is covering up what you are doing!
There’s one cool way to remedy this, even though the recording won’t sound exactly as good.
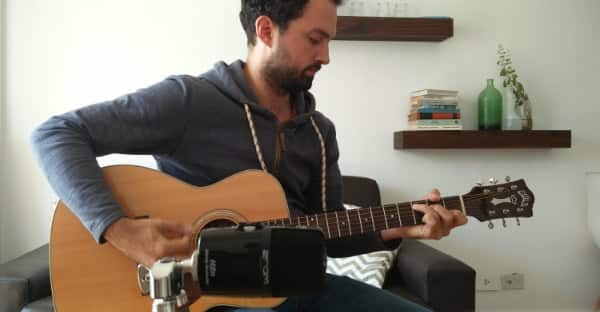
Well, what you need to do is place the microphone a bit lower and to the side, mid-way down the neck of the guitar and facing towards your right shoulder (if you are playing right handed guitar, if you are a lefty… just face it towards the left shoulder).
This will allow the microphone to pick up everything coming out of the guitar, while not being in the middle of the shot!
How to record Guitar and Vocals:
Now that you know how to set the Zoom H2n up properly for recording guitar, I’ll explain the best way to record Guitar and vocals at the same time!
One important thing to note is that, when recording Guitar and Vocals on the Zoom H2n, you want your voice to be the main feature of the song, not the guitar. This means that you want your voice to be heard just a bit more and usually, especially while strumming, the guitar will tend to be a bit louder.
How do you accomplish this?
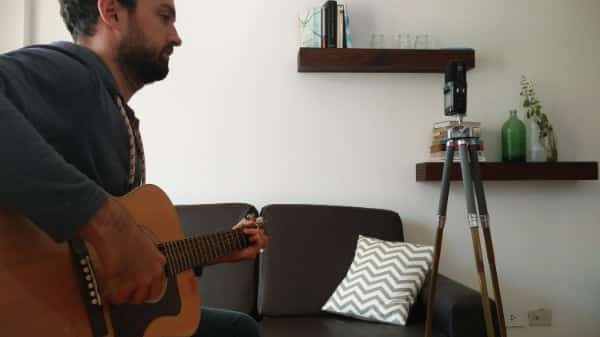
Well, the mic placement here is hey! I tend to place it about three or four feet away from me, or about One Meter.
The key here is to place the microphone in such a way that it is at the height of your mouth, facing towards you, this means that it will be closer to your voice rather than the guitar in comparison, effectively capturing more vocals and a bit less guitar.
I really like using this method because it creates a balanced recording. Of course, it all depends on how loud you plan on singing.
Not every voice is the same and not every song requires the same power. So, my recommendation here is to record some parts, listen back, move the mic up and down, while singing different parts of the song, and listen back again.
Going back to the Youtube side of things.
If you want to record a Youtube video of you singing and playing and you use this last method, the microphone will probably be covering your face up… you wouldn’t want this.
Instead what you can do is, lower the mic a bit, this way it will not cover up your face BUT tilt it up. It should be pointing towards your mouth, even if you lowered it a bit.
This way you will achieve a very similar effect to what I described earlier, but while still being able to be seen.
Now that you have recorded your songs perfectly, there’s still a couple of steps I can teach you to make them sound better… I promise these steps are easy and don’t take up much time and they will make a big difference.
If you are interested in reading about how to avoid wind noise while recording outside, which really comes in handy when owning a Zoom H2n, then read this post about how to avoid it!
Post Processing:
Doesn’t matter how well you record your songs / tracks, there are always some extra steps that you can take in the DAW (Digital Audio Workstation) to improve its sound quality.
Let’s face it, in todays music standards, we tend to listen to incredibly loud music. So, the best thing we can do is try and emulate that, by using certain plugins.
But first….
Apply some EQ (If needed):
Sometimes EQ is not really needed, but it’s not the usual case. When recording acoustic Guitar and Vocals, more often than not, you will get a boomier lower end.
Note: EQ should be first in the effects chain, then you add the plugins I mention in the order they were listed.
As a rule of thumb, I tend to go with a High Pass Filter on the low end, up to the 100Hz mark. Just to remove some of that boominess.
Another EQ trick is to lower the low-mids a bit, around the 200 – 250Hz mark.
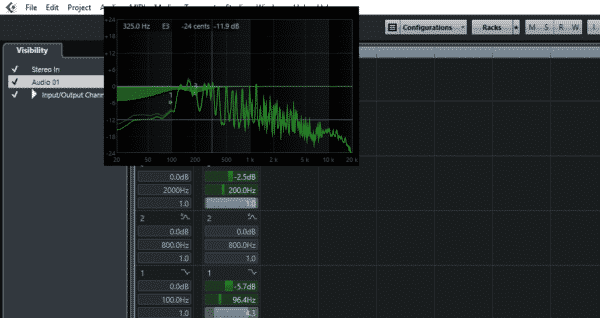
These changes are really subtle, but they give the recording a whole different feel, and I think we can all agree that boomy sounding songs… sound terrible.
Of course, these EQ settings are not set in stone. Play around with them and see which one feels the best to you. But as a general guideline, these settings work great!
Make it louder:
To make it louder I use two plugins, which are Free, the Saturation Knob by Softube and a very simple Compressor called MJUC jr. by Klanghelm.
The great thing about these two is that they are really easy to use. If I can be lazy, I will be… especially when the result that I get is still great! That’s why I love both of these plugins.
Saturation Knob by Softube:

The saturation knob is literally one knob that allows you to add some warmth and shimmer to the vocals and guitar, it can be used on almost any instrument also. I put it on almost all my recordings.
Just don’t go overboard with the saturation, if it starts sounding distorted, dial it back down a bit.
Here’s the official download link:
One huge issue I have with this plugin, is not the plugin itself, but all the hoops they make you jump through to be able to use it. It’s not as simple as just downloading and installing it like the Klanghelm Compressor.
You have to register with them, also register with ilok.com and then link those accounts…
AFTER that, I know… super annoying, you download the gobbler app and install the plugin, now you can finally use it!
I have to say, it’s worth the trouble! And it’s FREE.
MJUC jr. by Klanghelm:
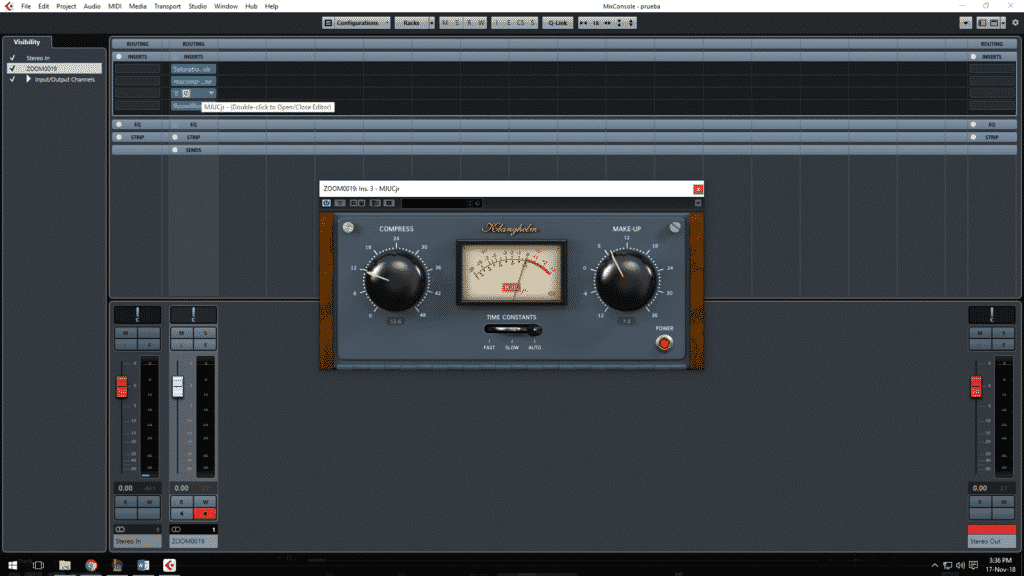
I don’t think you can go wrong with this compressor. It’s easy to use and works great!
Like with all compressors, just make sure you don’t kill the dynamics of the song, only compress a little!
Here’s the official download link:
Reverb:
Adding a bit of reverb is always advisable. It makes everything a lot less dry. The way I like to use it is by adding just a little, an almost unnoticeable amount. You shouldn’t be able to hear it unless you are really focusing on it.
The reverb I use Is one that came with Cubase. I feel like it does its job perfectly. If you own another one that you really like, go ahead and use that one.
Additional Free Software
I wrote articles about a lot of Free Plugins and Softwares which might be very useful to you;
- Best Free Drum VST Plugins
- Best Free DAWs
- Best Free Mobile Music Production Apps
- Best Free Orchestral VST Plugins
Conclusion:
Follow these simple steps and you should have a great sounding performance on your hands. But be careful to always put these effects in the proper order in the effect chain.
First EQ, then the Saturation knob, after that the Compressor and lastly reverb. And remember that not all settings work for all the songs, maybe you will need to adjust the EQ a bit, turn down the compression, etc.
I hope you enjoyed this post! See you on the next one!
Hello!
Thanks for any reply. Can the H2n be used as a microphone for either live performance or connected via an XLR for recording on my Tascam multitracker. The mic connections on the Tascam can either be XLR or 1/4 jacks.
Steve
Hey Steve, I wouldn’t use it for live performance since it’s a condenser mic and may be prone to feedback (if it’s for recording a live performance only, sure!).
I never tried connecting it to a mixer and it doesn’t have a dedicated output to do that. I don’t know if connecting it from the headphones output could work in some way, but again, I haven’t tried that.
Regards.
Hi Facundo!
I would like to know if you can record a track while you listen to a previous recorded track.
Record the guitar first, and record the voice while listening the guitar.
Thank you in advance!
Yes, absolutely! But only if you use the H2n as an Audio Interface connected to the PC. You can’t do that when recording to the internal SD card.
Hi.
I have this mic and I use it with Mixcraft. And I have been following your advices on the mic settings and placement.
However, when I record directly to the DAW (Mixcraft), I use the X/Y option, but I also have 3 options to arm the mic: Left Channel; Right Channel; Stereo
What do you think it’s the best? Single channel or stereo?
Thanks
It really depends on what you’re using it for; XY for instruments and mono for vocals, for example.
I generally record using XY or M/S, but that’s mainly because I only use the H2n to record acoustic guitar + vocals.
However, if you wanted to record them separately, I’d say XY for the guitar and Mono for the vocals (you can set it to M/S and completely reduce the Side volume to only get the Mid signal, which would be mono).
Can you record a track and then play it back and hear it while recording another track
I feel like I’m not getting good audio when recording vocals with my H2n. I’m trying to figure out whether I should make changes to my hardware, my recording technique and/or the way I process them. Do you have some sample files for the tips you’ve outlined out in the article so I can compare?
Hi Facundo, your posts are extremely helpfull, thanks! I use Ardour on Linux myself (Calf plugins). why don’t you mention Linux as an alternative? Thanks, Jaap
Excellent explanation! This is EXACTLY what I was looking for and it answered all my voice/guitar recording questions without all the techie stuff. Thanks so much!!! Bruce
to use automatic recording, ie for start/stop recording band rehearsal, what db levels would you recommend setting for start recording and for stop recording. And would these levels be adequate for any microphone configuration. I would like to just set it up and put it on record, and not have to worry about manually starting and stopping so as not to interrupt the flow of the jam session. Instruments are drums 2-3 guitars and bass, and vocals.
Hey Richard, thanks for commenting. In rehearsals I just go to the comp/limiter options and choose the Drum compressor, then i turn the gain to zero, which sounds weird I know, but it works.