Last updated on May 23rd, 2021 at 01:55 pm
We all know how frustrating it can be when we want to record a new song, or a video, or any other sort of audio outside, only to hear those annoying wind noises all over the recording!
Luckily, this can be dealt with, so make sure to follow the steps in this guide to achieve better audio recordings outside.
How to Reduce Wind Noise when Recording Outside?
- Use the right microphone (Cardioid)
- Engage the low-cut filter on the microphone
- Get as close to the sound source as possible
- Use a Deadcat Windscreen
- Remove wind noises from the recording using an EQ or a noise reduction software.
As far as this guide goes, I will first give you all the tips that are free and that don’t require you to either purchase additional equipment or require software to deal with the issue.
What is Wind Noise and what causes it?
Microphones are extremely sensitive to the movement of air, since this is how they actually record sound.
They are designed to pick up the acoustic energy and convert it into an audio signal via a diaphragm that vibrates when air moves around it.
The human voice, or even instruments for that matter, don’t move that much air, and this is why microphones need to be this sensitive.
Wind, on the other hand, creates a significant amount of air movement, and when it comes in contact with the microphone’s diaphragm it creates a large amount of low-end vibration, or low-end rumble.
Not only is this very unpleasant to listen to, but it can also overpower the actual audio that you want to hear.
Important Note: Wind will always generate low-end or low-frequency noise, and knowing this is very important since you can reduce it in the recording itself by EQ’ing those frequencies out.
Different Microphone types and how they respond to Wind
Microphones come in all shapes and sizes, and they are definitely not the same in terms of how they pick up sound in general, nor in how they deal with wind.
Here you only need to know two things;
Omnidirectional microphones have a more robust capsule and will be better at handling wind noise, but they are far from ideal since they pick up sound in a 360 degree angle.
Cardioid microphones, which are directional and only pick up sound from the front, are the ideal microphones to record outside, even though they are actually more susceptible to wind noise since the capsule is more sensitive.
This is because you can aim them exactly at the sound source and they will only record that.
So, go for a cardioid microphone unless you need to record everything around it.
Now, let’s get into the actual tips!
1. Use your Microphone’s Low-Cut filter
If your microphone features a low-cut filter, also known as high pass filter, you should definitely engage it.
This will cut off some of those low-end frequencies that generate that low rumble, making the recording clearer right from the start.
There are some additional benefits to doing this; if there are any other low frequency noises present, like a truck passing by, the low cut filter will help with that too, as well as lowering the handling noise.
Note: Even though I’d recommend engaging the low cut filter, if your microphone doesn’t have one, don’t panic! This is something that can absolutely be done in post; either in the video editor or in the DAW.
2. Record inline with the wind
This method can work pretty well!
You place your mic in such a way that the wind is blowing directly from behind it and towards the sound source.
Since the wind is not blowing directly at the mic, it is much harder for it to pick up those plosives.
3. Use a cardioid microphone

I just mentioned this in the beginning, but cardioid microphones, despite being more susceptible to plosives than omni mics, are the ideal choice when recording outside.
This is because they are directional, meaning that if you place one close enough to the sound source, since it’s not recording anything else around it, it should be able to record it quite well.
And even if it picks up some wind noise, the original sound source will be a lot more present than if you had used any other type of microphone.
4. Avoid recording at a huge distance
Adequate recording distance is always important, and this is more so when recording outside, this way you avoid picking up unwanted sounds from your surroundings.
The best thing you can do is to get the microphone as close to the sound source as possible.
Of course, this doesn’t make the wind noise any lower, but it makes the source’s signal louder in regards to the wind.
If the microphone is farther away, then you will have to increase the gain to get a good recording of the source, but this will also increase the wind noise.
So, get close!
5. Put your back against the wind
Using your body as a shield to keep the wind from reaching the microphone is quite effective, especially if you’re using lavalier microphones (the ones you attach to your shirt).
This can also work with other microphones; I use a Zoom H2n to record outside sometimes, and sitting with my back against the wind and having the microphone at a maximum of 2 feet in front of me, does help a little.
6. Seek Shelter
This one is boring, but you should pick a location where you are protected from the wind or wait until it dies down.
One would assume that this is an obvious point, but after watching so many YouTube videos where people don’t choose the right spot to record and the wind noises are just unbearable, I thought I’d stress the importance of picking the right location a bit more.
If you are recording a music video for YouTube, then I understand that getting a good shot is a priority.
But believe me, Image quality is not as important as Audio quality, even for videos.
7. Use a Deadcat Windscreen
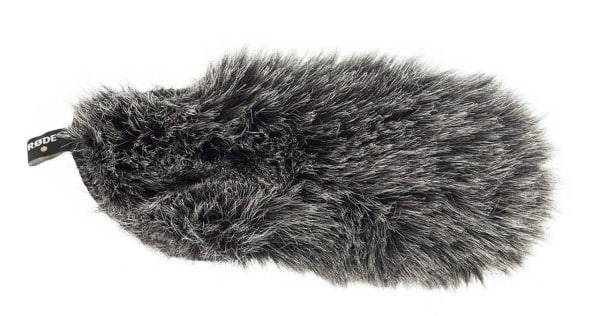
Note: Not an actual dead cat, clearly the people who invented this gadget have a very dark sense of humor!
This Windscreen is absolutely fantastic and I use one every time I record outside since it works wonders.
Unlike the regular foam Windscreens, these ones work really well even under heavy wind conditions.
They are not perfect, of course, but they are an amazing investment, especially considering that they cost about $10.
In some cases, they can muffle the sound slightly, but it’s much better than dealing with plosives.
Use Small windjammers with lavalier or lapel microphones

Lavalier microphones can also be protected using tiny wind muffs or windjammers, which are essentially small deadcat windscreens that you can get in a couple different colors to make them blend with the clothes you’re wearing.
These will help you achieve a better audio quality in windy conditions.
8. Protect the microphone with your clothes
This only works with lavalier microphones since you can place them directly under your clothes, which will then act as an additional barrier.
I would actually suggest using a lavalier windjammer, and if that doesn’t work then go for this method.
9. Use EQ to remove Wind Noises
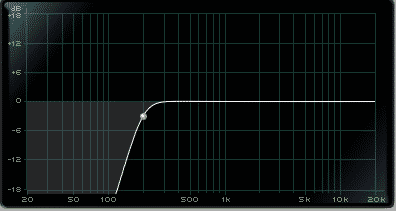
Since wind plosions are usually a Low-Frequency sound, you can use a high-pass filter to let the high frequencies pass through and filter out the Lower frequencies.
Start increasing the range at which the filter is cutting off the Low frequencies until you hear that most of the wind sounds are being eliminated. This is usually around the 200Hz mark.
The one issue with removing so much of the low end is that the audio can end up sounding thin and tinny.
If that’s the case, you can always use automation to only engage the high pass- or low cut filter when the wind noises are present, but not during the entire recording.
10. Use Noise reduction plugins to remove Wind Noises
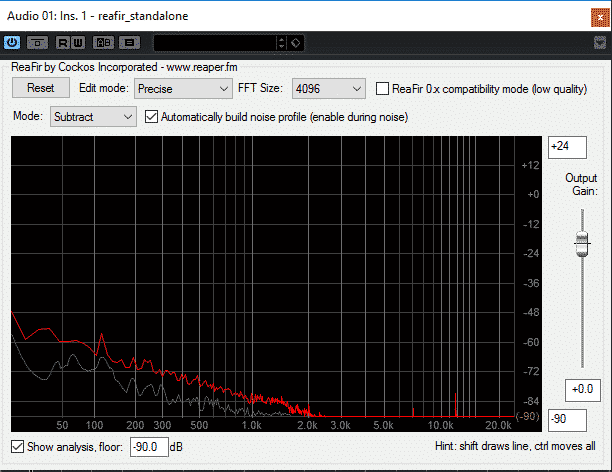
Lastly you can try some plugins that might aid you, should you have too much wind noise going on!
You might try Izotope RX which has a few tools such as spectral repair and noise reduction, or you can download ReaFIR, which is a plugin that comes included in the Reaper DAW.
This plugin has many different settings, but one is that it creates noise profiles and it can subtract them from the signal.
It’s quite effective, but depending on the frequencies of the noise profile, it could potentially change the way the recording sounds.
I’ve written this post on how to remove unwanted noise from recordings, where I go into more detail on how to use some FREE software to remove it.
Conclusion
While you may be tempted to think that everything can be fixed in post, I’d highly recommend to get the recording done as cleanly as possible since software isn’t magic.
Use a deadcat windscreen, position in such a way that the wind won’t directly hit the microphone, or choose a different location.
I hope this information was useful!
Have a great day!