Last updated on February 12th, 2021 at 01:09 pm
About two years ago I decided to invest in a portable recorder for the simple fact that I needed a way of recording high quality music without having to take half of my home studio with me.
With all the different portable recorders out there, I didn’t really know which one to get.
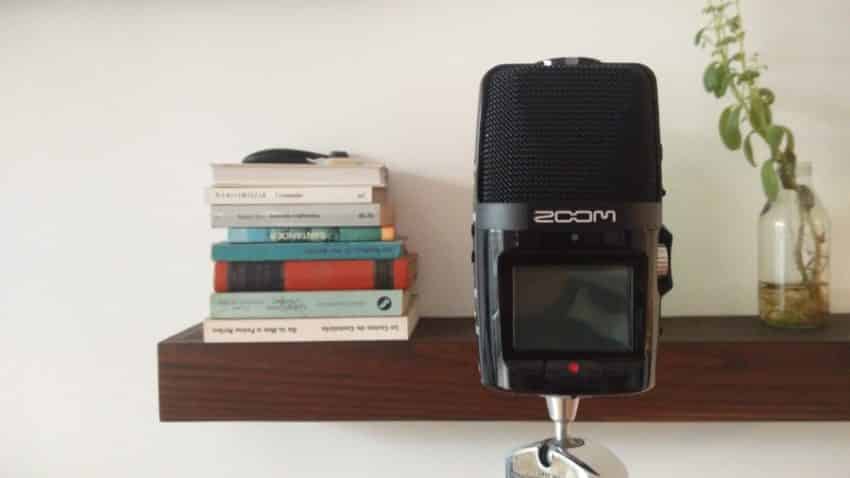
I did some research, tested out a couple, and finally decided to get the Zoom H2n.
Note: I wish I could have gotten my hands on the Zoom H2, which is the older version, mainly because I’ve heard multiple people say that it’s better than the H2n, despite being older.
So, if you see a used H2 on the market, consider getting that one.
Now, I’ve also covered some other portable recorders previously, and you should absolutely check out that post, but the H2n definitely came out ahead, especially when taking cost-efficiency into account.
Now, without further ado, let’s get started!
Zoom H2n Overview

The Zoom H2n features five internal microphones that can be used to switch between different microphone patterns; X/Y, Mid-Side, and 2- or 4- channel surround.
Let’s take a quick look at each of these configurations:
X/Y: Both of the front mics are engaged, capturing everything in a 90 degree angle relative to one another.
This is the most common set-up that you will be using most of the time.
Mid-Side: This configuration engages the three microphones on the back of the H2n; One facing straight back and the other two to the sides.
This allows you to control how much sound the side microphones are picking up, letting you choose how much- or how little- of a stereo image you want… But more on this in a bit (I will include audio examples).
4-Channel surround: Uses all the available microphones to record to two separate stereo tracks; Mid-Side microphones on one stereo track, X/Y on another.
2-Channel Surround: Same as the 4-channel setup, with the difference being that all the microphones record on-to just one stereo file instead of two.
Additionally, a line in jack is also provided, which allows you to connect an external microphone (You can connect a condenser microphone that requires 2.5v of power), as well as a 3.5mm headphone jack.
This headphone output isn’t going to blow you away by any means; however, it does sound good and it can drive my Audio-Technica ATH M40x with ease, but that’s it, it’s just for monitoring.
Other Features
Note: I go into each of these features in detail in my guide on how to use the Zoom H2n, as well as teaching you how to record high-quality audio with it, so check it out!
Here’s a quick summary of all:
Pre-Record
When enabled, the H2n will consistently record in the background, and once you hit Record, it will keep the previous 2 seconds.
This can be very useful in meetings, since you can’t really know when someone is about to start talking.
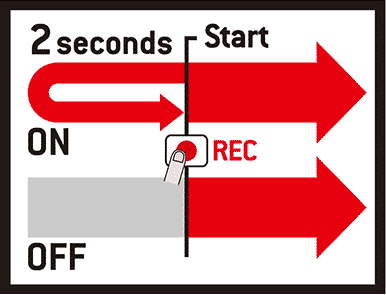
This way you know that if you hit the record button too late, chances are you still were able to record the previous part.
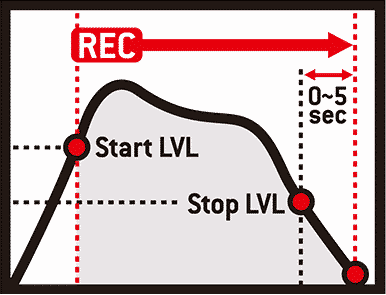
Auto Record
When enabled, as soon as a certain threshold is reached, the H2n will start recording automatically.
There is an “Auto Stop” feature as well, that will stop the recording once the audio goes below the set threshold.
Audio Recovery
The Data Recovery feature automatically repairs corrupted files; Like when the SD card gets removed during a recording, for example.
Audio Interface
The Zoom H2n can be used as an Audio Interface as well, which is one of the reasons why I bought it, since some of the other similar-priced recorders don’t have this option.
This means that you can connect it to your PC and record directly to your favorite DAW, without having to use the recorder’s internal storage.
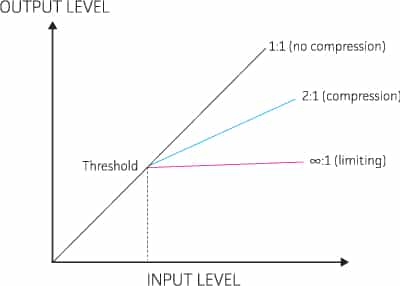
Built-in Effects
Low-Cut, Compression and Limiting are included in this recorder.
One of the cool things of having these effects is that you can record really loud rehearsals and not worry about clipping the signal.
Just set the compressor to “drum” and turn the gain to zero, and voilà… you have a great-sounding rehearsal on your recorder.
But more on this in the guide I linked earlier.
Spacial Audio
The Zoom H2n can be used to record audio in the 4-channel surround mode to be used in conjunction with 360-degree VR videos, meaning that when you move the camera to one side, the audio will adapt to it, giving you a better sense of realism.
This can also be used for live streaming.
Moving on…
What comes with the Recorder?
There are two ways you can buy the H2n; In a bundle with a tripod desk-stand, storage pouch, foam pop filter, and a couple other extra things, or without all of these extras.
I decided to buy mine on its own without the bundle because after reading over a dozen reviews, all the extras that came with it seemed to be of extremely poor quality.
What I decided instead is to get the recorder on its own, which still comes with a 2GB SD Card, a USB cable and some batteries, and purchase a “deadcat” windscreen.
These windscreens are much better at controlling unwanted wind noises/plosives than any regular foam pop filter, and allow you to record out in the field without too many issues.
Plus, they are dirt cheap!
This is the one I got that I still use until this day and it works wonders.
My recommendation would be to only get the recorder, like I did, especially because of the price, since you can then invest in a deadcat windscreen as well as a cheap tripod and spend exactly the same as you would have by purchasing the bundle.
Included Software
It comes with Cubase LE and Wavelab LE software Keys included, which are basically stripped-down versions of a DAW/audio editing software.
If you’re looking for a good free DAW, then I’d recommend checking out this list, since these two are very limited.
Build Quality
The only thing made out of metal on this recorder is the grille… Everything else is made out of plastic, which obviously isn’t ideal.
However, it doesn’t feel cheap and it should definitely last you forever, especially if you are at least a tiny bit careful when handling it.
One thing I really like is that the Gain Knob is covered by a bit of plastic, which makes it harder for you to accidentally change the Gain settings.
The screen is black and white and pretty small, but it’s not too bad since you can easily access all the settings and also see what’s going on.
At first, I thought that having no color would be an issue when setting the gain, since it’s hard to tell on the screen if you’re clipping or not, but there’s a built-in red light on top of the recorder that flashes every time the signal gets too hot.
So, overall, especially considering the price, I really can’t complain.
Sound Quality
Being by far the most important aspect to consider when buying any sort of recording device/microphone, you should always pay special attention to the recording quality, and I’m not talking about sample-rate and bit-depth, since going past 44.1kHz and 16-bit doesn’t really provide any audible differences, but how good the built-in microphones actually sound.
Think of it this way; All the CDs that we used to listen to were recorded using 44.1kHz and 16-bit, and the sound quality has always been absolutely fantastic.
So, there’s no real use in going past this limit…
However, if you want to go above this and achieve an even higher quality, the Zoom H2n allows you to record up to 96kHz at 24-bit, just know that it will take up a lot more storage.
As far as the sound quality of the recorder itself goes, I think that it just sounds fantastic.
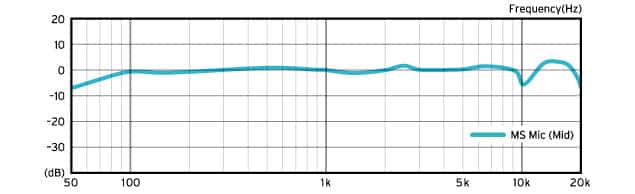
The frequency response of all the different setups is almost completely flat, which means that it will give you an accurate representation of how the source really sounds without adding any color to it.
I personally like the X/Y and Mid-Side configurations the most, but honestly because I don’t really need to use the surround modes to record my own music, plus they sound quite good!
How does each configuration sound?
Here I will include a couple audio samples that I recorded myself with the Zoom H2n, showing you how the X/Y, M/S, and 2-/4-channel surround configurations sound.
Note: I will not do any post-processing or anything, just the raw files, and the recordings themselves will be simple chords played with an acoustic guitar.
Also, these were all recorded in my living room with no acoustic treatment whatsoever, to give you a more “real life” eaxmple of how this recorder actually sounds.
X/Y Configuration:
Mid-Side Configuration:
The first example is with the side microphone’s level set really low, meaning that there won’t be as much of a stereo feel.
This recording is with the side microphone’s level set to max, which yields a wider stereo feel.
2- and 4-Channel Surround:
Both the 2-channel and 4-channel surround sound the same, the difference is in how they get stored. That’s why I’m just showing one example.
Related: I wrote a whole post about how to record guitar and vocals using the Zoom H2n, which you might find useful!
Mid-Side Decoding

Now, there is one very cool feature that I absolutely love, and that is Mid-Side decoding.
Like I mentioned earlier, recording using the M/S configuration engages the microphone that is facing the back of the recorder as well as the side ones.
Depending on how high you set the levels for the side mics you will be able to get more- or less- stereo width.
If the level of the side mics is higher, then the stereo image will sound wider, while on the other hand, if you turn them all the way to zero, then you would actually just be left with the middle microphone’s signal, which basically means that you are recording in “mono”.
There are two ways you can approach this:
One way is to set the gain level of the side mics directly on the recorder, which will record it just as you set it up, meaning that you won’t be able to adjust it later on.
The other way, which is one of the reasons I like this recorder so much, is that you can select the RAW setting, which will record both the signals of the middle and the side microphones separately and allow you to control the width later on via a plugin.
This is great for the simple fact that you don’t need to worry about getting the settings right from the start, since you can adjust everything later on in your DAW.
Of course, this feature isn’t unique to the Zoom H2n, in fact, the Zoom H5 and H6 also feature this functionality; however, you need to purchase a separate capsule and the recorders themselves cost twice as much as the H2n, or more.
How long can it Record?
Well, this obviously depends on how much storage your SD card has as well as the format you’re recording in, since the H2n can record both in WAV and MP3.
Of course, recording in stereo mode (X/Y or M/S) is completely different than recording in surround mode.
So, here’s a chart with all the data you need:
Stereo Modes: X/Y and M/S
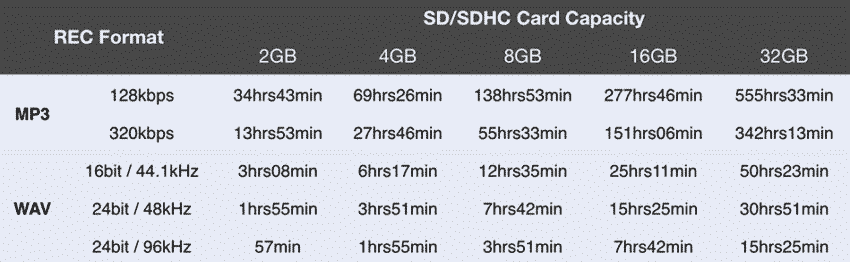
Surround Modes

Here’s a link to the Zoom’s official website where you will be able to see more of the Specs of the H2n.
How long does the battery last?
To be honest, I was pleasantly surprised with how long it lasts since I’ve probably recorded over 30Hrs now, and I haven’t changed the batteries once.
They are about to run out, so I assume that I still have two or three hours of recording time, but this is a lot!
What I like about the H2n
The recording quality is excellent and it comes with the Mid-Side recording feature which works surprisingly well, plus you can record in RAW mode and then control how much stereo width you want with the plugin they provide.
The small form factor is also something I like, especially since it fits nicely in any of my jacket’s pockets, which makes it super portable.
This is something that you can’t really do with other portable recorders, like the Zoom H6, since some of them are three times larger, or more.
Lastly, I love how long the battery lasts; I know this might not be a big deal to most of you, but I hate having to run out to get new ones too often.
What I don’t like about the H2n
There isn’t much I don’t like, which is why I decided to buy it instead of other recorders.
But, if there is one feature that I’d love it to have, it’s XLR inputs.
Some other recorders, like these ones, have built-in microphones as well as XLR inputs, which just gives you more to work with.
But other than that, I can’t complain!
Get the Zoom H2n here: Amazon, Sweetwater.
Summary
The Zoom H2n is a small form and lightweight portable recorder that can record in X/Y, M/S and Surround modes.
It doesn’t feature any XLR inputs to connect external microphones, but this is also why it’s such a small recorder.
All things considered; I think that the H2n is the best portable recorder out there in terms of price-to-quality ratio.
Now, as I mentioned earlier, you can purchase a bundle that comes with some extra equipment, but I’d recommend just getting a deadcat windscreen like the one I got, since it’s much better than the pop filter that comes in the bundle.
Here’s a link to Amazon where you can check both the current price and the user-reviews of the H2n.
I hope this information was useful!
Have a wonderful day!
Thanks for the review, very helpful! You wrote the older model “h2” is better. Do you have any specific information in what ways it is better?
Do you know how to turn off the external mics when monitoring a a live recording? I run my guitar signal out from a mixer into the line in on the zoom h2n. I hit record. I monitor the sound with headphones in the h2n. The zoom records the guitar from the line in but it also records the outside noise. I have no idea why the external mics are active when I’m using the line in for recording. If I turn off the ‘monitor’ option I don’t hear anything at all while recording. It’s either all mics going, or none at all. Very odd.