Last updated on February 18th, 2022 at 11:07 am
I’m sure this has happened to all of us once getting into music recording and mixing. You record a track and want to add some effects but have no idea if it should be an “insert” effect or a “send” effect.
Sends vs Inserts
An insert slot is typically used for processors that change the whole signal, like EQ, Compression, Limiting, Gates, etc., which will alter the signal of the entire track, whereas send effects, such as Reverb, Delay, and other time-based effects, are typically used to add effects to a signal without affecting the original audio.
For Send effects you usually set them up in Bus, then you select which track´s signal you want to send to this effects bus. This processed signal then returns to the output of the recording software, where it mixes with the direct signal of the track.
The SEND effect doesn’t change the signal of the original track, it creates a parallel signal path which then blends with the original dry signal.
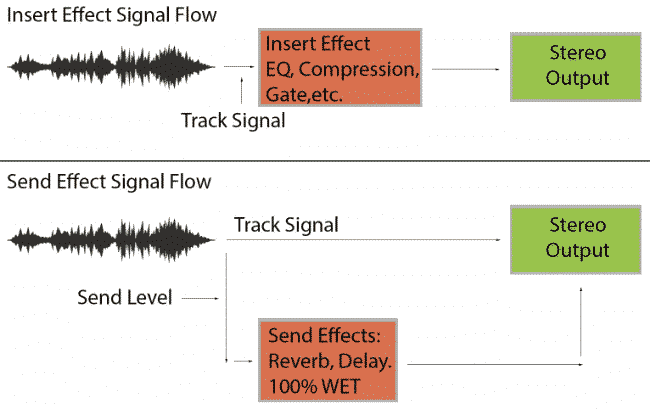
Here is a visual explanation;

Let’s take a look at the Insert effect signal flow;
- The signal from a track goes into the inserted effect, such as EQ, compression,etc
- The output of the inserted effect goes to the stereo output channels of your Audio Interface or to stereo output bus in your DAW. In the tracks “In” and “Out” settings you can choose the Output channel.
Now let’s take a look at the Send effect signal flow;
The signal from the track goes:
- to the stereo output bus or the interface output.
- A copy of the same signal gets sent to an Effect Bus.
The Output of the effects bus ( the signal that got processed ) mixes directly with the track, which gets sent to the Output Bus or interface output.
The dry and wet controls of the SEND effect should be set to 100% wet, since you control the amount of effect you send with the “Send Level Control” in your track.
Now the question is, when should you use each of them?
You generally want to use time-based effects, such as delay, as SENDS.
While you can use effects such as Reverb and Delay as INSERTS on each track, generally you are not going to want to, simply because they are very CPU intensive.
Imagine if you need to add separate reverb and delay to 20 tracks, unless you have a really powerful PC, you WILL run into problems. It makes more sense to create a SEND with those effects, and make your multiple recorded tracks share the same plugin.
Also imagine adjusting the settings for each tracks reverb, or delay effect separately, this will take you way too long!
Sending everything to an effects bus allows you to implement global changes across the board with ease.
Want a drier sound overall? Just turn down the reverb channel, leaving all your instrument balances otherwise as they were, as long as you are using the effect 100% wet, as you do when using separate effect channels in this way.
Another pro to having your delays or reverb on a separate track is that it gives you much more control and flexibility when it comes to the customization of the effect without changing its dry sound.
Normally, when adding reverb, you want to emulate the sound of the room the musicians were playing in… so creating a reverb bus will make this much easier.
Why is this?…
Because the EXACT same effect is being applied to all the tracks. You only need to set up that one reverb to sound just like you want it to, and then send those tracks signals to it.
Note: Sometimes it’s a good idea to create two or even thee different reverb buses, maybe one for delay and another one for chorus.
Now, let’s say you want to EQ just the tail of the effect, or maybe add distortion or chorus, if the effect is on a different track this becomes really simple and easy!
You can sometimes add a little reverb to a single track as an insert if you feel that specific track sounds a bit too “thin”, but that´s the only time to really use reverb that way.
It’s more to change the tone rather than trying to create and effect tail.
An INSERT effect is used to directly change the whole signal of the track.
When you want to EQ, compress, gate, etc, you should generally use them as INSERTS because as stated earlier, a SEND creates a parallel signal which then BLENDS with the original one.
If you use a compressor as a SEND, you will be compressing the parallel signal but not the original one.
Note: Using parallel compression is actually quite common and it works great, but you need to know what you are doing.
Basically, this involves creating a parallel stream of audio, compressing it a whole lot and mixing it with your original signal. It tends to work especially well with drums and percussion.
The aim is the sort of increased tightness that you’d expect from standard compression, while still letting some of the dynamics of the original through.
Some plugins offer the Wet / dry setting which creates a similar effect, but it doesn’t provide the same flexibility because with parallel compression you can process the original and compressed signals by adding EQ to one but not the other, or any other kinds of effects, yielding a unique sound.
Have fun and don’t stick to the rules as much!
These are just basic guidelines, if you follow them you should be all set, everything you mix should sound good enough. That being said, nothing is set in stone. You can always improvise (and you should at least try it from time to time).
For example, with parallel compression, like I just talked about. You could compress the drums regularly or you could try parallel compressing them and see which one sounds best for your project.
It all comes down to taste. Or you could use any number of effects as SENDS, that would conventionally be best suited for inserts and just play around with them.
You could use a harmonic enhancer o even distortion as a SEND. Most enhancers work by adding harmonics that are related to the source signal and blending them back in with the source.
This makes it sound brighter or fuller. By setting this up as a SEND you can route the desired signal to it and then remove unwanted frequencies.
You could also use overdrives or distortion, since they also add harmonics, but careful, even though you might think that adding such effects even to guitar and bass tracks might work great (and it can if done properly), it can change the whole character of the sound.
It has to be used in a very subtle way.
For instance, you could use it on snare drum if it’s hard to make it cut though certain parts of the mix.
Let’s say it sounds great for the whole song, but in the chorus section a lot more instruments come in and the snare drum get’s kind of lost, you could create a SEND channel with distortion, cut out all the unwanted frequencies and use it as a “presence” fader which you can automate to send a higher signal during certain parts of the song and automate it to remove that added distortion when it’s not needed.
The same technique can also be used to “fake” an under-snare mic, which will give you a more diverse sound and more control over what you can do with it.
Conclusion
If you are new to the whole recording scene I would recommend you start with just the basics. Go the conventional route and use SENDS and INSERTS as described in the beginning.
It’s just a good rule of thumb to follow.
However, as you become more adept at using these kinds of tools, you should try and play around with them, you will find there are some benefits to using typical insert effects as sends, it’s just a matter of trying and getting used to it.
Don’t be afraid to break the rules from time to time!
I hope this was useful! Have a great day!
I am new to audio mixing, as a non-professional, and greatly appreciate your simple but clear and lucid explanation. So much so that I feel compelled to email you to that effect. Well done!