Last updated on July 20th, 2021 at 01:09 pm
Mixing can be quite a long and complicated process, especially if you’re just starting out…
Even more when mixing drums since you can have like 20 tracks for just one drum kit.
At first you don’t know where to start, you think that you need to use eight plugins per track to make it sound like the pros do.
We all tend to over-complicate things when it’s really not required…
But in truth, mixing drums doesn’t need to be hard or even take that long, especially if you follow a couple basic concepts.
But before I get straight into the mixing steps there’s one hugely important concept that I think many people miss or decide to ignore…
Using quality Tracks
The single most important rule when it comes to mixing drums doesn’t have to do with the mixing process itself…
You should be using great sounding tracks, meaning that the initial recording of the drums needs to be on point.
This is because even though you can polish bad sounding tracks, they will still be bad sounding tracks and no matter what you do they won’t sound nearly as good as some well recorded ones.
Like that old saying goes; “You can polish a turd, but it’s still a turd” …
This is a very important concept to understand since without quality recordings you won’t get the desired sound, plus the time spent on those tracks will be far more only to achieve a subpar mix.
I wrote an article about the best microphones for beginners where I listed some that also work well for drums… make sure to check it out as well.
Related: If you want to download some free samples to practice with, here’s a link to an awesome website that has loads of unmixed songs for you to download freely.
Now that that’s out of the way, let’s get straight into how to mix drums the right way…
How to Mix Drums
Here I will be covering a lot of ideas for you to consider as well as some important steps to follow.
Note: These aren’t strict rules, but rather guidelines.
This is because every song requires something different, as does every genre, which means that approaching song “A” exactly like you would with song “B” might not be the smartest move.
Step 1: Use a Drum Bus
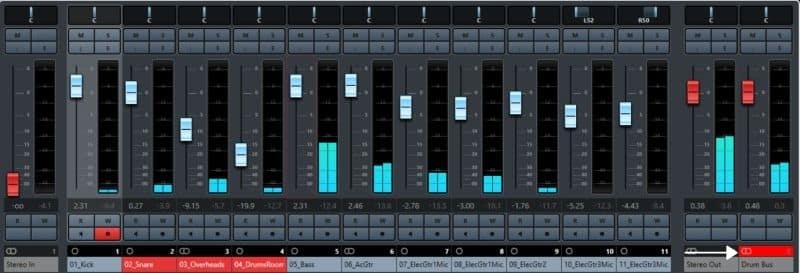
First of all, what is a Drum Bus?
A Drum bus in your DAW is just a stereo track where you can run all your drum tracks through.
The cool thing about this drum bus is that not only can you control the volume of all the tracks you send to it simultaneously, but you can also add effects like EQ and compression, which will affect all of those tracks.
Why is this useful?
Well, it’s useful because it allows you to process the whole drum kit and affect how it sounds overall before you move on to the individual pieces of the kit.
Also, since you’re applying the exact same effects to the whole kit, it makes it sound like a complete drum kit and not like individual pieces.
And lastly, it helps you think about the drum kit as a single unit and not as a bunch of separate tracks.
Which brings me to my next point…
Step 2: Don’t focus on individual tracks… at first
Oh boy… this is a trap that I’ve fallen into so many times and I guess you have too.
I’ve seen a lot of people start mixing individual tracks right away…
They mute everything but the kick drum and off they go; Adding lots of EQ, Compression, Saturation, and every other effect you can think of.
After a while they achieve their desired kick drum sound, mute it and move on to the snare.
They follow all those steps for every single individual component of the whole drum kit until each of them sounds like they want them to…
However, those tracks only sound good on their own, but as soon as all the faders come up and you can hear the full kit, suddenly everything sounds terrible, and oftentimes even lifeless.
This is why you shouldn’t focus on a single track at a time.
The drum kit is a whole instrument and it has to be mixed like one…
Every part of it interacts with another one and muting everything to focus just on the snare, for example, especially in the beginning of the process, will probably create more issues than solutions.
I like to view the drum kit as if it were a musician and not a group of individual components… this concept might help you out.
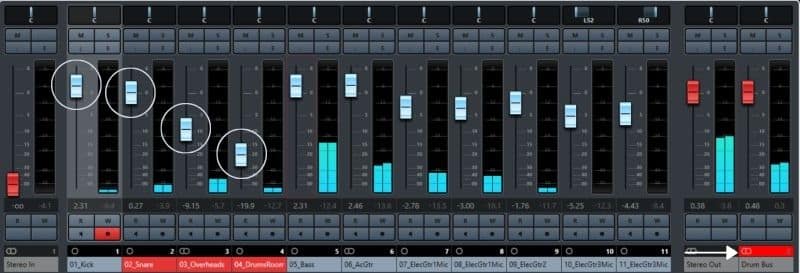
Step 3: Spend time on the Balance
If there’s one step that I really want you to take your time with, it’s this one.
As soon as you’re ready to mix your drums, you should focus on setting the levels for each part of the kit as best you can.
This concept also goes back to what I mentioned in the beginning of this article about getting the best sounding recordings you can…
If you have some great sounding drum tracks right from the start, then just setting the levels right for each individual piece of the kit should already make it sound fantastic without adding any processing whatsoever.
Focus on getting a balanced sound first, even before applying any sort of processing to individual tracks or even to the drum bus.
Just mute all the tracks and start bringing them in one by one starting with the kick drum, then the snare, then hi-hat, toms and overheads and adjust the levels until they sound like one kit.
Be careful to leave some headroom though; If everything’s around -10dB you should be set.
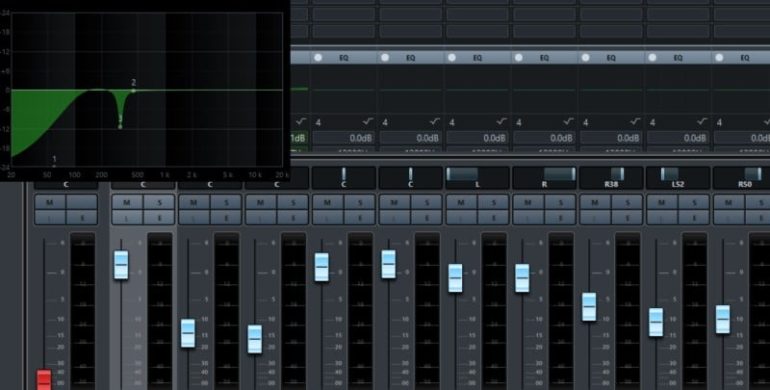
Step 4: Use EQ to tame offending frequencies
Sometimes when you start listening to your drum mix you can distinctly hear a “ringing sound” which, while not being terribly annoying, really sticks outs.
It’s not necessarily wrong for that sound to be there because it’s just a part of the drum’s character… I mean, drums tend to have some ringy sounds to them, especially on the kick, snare and toms.
If there is some ringing going on and you feel like it shouldn’t be there, then there’s a really simple way to get rid of it or at least reduce it dramatically.
One important thing to note is that those offending frequencies can be coming from just one track or even all of them.
It’s important that you find out what track is generating that annoying sound, so you know which one needs to be EQ’d.
If every track, or most at least, generate that ringing sound, then you can apply this tip I’m about to show you directly to the drum bus itself instead of just a single track.
Here’s how to do it;
Step 1: Start listening to every track in “Solo” and find out which one is generating the ringing sound.
Step 2: Use an EQ, it doesn’t need to be a premium one since any stock EQ will do fine. Now use a very narrow parametric EQ to sweep for the frequency that needs to be reduced.
All you need to do is add some dB to the EQ and start moving it from side to side.
Once you reach the offending frequency, the ringing should be much louder.
Make sure to exactly pinpoint it.
Step 3: Simply drag the EQ down as far as it goes, making sure that it’s as narrow as possible. This way you will only affect that specific frequency range and not a wider one.
Hopefully, if you’ve done this right, the ringing should now have disappeared or at least be much lower.
Note: Like I mentioned earlier, if the ringing sound can be heard on all tracks, simply apply this technique on the drum bus.
Moving on…
Step 5: EQ and Compress the Drum Bus
This is the final step of the general drum mixing process.
After this I’ll go into more detail of how to EQ, Compress, etc. the single tracks.
So, what you’re going to be doing here is apply some subtle EQ and compression to the drum bus, which will be affecting every single drum track simultaneously.
The order in which you do this isn’t important… You can choose whether you’d like to EQ or Compress first.
Note that I bolded the word Subtle… This is key.
You don’t want to go overboard with the drum bus processing…
How to EQ the Drum Bus
Generally, you’ll want to focus the mid frequencies around 400Hz and do a slight cut there.
You can use the same sweeping technique I mentioned earlier to search for the annoying frequencies you’d like to EQ down.
This will tone down those mids a bit which allows for the lows and the highs to really shine.
Next you could boost the low end just a bit depending on whether or not your mix requires it.
Lastly, I’d recommend that you use a shelf EQ to slightly boost the upper frequencies which will add some brightness to the drums.
Important note: Like I mentioned in the beginning, these are just guidelines and you should do whatever the mix requires you to do… so use your best judgement.
How to Compress the Drum Bus
Again, since processing the drum buss will apply that same processing to all the drum tracks, be sure to not go overboard with this… Just like with EQ, subtlety is king here.
You can use any stock compressor for this, no need to get too fancy.
You just want to add a bit of compression… it shouldn’t be compressing the entire time but rather when the snare and the kick are played.
Use a relatively soft knee, this way when the compressor starts to clamp down it’s not as drastic, making it sound more natural.
Remember to play around with it for a bit to find the right settings for your particular mix.
Step 6: Process Individual Tracks
The question you have to ask yourself whenever you’re about to process individual drum tracks is if it’s really necessary.
I know we all love adding loads of plugins to every single track because we want it to sound fantastic, but this generally does more harm than good.
Take a good listen to how your drums sound after following the previous steps and seriously question whether or not individual tracks need some extra processing.
In many cases you’ll find that they don’t really do, even though, more often than not, there may be small things you can do here and there to improve the overall sound.
Note: Modifying individual tracks will affect the overall balance of the drum mix, so make sure to consistently check it by increasing or lowering the volume of the track that you’re working on.
How to approach this?
There are no strict rules when it comes to processing individual tracks since it’s very dependent on every recording and also on the sound you’re going for.
However, I would suggest that you generally start with the kick drum and then move your way on to the snare, then hi-hat, toms and finally overheads.
Also, the only “strict rule” is to use a high-pass filter on every single track, even the kick drum, to get rid of any low rumble build up which can be a real issue.
Mixing the kick drum
The kick drum is the foundation of the whole kit, if it doesn’t sound right then the whole kit won’t sound like you want it to and your mix may be ruined.
It needs to sound punchy and tight and it has to be able to cut through the mix and not just sound good on its own.
The two ways to achieve this is through EQ and Compression.
How to EQ the Kick Drum
EQ’ing bad frequencies away, reducing low rumble and high-frequency bleed on the kick, like overhead bleed, are some of the things that may need to be addressed.
It feels as if you were a surgeon when doing it…
The first thing you’ll want to do, and be very careful with this, is avoid low frequency- or low rumble– build up.
Use a high-pass filter on you kick-drum, and in fact do this on every single track of your kit, to remove some of that extreme low frequency range.
With the kick drum in particular, you need to be very cautious… you don’t want to remove any of the kick’s actual frequencies since this will affect the way it sounds.
A High-pass filter around 30-40Hz shouldn’t affect your kick’s tone, but it will get rid of the unwanted low frequencies.
If you don’t feel confident doing this, then it’s ok to skip it on the kick, but not on the rest of the kit.
If your kick is sounding boomy, then this will take away a lot of the kick’s clarity, making everything muddy.
You’ll want to focus on the range between 190-250Hz and give it a slight cut which will give it a clearer overall sound.
You may recall something I mentioned when I was talking about how to EQ the drum bus…
Usually around 400Hz, ranging from around 300Hz to 600Hz, is where the “boxy” sounding frequencies are.
Boxy kick drum sounds are quite common, so giving those a slight cut may also be very helpful.
But at times you also need to boost some frequencies, especially if your kick drum is sounding a bit weak.
A slight boost between the 70-100Hz will usually help add more bass to the kick, giving it more body.
Lastly, you’ll want to take a close listen to how the beater sounds.
If you’ve ever recorded a bad sounding kick drum then you probably also know that they tend to sound “soggy”, for lack of a better word…
They don’t have any “snap” to them.
A slight boost between the 2h-4kHz should bring out that “snap” a lot more.
How to Compress the Kick Drum
While being pretty simple to do, this step varies a lot from genre to genre.
Heavy metal drums are usually compressed a lot more than something like a jazzy one…
This is why there are absolutely no rules when it comes to compressing the kick drum, or drums overall…
However, here are some basic guidelines;
Depending on the style of music and if the drummer can actually produce a consistent kick sound without extreme volume variations, I like to start with just some slight compression.
If the drummer can’t maintain a consistent kick sound, then you might want to compress a bit harder to make them even.
I like to start with a conservative ratio of about 3:1 all the way up to about 6:1.
After this you should start bringing the threshold down until it starts compressing.
How much you want to compress depends on what you feel the drum sound needs, but anywhere from -3dB to –6dB should be fine.
When it comes to the attack you should adjust it to taste.
The fast attack setting works by clamping down on the transient of the kick drum fast, meaning that it applies compression fast.
A slow attack doesn’t instantly compress the signal once it surpasses the threshold, but rather does it after a certain amount of time.
I like timing the release to the beat, meaning that I want the compressor to stop working right before the next hit.
The great thing about this is that you don’t even need to listen to do this, even though you still should, since most compressors have a reduction meter which shows you exactly when the compressor is clamping down and when it stopped doing it.
Finally, since compressing will probably lower the overall volume of the kick, I’d recommend you do this;
Bypass the compressor so you can listen to the volume of the original kick, then engage the compressor and using the gain setting try to match the volume of the original kick.
Moving on…
How to Mix the Snare Drum

The snare drum is also extremely important, just like the kick drum. If it sounds bad, your whole mix probably will too.
This means that both the kick- and the snare- drums will need a lot of attention on your part.
Let’s get straight into it…
How to EQ the Snare Drum
First of all, use a high-pass filter to get rid of all the lower frequencies that you don’t need for the snare, usually 100Hz and below, to avoid the rumble build up.
If the snare has some annoying ringing frequencies, you can try removing them by using the method I explained in Step 4 by using a parametric EQ, boosting it and sweeping from side to side to find those annoying frequencies.
Once you find them, simply remove them by lowering the gain on the EQ.
Just like with the kick drum, the snare might sound a little boxy… Here you can try cutting around the 500Hz to 700–800Hz region which should reduce that “boxiness”.
The next step is useful if you feel that the snare lacks body and thickness.
A little boost around the 150Hz-170Hz mark will make it sound thicker and fuller.
Lastly, if there’s one thing that defines a good sounding snare drum… it’s the attack.
If you feel like it’s lacking a bit, try boosting around the 2k-4kHz.
Don’t use a narrow EQ for this since you want to give a slight boost to a wider range of frequencies.
How to Compress the Snare Drum
This is a very similar process to compressing the kick drum since it doesn’t require you to do too many things.
First, I don’t like having a high ratio, so anything around 3:1 to 6:1 should be fine depending on the sound you’re going for.
Next you should start lowering the threshold until you get anywhere from -3dB to -6dB of gain reduction.
If you’re going for a fatter snare sound, then a fast attack will help. Otherwise leave it at a medium to slow setting so that you don’t lose any of the snare’s snap.
With the release setting you should configure it so that it stops compressing right before the next hit, just like you did with the kick drum.
This will allow the snare to breathe with each hit.
Lastly, use the gain knob to bring up the volume again by bypassing the compressor and comparing how it sounds to the original snare.
Note: Always unmute the rest of the kit and listen to the snare in context… don’t get too focused on just one thing.
Adding Reverb to the Snare Drum
This is the part where you can really get creative.
Adding reverb to a snare drum can completely change the way it sounds, and I mean completely.
If you want something like a big arena sound, like they used to do a lot in the late 80’s and 90’s, then reverb is the way to go.
I’d recommend you try all your reverbs out one by one and see which one-, and which settings fit.
Here it all depends on your taste and what the song needs, no real rules or guidelines to follow.
Next on the list we have…
How to mix the Hi-Hat
When it comes to the importance of each element in the kit, the hi-hat, while not being AS important as the kick- and snare- drums, is still extremely important.
It’s being played consistently throughout the whole song and it should blend in perfectly.
Again, a high-pass filter is a must, especially considering that everything below 250Hz doesn’t really do anything for the hi-hats sound.
Whenever you apply a high-pass filter make sure that it’s not affecting the hi-hats sound. If you feel like you can go over 250Hz without affecting its tone, you should do it.
The way to do it is by filtering until you can clearly hear the hi-hats sound being affected. All you need to do now is back it up a bit and that’s it!
If you want to add some brightness to it then you should give it a slight boost around the 6–7kHz area. I’d recommend you do this with a high-shelf EQ.
If your hi-hat is sounding harsh, then it might be a good idea to use a multiband compressor to deal with this.
To give the hi-hat a sense of space, width and depth, you might want to add a slight delay. You could use reverb but generally I find delay to be better.
Lastly, if you want to add warmth to the hi-hat you could add some saturation… But just slightly, otherwise it will end up sounding distorted.
How to Mix the Toms
Depending on the style of music you’re mixing, toms are going to be playing a hugely important role, or not so much…
Also, depending on the genre they tend to sound quite different…
In heavy metal, for example, they generally sound super punchy and compressed.
How to EQ the Toms
You are typically going to want to roll off the low end by using a high-pass filter.
How much you need to roll off will depend on each tom.
Just do it by filtering until you can clearly hear the tom’s sound being affected. All you need to do now is back it up a bit and that’s it.
Now, the best way to make them sound punchy is be giving them a cut around the 400Hz mark and then boosting the lower and higher ranges a bit.
You may also need to filter out some unwanted frequencies by using the method I explained in Step 4.
How to Compress the Toms
Just like with the kick and the snare, compressing the toms will make them sound amazing and punchy.
I’d recommend a 4:1 ratio with a fast attack and a medium- to slow- release.
Again, this will all depend on what the song needs, so play around with it… but this is a good place to start.
Adding Reverb to the Toms
Adding reverb is optional and it depends on the type of sound you want.
However, it’s a good idea to at least add a little reverb to create a sense of space. Just make sure not to drown them in it.
Now we can move on to the overheads…
How to mix the Overheads
The importance of overheads can’t be understated, in fact if you only had two microphones to mic up an entire drum kit, you should use overheads.
They pick up the entirety of the kit extremely well, which makes them super valuable.
Some people like mixing everything around the overheads, meaning that they adjust every other single track to fit within the overhead recording…
While some others use them mainly to accentuate the cymbals and they higher frequencies.
The issue with the first method is that you can’t really filter out the lows as much, which can create some phase issues.
Phase cancellation is something that happens a lot when recording a drum kit for the simple fact that you are using a lot of microphones…
Especially in the low end because of how big the soundwaves are.
This is why, especially for anyone who isn’t an expert at mixing drums, I’d recommend applying a high-pass filter to get rid of the low end as much as possible.
This will drastically improve any phase cancellation issues you might have been having.
To give the cymbals more presence and brightness you could use a high-shelf EQ and boost the higher frequencies a bit.
Compression can also be added, just not as much as you did with each specific part of the kit.
Just aim for about –1dB to –2dB of gain reduction which should give you a punchier sound when combined with the rest of the drum tracks.
Important note: Listen to the whole drumkit in mono without the overheads and then listen again after unmuting them.
If you have phase cancellation issues you will hear any of the other drum components sounding very thin.
Try to pinpoint which component it is and click on the “phase flip” switch on that specific track.
This might solve the problem.
I have an extensive article about mixing in mono where I also explain how to solve these phase issues, so make sure to read it as well.
And lastly…
Room Mics
It’s not that common to use room mics to record drums with, at least not in a home studio setting.
The issue with room mics is that they are extremely dependent on the acoustic treatment of the room…
Basically, if you have poor acoustics the recording will sound terrible.
However, if you have a good sounding room recording then you could add some compression to make the mix sound punchier.
Having great sounding room recordings also reduces the need for additional reverb, since you’re already getting the natural reverb of the room.
Final Recommendation
I hope I did a good job at conveying that you should focus on mixing the drumkit as a whole and not just focus on one part of the kit at a time.
You should do the same when it comes to checking how your drums sound within the entire mix.
Unmute the guitars, vocals, bass, etc. and listen to how they sit in the mix and decide whether or not some adjustments are required.
Summary
To properly mix drums you need to;
- Route every drum track to a Drum Bus.
- Not focus too much on individual tracks at first.
- Focus on the Balance.
- Use EQ to tame Ringing and Offending frequencies.
- EQ and Compress the Drum Bus.
- Process individual tracks: EQ, Compress, add reverb, delay and saturation when necessary.
- Check the mix in mono for phase cancellation.
- Listen to how the drums sound within the entire mix.
Conclusion
I know, it’s a long article… but I hope you made it to the end and that you found all of this information useful.
These are all tips for new- and even seasoned- mixers which should add some value.
If you’re just learning how to mix, then I’d advise you to stick to the first 5 steps where you only focus on mixing the drums as a whole.
You’ll be amazed at how good you can make them sound with just some general bus processing and balance.
After learning how to do this you can definitely start getting into more detail and take a closer look at every single track.
I hope this information was useful…
Have a fantastic day!