
Last updated on January 29th, 2024 at 04:25 pm
Auto-tuning vocals is an important aspect of music production, and FL Studio offers a variety of plugins to help with this. In this article, we will be discussing the two stock plugins included in FL Studio for vocal tuning: NewTone and Pitcher.
I will go over the similarities and differences between the two plugins, as well as their specific controls and features. I will also provide a guide on how to use these plugins for pitch correction and achieving the desired sound.
Let’s get started!
Included FL Studio Plugins that allow us to AutoTune vocals
The two stock plugins that allow for vocal tuning are NewTone and Pitcher:
NewTone is very similar to Melodyne and is meant for pitch correction, allowing you to edit notes in a piano roll, tuning each syllable to your desired pitch, and basically offers in-depth control over every single sound.
Pitcher acts more like your standard live autotune since it can correct vocals as they are coming in, but it can also be used on already-recorded tracks. It’s also worth noting that Pitcher is generally used more as an effect, similar to Auto-Tune (think Charlie Puth, I’m Blue by Eiffel 65, etc.).
Note: There are plenty of free pitch-correction and Auto-Tune plugins out there that you can also get and I will be mentioning some of them down below and linking to a post I wrote about the best ones.
Now, let’s get into the actual guide on how to use both NewTone and Pitcher:
How to Pitch-Correct with NewTone
To get started, you first need to load a new instance of NewTone, and there are two ways of going about it:
- To load a new instance of NewTone go to your Mixer (F9), click on any insert slot of a track and load NewTone. Now you can drag any audio file you want into it.
- Another way of opening NewTone is by double-clicking on any audio file on the playlist and then right-clicking on the waveform and selecting “Edit in Pitch Corrector”.
Let’s quickly go over the different controls that NewTone has to offer since it’s important to familiarize yourself with them in order to understand the plugin’s workflow:
Understanding NewTone’s interface
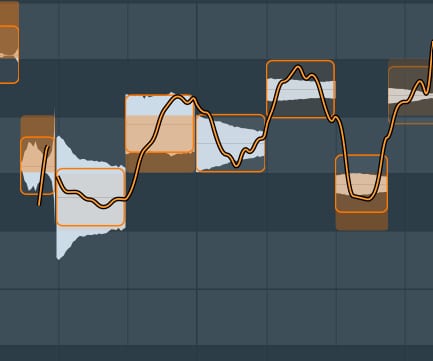
Waveforms: Once you open up the audio file in NewTone you will see the different notes broken up into distinct sections displayed on top of a piano roll, usually, each word shows up as a separate waveform, that shows you exactly the pitch of the notes and it’s quite easy to see if they are in tune or out of tune. These are represented as Lightgrey waveforms.
Orange Line: The squiggly orange line going through the waveforms represents the exact pitch throughout each note and how the pitch moves from one word to the next.
Orange Horizontal Lines: These lines show you where the center of the pitch is and the orange rectangle shows where the pitch actually “should” be, making it easy to see how in- or out of tune that specific vocal part is.
NewTone Controls
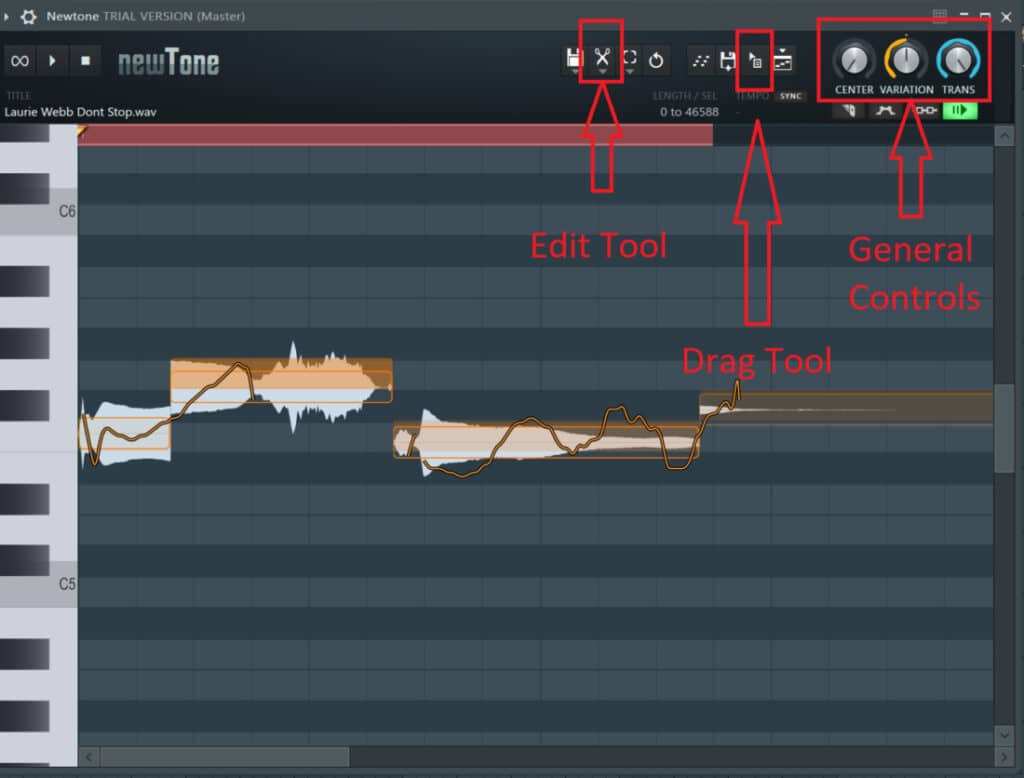
While you could certainly do everything manually, and generally you should, NewTone allows you to control general parameters with three knobs to pitch-correct the entire audio file quickly. These are “Center“, “Variation“, and “Trans“. Let’s take a quick look at each of them:
Center: Adjusts how on-grid, or how “in pitch”, the notes are. Turning it all the way to the left leaves the file exactly as it was recorded, turning it to the right makes it as “in pitch” as possible.
Variation: This knob controls how much variation there is in the pitch within each of the recorded notes, or words. This is represented by the squiggly orange line I previously mentioned. Generally speaking, this affects the “vibrato of a note”: Turning it all the way to the left makes it sound extremely flat without any vibrato, and turning it to the right adds even more vibrato to the original performance.
Trans: This adjusts the transition time between each note. All the way to the right makes the transitions almost instant which results in a robotic sound.
Advanced Editing Mode
The advanced Editing mode can be accessed in two different ways:
- Double-click on any note in NewTone.
- Click on the icon that looks like the upper half of a cogwheel.
Enabling the advanced editing mode opens up a whole new set of controls that you can use to adjust every specific note (very in-depth).
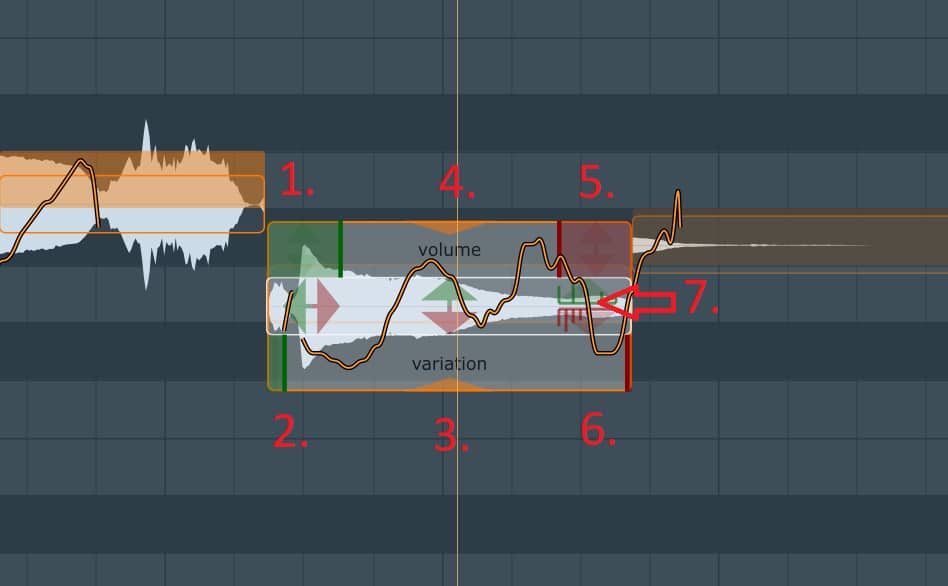
You can click on any of the sections shown in the image above and drag them up or down to control specific parameters:
- Fade in Gain: Controls the volume at the start of the note.
- Ramp In: Controls the pitch at the beginning of the note.
- Variation: Controls the pitch variation between the ramp in and ramp out sections.
- Volume: Controls the volume between the Fade in Gain and Fade out Gain Sections.
- Fade out Gain: Controls the volume at the end of the note.
- Ramp Out: Controls the pitch at the end of the note.
- Advanced Formant Shift: Controls how masculine or feminine the audio sounds.
Advanced Vibrato Editing
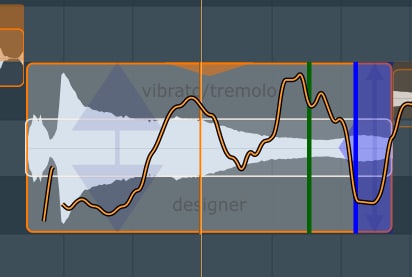
In addition to the controls I just mentioned, you have access to the “Advanced Edit Vibrato” mode by clicking on the Edit Tool’s dropdown menu which basically gives you a bit more in-depth control over the vibrato than the variation tool.
Recommendations when using NewTone
Here are some of the things I would recommend doing every time you reach for NewTone (especially if you’re just learning how to use it):
Select a Scale
I would highly advise selecting a scale so that NewTone properly understands what notes it should be correcting to. This is done by clicking on the dropdown menu of the edit tool (Small Scissors), going to “Scale” and then selecting the right one.
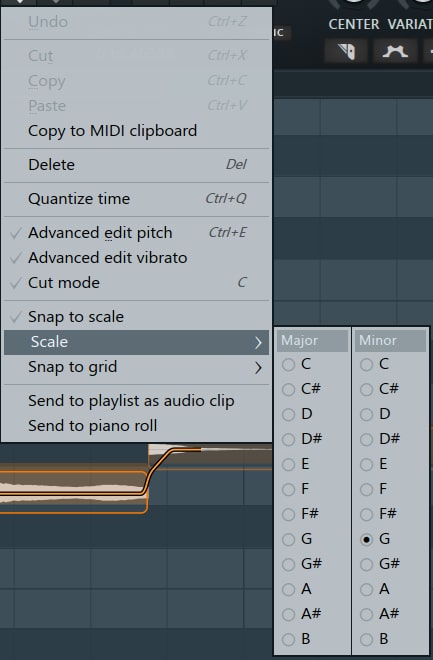
Selecting the right scale makes the use of the general controls (Center, Variation, and Trans) more effective.
Start with the Basics
Start out by adjusting the basic three controls that NewTone offers, Center, Variation, and Trans, and see what results you get.
The importance of doing this is that you may end up investing too much time into adjusting every little detail without realizing that maybe the track now sounds great on its own, but no longer fits right in the mix.
Cut the notes multiple times
Use the “Cut” tool cut up the different notes into multiple parts. You may notice that the different parts you cut now move to a slightly different part of the grid, but this won’t affect the sound.
The whole point of doing this is that you get more granular control over that specific note since you can adjust the ramp in and ramp out, Fade in Gain and Fade out Gain, variation, vibrato, etc. for every single part.
This, however, is more advanced and may take up a lot of your time, but the results are generally better.
Dragging the Audio File back into the Playlist
Once you have the audio sounding the way you want it to, simply click on the “Drag Selection” button and drag the file back into the playlist.
Of course, you could also save/export the file by clicking on the save icon.
Create a MIDI Score with NewTone
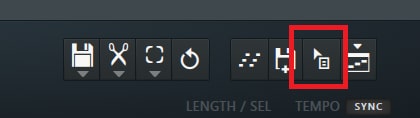
With NewTone, you can convert audio into MIDI, allowing you to use the composition of your audio file in other instruments. This is especially useful when trying to figure out the key of a sample, or even which bass notes you want to play. You can do this by clicking the MIDI score button (see image below).

This will input the MIDI information into your sampler in the channel rack, and it will copy the MIDI data to your clipboard as well.
To input the MIDI data directly to a specific instrument or sound, select the desired sound in the channel rack, there will be a green box indicating that you’ve selected something. Then click the MIDI score button, and your data will be sent directly to your instrument from NewTone.
How to AutoTune with Pitcher

Pitcher is a real-time pitch-correction, manipulation & harmonization plugin that can be used to correct and harmonize notes via MIDI control.
It’s worth noting that Pitcher is mainly intended to be used as an Effect, similar to Auto-Tune, and not so much more in-depth and subtle pitch correction.
There are four primary modes for which you can use this plugin:
- MIDI: When enabled, makes the pitch react to the notes being sent to Pitcher via MIDI.
- Automatic mode is automatically enabled when MIDI mode is disabled and Pitcher will do all the work for you.
- Octave: Similar to MIDI but can add a second octave if it’s found in the MIDI file.
- Harmonizing mode allows you to input MIDI and Pitcher will correct the incoming signal to the key you’re pressing.
How to use Pitcher
- Open the Mixer (F9) and load an instance of Pitcher into the required track.
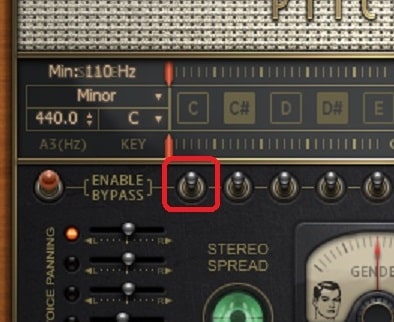
- Set the corresponding scale (Major, Miner, Pentatonic, All) and then select the Key of the scale. This will tell Pitcher what notes it should snap to.
Note: If there’s a note in the scale that Pitcher should not be reacting to, then click on the little switch below that note to disable it.
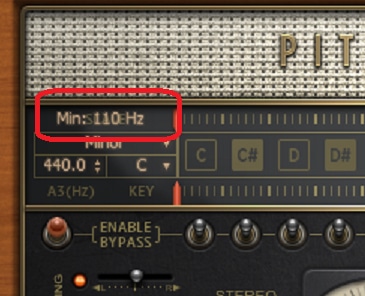
- Recommendation: Where it says “Min: 110Hz“, you can use this section to allow Pitcher to work better when tuning male or female vocals: Use 80Hz and below for male vocals, and 110Hz and up for female vocals.
- Use the Speed and Fine Tune Controls to determine how fast Pitcher snaps to a note also to slightly shift the pitch up or down.
- Use the Formant Shift control to adjust how “Masculine” or “Femenine” the audio sounds.
- If you have created a piano roll with the MIDI notes that you want to use to pitch the Audio, click on MIDI in Pitcher, select the corresponding port, and then use the MIDI Out plugin to feed those notes to Pitcher.
Use Pitcher to create Harmonies
As I previously mentioned, Pitcher comes with the Harmonizing mode which feeds off of the Notes of a Piano roll to both pitch the vocals and also add up to three additional harmonies (4 in total).
Click the harmonize button and the MIDI button to enable this mode.
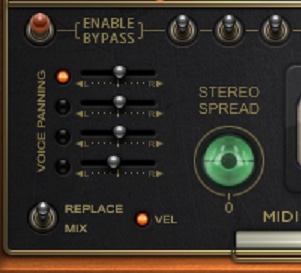
When enabling the Harmonize Mode, you get control over the panning of each voice
Octave Mode
Similar to the Harmonize Mode, Pitcher can use the MIDI information from a Piano roll to add an octave to one of the notes. The way it works is by detecting if there’s an additional MIDI note in the Piano roll: If there is, Pitcher will play that note, if there isn’t it will only reproduce the original note.
When to use NewTone or Pitcher
If you are looking to edit notes in a piano roll and have in-depth control over every single sound, then NewTone is the plugin for you. It is similar to Melodyne and is meant for pitch correction, allowing you to fine-tune each syllable to your desired pitch.
If you are looking for live autotune, or an effect similar to Auto-Tune, then Pitcher is the plugin for you. It can correct vocals as they are coming in, but it can also be used on already-recorded tracks. Pitcher is generally used more as an effect, similar to Auto-Tune.
It’s worth noting that there are plenty of free pitch-correction and Auto-Tune plugins available that you can use in place of NewTone and Pitcher. It’s important to familiarize yourself with the interface and controls of the plugin you choose in order to understand its workflow and achieve the desired result.
Other Alternatives
There are multiple Pitch-correction and Auto-Tune-style plugins out there, both Free and Paid, that you can use.
If you already own a version of FL Studio that comes with Pitcher and NewTone included, then I wouldn’t recommend using anything different unless you’re willing to fork out some cash, since these built-in tools are much better than any of the free alternatives.
However, if you can only use both of these plugins in their trial version, then you should absolutely download some of the free ones.
Investing in Melodyne and Auto-Tune is always worth it if you re a dedicated music producer (especially Auto-Tune since it is much more powerful than Pitcher).
Of the Free ones, I would recommend Graillon2 and MAutoPitch since they are powerful and easy to use.
The paid Alternatives would mainly be Auto-Tune and Melodyne, here’s where you can get them:
Get Auto-Tune here:
Get Melodyne Here:
Summary
So, wrapping up, I would suggest using NewTone for in-depth vocal pitch-correction, especially when you want it to go unnoticed, and use Pitcher as an effect (similar to how artists like Charlie Puth, etc. use it).
I hope this information was useful!
Have a great day!