Last updated on November 1st, 2023 at 12:39 pm
Generally, plugins already have a default folder where they get installed in and most DAWs will automatically scan those folders and add those plugins to the ones you can use.
However, sometimes new plugins don’t get installed into those default folders for a reason or another and you need to let Cubase know where it can find them.
In this article, I will show you how to install plugins, what those default folders are, how to tell Cubase where some additional plugins might be installed, and how to re-scan those folders to update the plugin list available for use in Cubase.
How to install VST plugins for Cubase in Windows
First of all, it is important to understand that not all VST plugins are being installed into the same folder. The installation path of a plugin depends on several factors:
- VST format: VST2 or VST3?
- Operating system
- Manufacturer
- 32-bit or 64-bit architecture
- Customization
To install a new plugin you need to:
To install a new plugin you need to execute the installation file, select the installation path (I’d recommend leaving it as is so that it gets installed into the default folders) and that’s it!
If Cubase was already open then I’d recommend closing and opening it back up again since it won’t detect the new plugins as soon as they are installed unless you do so (or you could re-scan for new plugins, but more on this later in the post).
If you’re looking for plugins to download, both free and paid, check out this article I wrote about the best 600+ VST plugins.
Where do VST3 Plugins get installed in Windows (Plugin Path)?
The VST3 format has a dedicated installation path all VST3 plugins must comply with. All your VST3 plugins should be installed here:
| Format | Path | Extension |
| VST3 | C:\Program Files\Common Files\VST3 32-bit VST3 plugins on 64-bit Windows: C:\Program Files (x86)\Common Files\VST3 | .vst3 |
Where do VST2 Plugins get installed in Windows (Plugin Path)?
As the VST2 standard does not know a dedicated installation folder, VST2 plugin installers usually let the user select an installation path. But VST2 plugins can also have a fixed installation path predefined by the manufacturer. In this case, you may want to check the plugin’s documentation.
The original installation path used when VST had been introduced in 1996 is C:\Program Files\Steinberg\VSTPlugins.
Since then, many different plugin manufacturers used many different folders. In general, it’s not easy for users to keep track of their VST2 plugins, which is why VST plugins installations often are all over the place even on well-maintained Windows systems.
To prevent a plugin mess, it is recommended to decide on a single installation folder for all VST2 plugins and stick with it as far as possible.
Since it corresponds to the defined VST3 plugin folder, this path is a good choice for all VST2 plugins:
- C:\Program Files\Common Files\VST2
- 32-bit plugins on 64-bit Windows: C:\Program Files (x86)\Common Files\VST2
Any other folder your VST host application is scanning during startup by default is also suitable. But, to keep plugin installations independent from a specific VST host release, never install plugins into the program folder of the VST host application or any other program since this may cause problems in the future if this application is removed!
The following chart includes other common VST2 paths. Depending on the program version, these folders are the default VST2 folders in Cubase as well as Nuendo.
| Format | Path | Extension |
| VST2 | C:\Program Files\VSTPlugins C:\Program Files\Steinberg\VSTPlugins C:\Program Files\Common Files\VST2 C:\Program Files\Common Files\Steinberg\VST2 32-bit plugins on 64-bit Windows: C:\Program Files (x86)\Steinberg\VstPlugins | .dll |
Once you installed the plugins in their respective folder, you will need Cubase to re-scan those folders to include any new ones you might have installed.
Usually, closing and re-opening Cubase already does this for you, however, here’s how you can scan for new plugins:
Re-scanning plugins in Cubase (Windows)
- Go to the Devices menu and select Plugin Manager
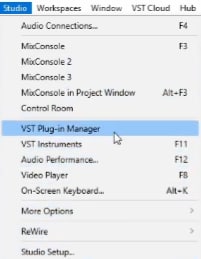
- Click the re-scan button (if the plugin doesn’t appear on the list, follow the next steps).
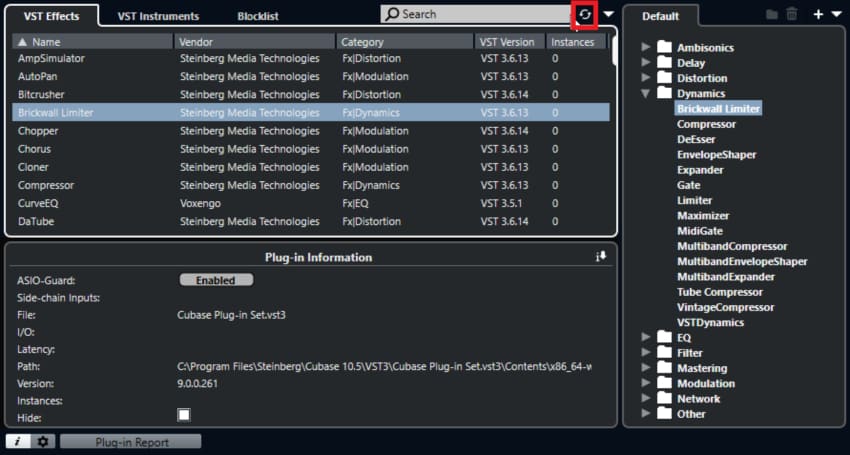
- Click on the cog icon at the bottom left of the window.
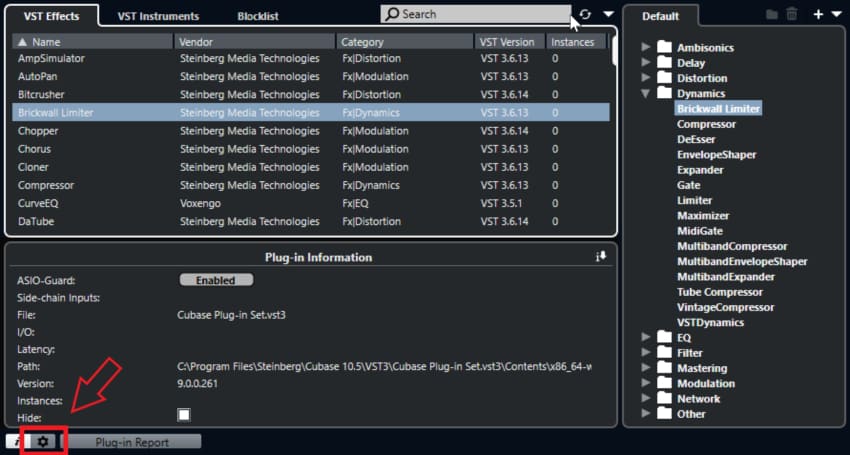
- If the plugin was installed in a location that is not being shown in the Plugin Path settings, click on the “Plus” icon and add the folder (path) where the plugin is installed.
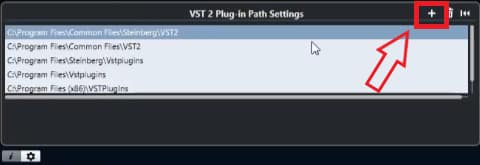
- Click on the re-scan button again and the plugin should appear on the list.
After going through all of these steps, Cubase should have located the newly installed Plugins and you should be able to use them.
How to install VST plugins for Cubase in Mac
Just like installing plugins in Windows, it is important to understand that not all VST plugins are being installed into the same folder.
The installation path of a plugin depends on several factors, however, on Mac OS X/macOS many of these possibilities do not apply since 32-bit and 64-bit plugins share the same location and manufacturers usually stick with the default paths defined by Apple and the VST3 standard.
These factors are:
- VST format: VST2 or VST3?
- Operating system
- Manufacturer
- 32-bit or 64-bit architecture
- Customization
Where do Plugins get installed in MacOS (Plugin Path)?
While the newer VST3 format has a dedicated installation path all VST3 plugins must comply with, the VST2 standard doesn’t have an obligatory folder.
However, on Apple systems there is a defined plugin folder within the system’s folder structure since the first version of Mac OS X. All VST plugin installers for Mac are using these folders:
| Format | Path | Extension |
| VST2 | Library/Audio/Plugins/VST Rarely used: Users/your username/Library/Audio/Plugins/VST | .vst |
| VST3 | Library/Audio/Plugins/VST3 Rarely used: Users/your username/Library/Audio/Plugins/VST3 | .vst3 |
The ‘Plugins’ directories contain both a VST and a VST3 folder as well as folders for other plugin formats. In most cases, plugins installed correctly into these folders should be available in compatible host applications. However, in some VST hosts, scanning of VST and VST3 folders must be enabled in the VST host’s settings.
Custom plugin paths in MacOS
If a plugin, for whatever reason, has been installed to a different folder, like maybe you specified a different folder, the VST host application, Cubase in this case, needs to be told where to look for it.
In Cubase, as well as Nuendo, the list of monitored VST2 folders can be managed here:
| Cubase 9.5/Nuendo 10 or later | Studio ▸ VST Plugin Manager ▸ VST 2 Plugin Paths Settings (click on gear symbol) |
| Cubase 8/Nuendo 7 or later | Devices ▸ Plugin Manager ▸ Plugin Manager Settings (click on gear symbol) |
| older Cubase/Nuendo versions | Devices ▸ Plugin Information ▸ VST Plugins ▸ VST 2.x Plugin Paths |
Note: You will need to select the plugin path as well and then hit the re-scan button. Here’s a list showing you how to do it from start to finish:
Re-scanning plugins in Cubase (Mac)
- Go to the Devices menu and select Plugin Manager.
- Click the re-scan button (if the plugin doesn’t appear on the list, follow the next steps).
- Click on the cog icon at the bottom left of the window.
- If the plugin was installed in a location that is not being shown in the Plugin Path settings, click on the “Plus” icon and add the folder (path) where the plugin is installed.
- Click on the re-scan button again and the plugin should appear on the list.
After going through all of these steps, Cubase should have located the newly installed Plugins and you should be able to use them.
Conclusion
In short, installing a plugin is as simple as launching the executable file and selecting the folder where it needs to be installed. Then you need to re-scan for new plugins by going to the Devices menu and select Plugin Manager.
If the plugin doesn’t appear on the list after you hit rescan, click on the “cog” icon and then on the “plus” icon, insert the folder path where the plugin is installed, and then re-scan again.
I hope this information was useful!
Have a great day!