Last updated on February 12th, 2021 at 01:24 pm
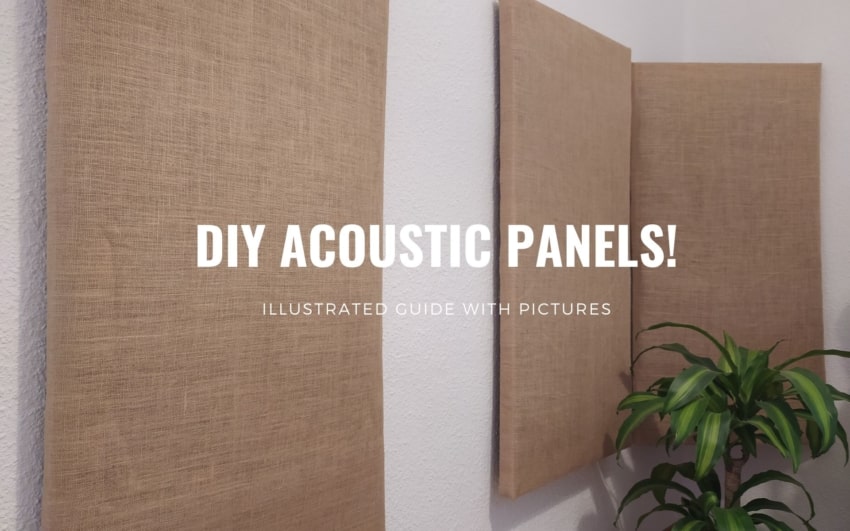
If you’ve ever done a quick search for acoustic panels, and I mean panels, not just acoustic foam, then you probably know that every panel costs roughly $100.
Luckily, you can make your own at about 1/8th the cost; all you will need are some tools, materials and about 2-8 hours of time depending on how many you want to make.
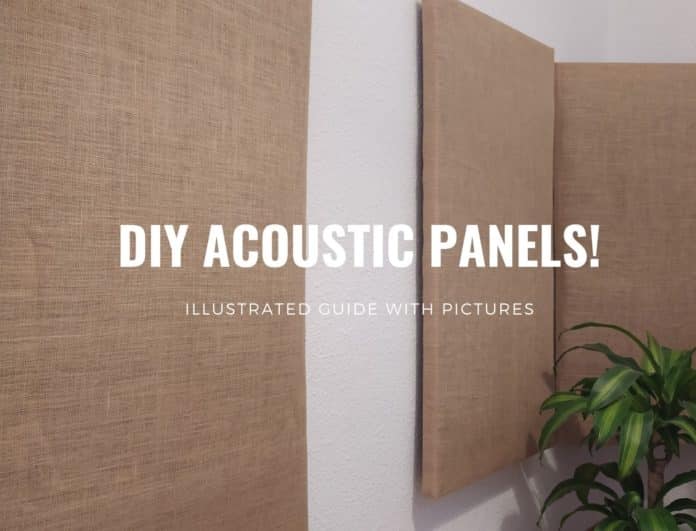
I made 9 panels using rockwool as the insulation and they turned out better than I hoped; the room’s acoustics changed dramatically.
In this post I will teach you how to build the same acoustic panels I built, how to hang them from the walls as well as the corners of the room, since this can be tricky.
I will also include before- and after audio files so you can actually hear the difference these panels made to my room.
Let’s get started.
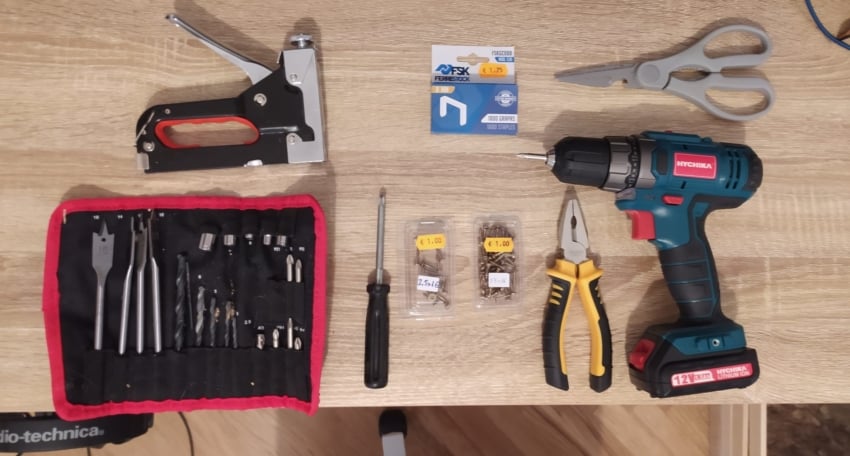
The Tools You Will Need
Note: If you don’t have any of these tools then simply click on the links which will take you to Amazon to that specific product.
- Drill (With Screwdriver bits)
- Screwdriver (if no screwdriver bits are available for the drill)
- Measuring Tape
- Wood Screws (length will depend on the thickness of the wood)
- Screws and anchors
- Saw (If you need to cut the wood yourself)
- Stapler
- Staples: I bought 1000.
- Scissors
The Materials I Used
- 4×1 pieces of wood: I used 18 pieces of 125cm (49”), and 18 pieces of 62cm (24”) for nine panels in total.
- Fabric: Enough to cover all the panels; I got 8 meters by 1.50 meters, or 26 feet by 5 feet.
- Rockwool: This is the insulation material; I bought 9 pieces of 135x60cm, or 53” by 23”, and 5cm , or 2”, of thickness.
- Elastic Sewing Bands: 23 meters, or 75 feet.
And as far as time goes, it took me about 2 hours to make the frames, 4 hours to staple the fabric to the frames and half an hour, or slightly more, to insert the insulation and to fasten it to the frames using the elastic bands.
Then about two more hours to properly hang them.
Characteristics of the Fabric
The fabric needs to be breathable, if it’s not then it will not let the sound through and act as a reflector instead of letting the rockwool absorb it.
How do you know if the fabric is indeed breathable?
If it’s got hole that you can see through, then that’s already an extremely breathable fabric.
However, you can simply put your hand behind it and blow through it; if you can feel the air on your hand, then this means that air can go through it, and therefore sound will as well, making it ideal for the panels.
Acoustic Panels Cost
- Rockwool: €26.18 + €16.52 for shipping.
- Wood for the Frames: €55.30.
- Fabric: €22.40 + €4.6 for shipping.
- L-Brackets: €8.4
- Screws: €2.50
- Elastic Sewing Bands: €19.80.
Total
- Total Without Shipping: €134.58 = €14.95/panel.
- Total with Shipping: €155.70 = €17.30/panel.
In US dollars this would end up being $16.35/panel without shipping, and $19/panel with shipping.
Of course, this will highly vary on the deals you’re able to get; if you manage to save on the wood and fabric, you should be able to lower the price even by 30%.
Building the Frames
Now, this is definitely a simple enough step, but there are some things to take into consideration if you want to do it right.
First, elevate the pieces of wood by placing them on top of one or two extra pieces of the 4×1. This will make drilling the holes much easier since the drill won’t come in contact with the floor.
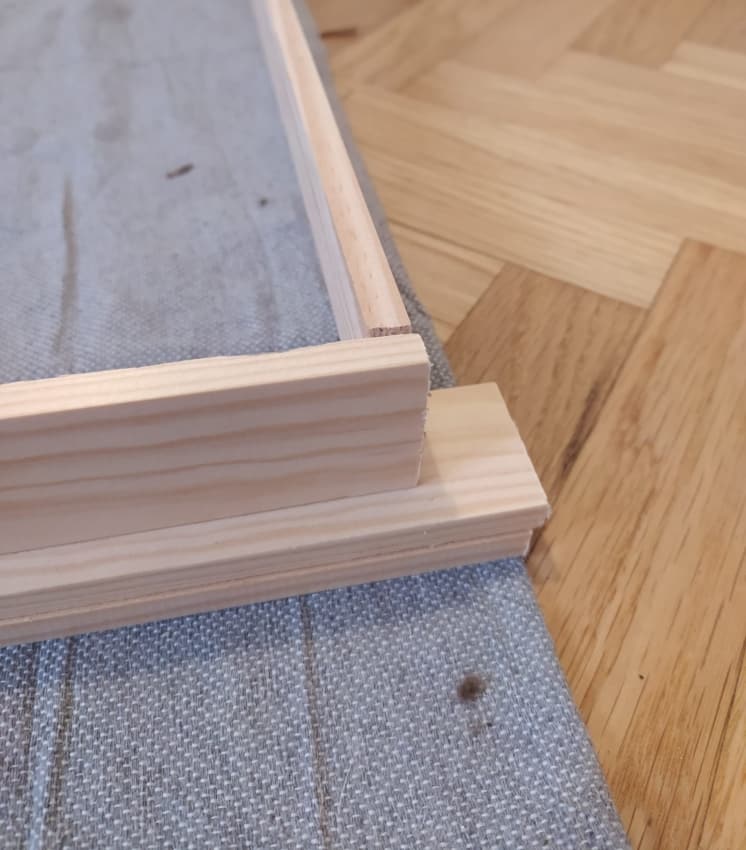
Of course, if you have a work table, then all the better.
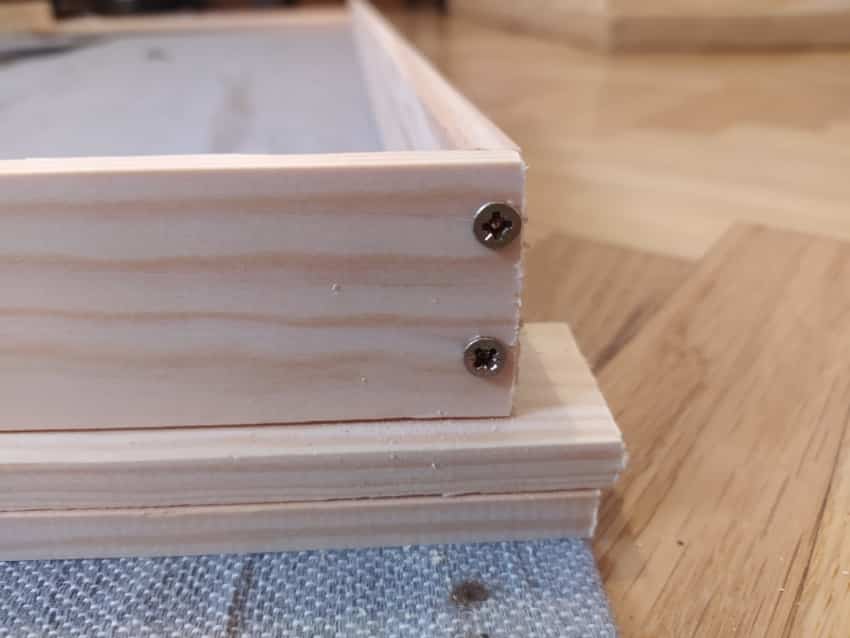
Second, drill holes on the on the top and bottom of each piece like I show in this image; if you don’t do this and just screw them together, the wood will probably crack open.
Also, make sure not to drill too close to the edge of the wood, otherwise as soon as you get the screws in, it will crack wide open.
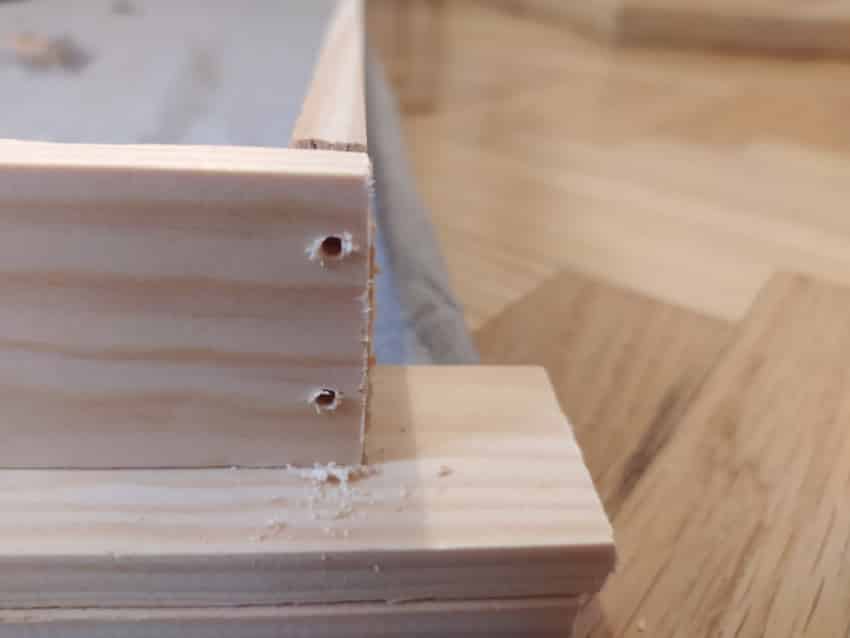
After drilling the holes on one side of the panel, you can then move on to screwing in the screws.
Now, don’t screw them in too hard, otherwise the boards can crack (which happened to me at one point).
Now that one side of the frame is built, you can move on to the other side.
I like drilling all the holes on one side and adding the screws before moving on to the other side for the simple fact that I end up moving around a little less, and when you build 9 panels, like I did, you want to be as efficient as possible.
Build all the frames first, and then move on to the next step.
Attaching the Fabric to the Frames
This is by far the worst part of building these frames, since you need to staple the fabric to them, and not only does this take a lot of time, but my stapler did jam many times, which meant having to take the staples out, putting them back in, etc., and this definitely adds a lot of time to the whole process.
Additionally, after the first two or three panels, your hand will start getting tired of using the stapler, so make sure to take some rest here and there.
Now, here’s how you should go about attaching the fabric to the frames:
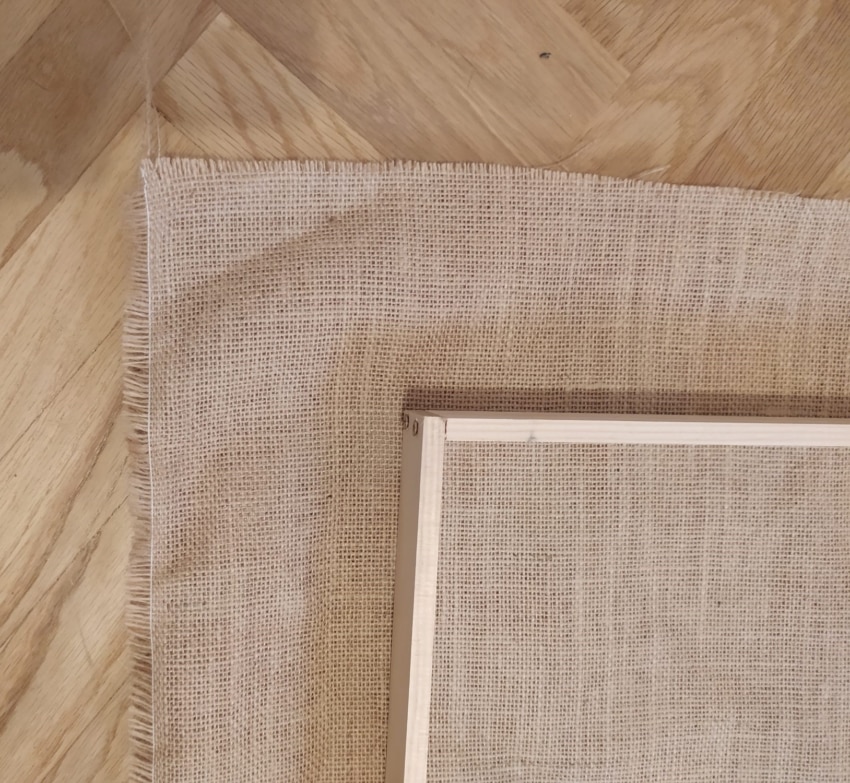
Start in the center of the longer side of the frame and get a couple staples in, then do this on the opposite side and make sure that the fabric is nice and tight.
Note: Don’t tighten it up too much or the wood might bend; this will depend on the kind of wood you purchased, of course, but take that into account.
Once you’re about 15cm, or 6 inches, away from the corners, stop stapling, since this is where it gets a bit tricky because you will have to deal with the corners.
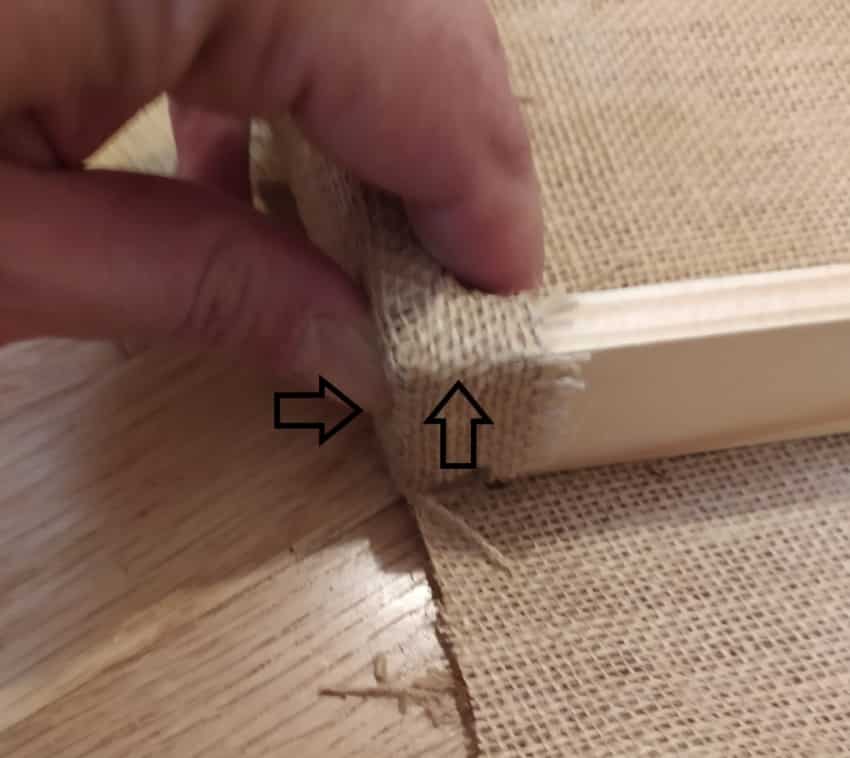
Dealing with the Corners of the Panel
When folding the fabric around the frame’s corners, if you don’t want there to be too much excess fabric, then you’ll have to remove a bit of it in a specific way and then fold- and staple it to the frame.
If you don’t care too much about creating perfect-looking corners, then don’t follow these steps.
The way I went about it was by cutting off some fabric like I show in this picture:
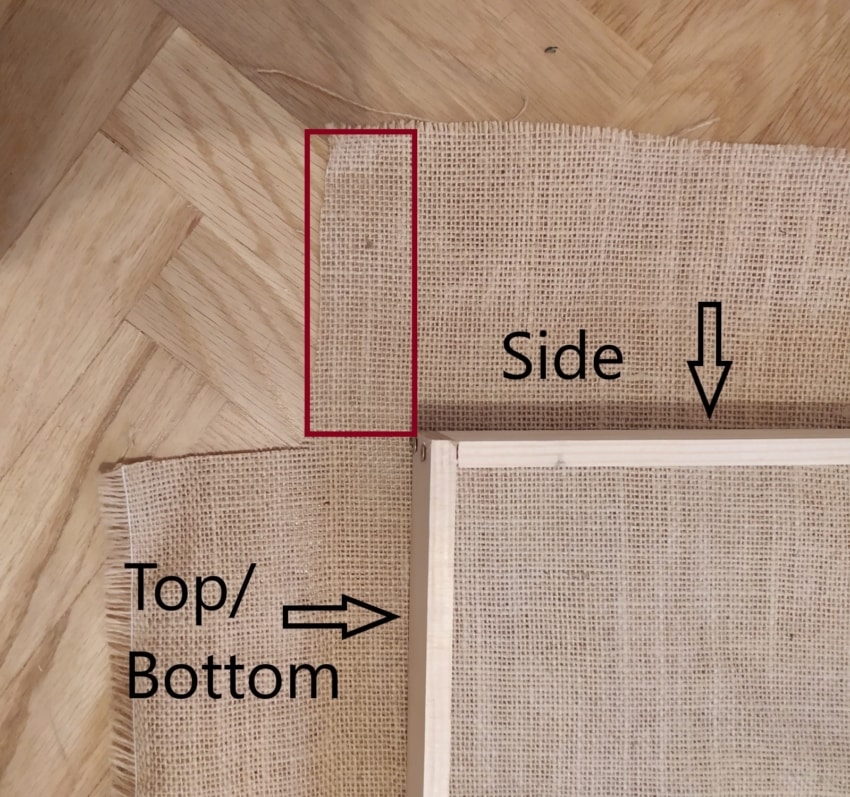
First: Cut in a straight line from the top of the panel straight down towards the frame; Basically, just cut in a straight line following the side of the frame.
Second: Do the same for the side of the panel but leave a bit of fabric at the top, shown in the red rectangle, which will come in handy once you’ll have to do the fold.
Now, you definitely could fold it like this, or you could do what I did, which was to cut a little deeper on the top until I reached the frame.
This will make the fold even easier and more precise.
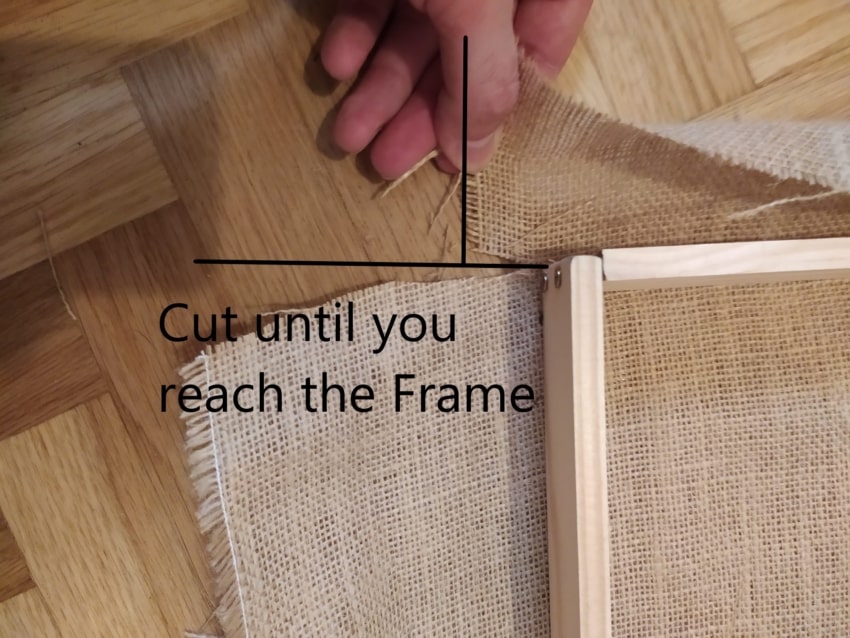
Now it’s time to fold the fabric over the corners and staple it to the frame; here’s how to do it:
Remember that little excess fabric that I showed in the red rectangle in the previous picture? Well, fold that one in over the top of the panel, and then over the frame and into the panel itself.
Next, grab the fabric that’s on the top side of the panel, fold it over the frame and make sure that it lines up correctly with the outer edge of the frame.
Now staple that to the frame like I show in this image:
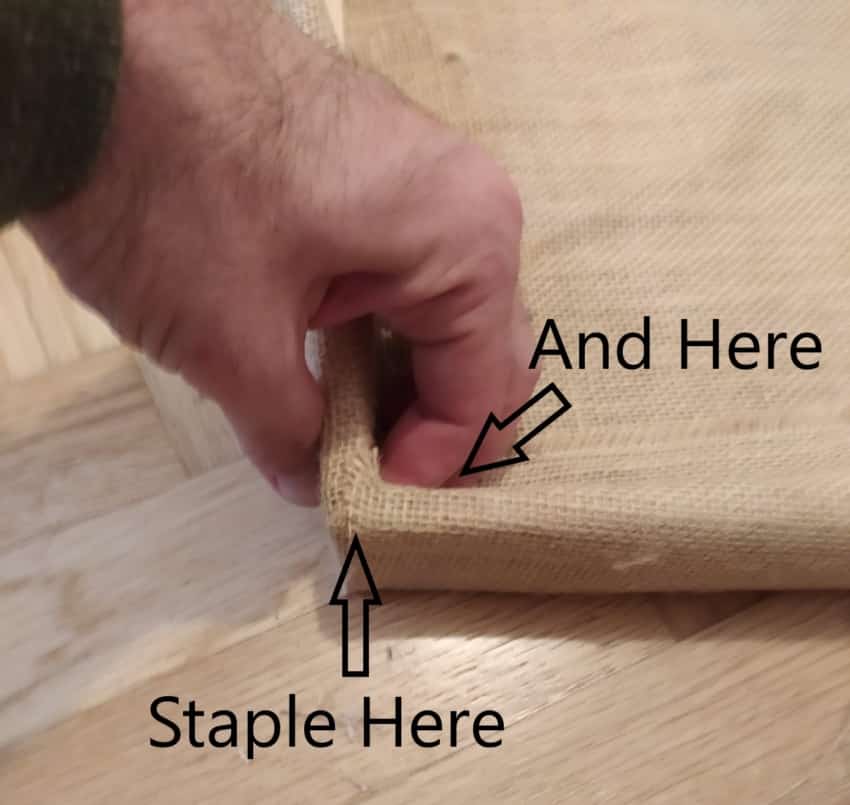
Make absolutely sure to staple the fabric you used for the corners to the inside of the frame, since this will properly hold it in place and make the corners look good.
The interesting thing about doing the corners this way is that even if you don’t cut the fabric in an extremely precise way, they still come out looking great!
Inserting the Insulation
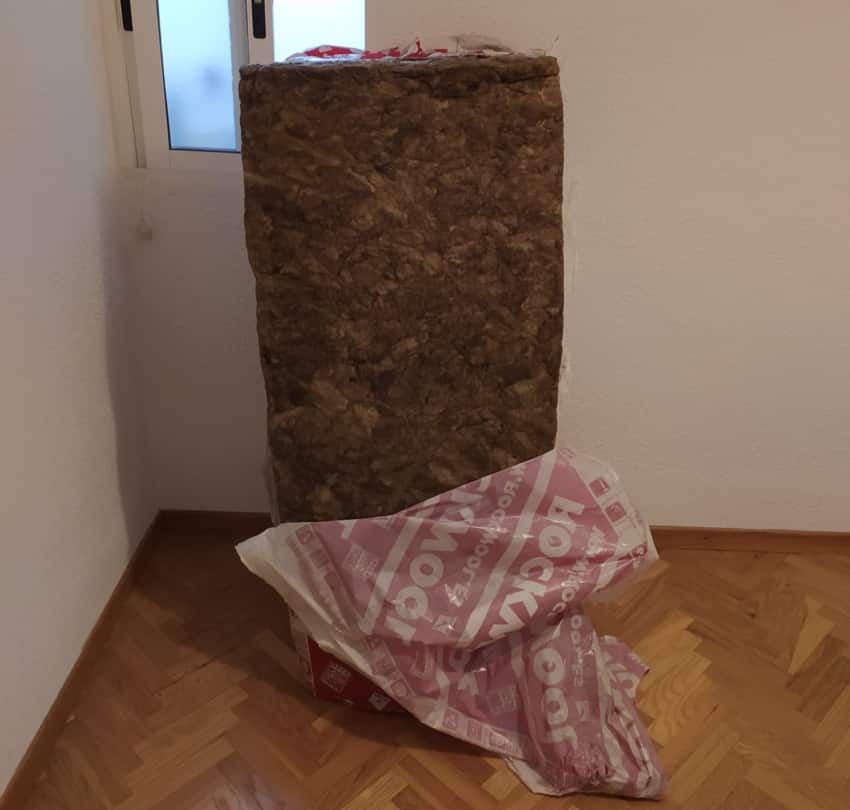
Like I mentioned, I used RockWool for these panels.
I know that there are several other alternatives out there, but I decided to go with RockWool because it is very affordable and also safe, contrary to fiberglass -another popular sound absorber- which isn’t that safe.
Still, no matter what insulation material you choose, the process is exactly the same:
Since the frames should be of the same size as the material you got, you can simply place them inside, and that’s it.
In my case, the frames where a bit shorter than the RockWool because I wasn’t able to find large enough pieces of wood, so I had to press it in.
But since RockWool is very malleable, it took me about 15 seconds to make it fit, even though it was slightly bigger.
However, if you’re having trouble with this, then you could always just cut off the excess insulation to make it fit snuggly.
Fastening the Insulation inside the Panel
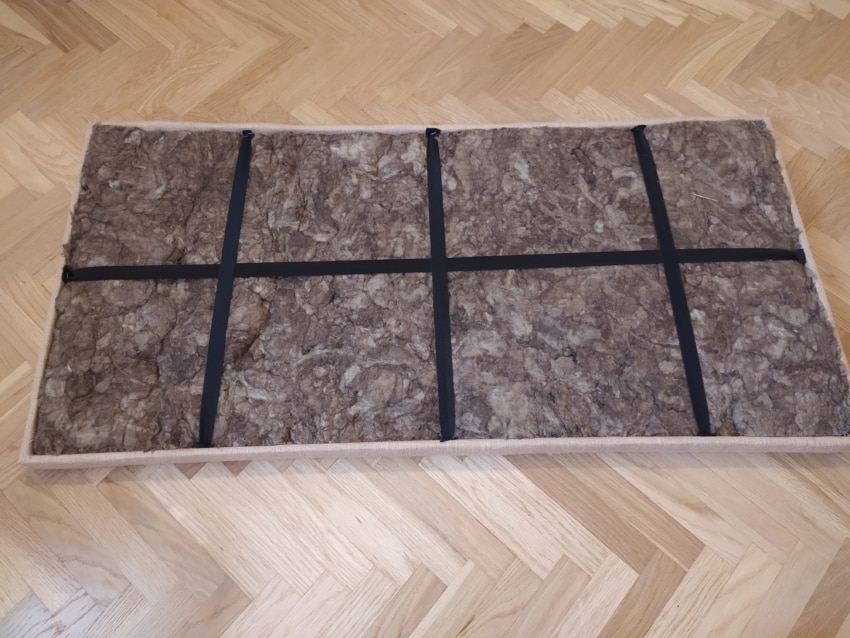
Now, I know that there are loads of ways of achieving this, and most of them are probably better than the method I used… But are they cheaper? Hell no!
The whole point of making these panels was get good sound absorption at the lowest price possible, and at €15 a panel, I think that they are great cost-effective wise.
I decided to purchase elastic sewing bands and use those to keep the rockwool from falling out the back of a panel.
All I did was staple three strips of it horizontally across the panel, and one longer strip from top to bottom.
And that’s it!
However, another alternative, which is better but also a bit more expensive, is to staple some cheap fabric to the back of the panel, covering it up in its entirety.
This will keep the RockWool inside the panels no matter what happens.
How to Hang Acoustic Panels
I decided to use two L-brackets on top of the panels to hang them; however, you can hang them like picture frames, or any other way you’d like.
The reason I decided to go for the two L-bracket method was simply because I wanted to make absolutely certain that there was cero chance of them falling to the ground if I ever bumped against them.
At first, I thought I would use one L-Bracket on the top of the panel and one on the bottom, but since they are so light, I decided to just hang them using two brackets on top.
Also, and this is important, if you want better insulation, then you should create an airgap between the panels and the wall.
This is why I bought large enough L-Brackets, so that there would end up being about 2 cm of a gap behind the panels.
In order to hang them properly, I used a small coffee table as an “assistant” to make sure all my panels were set up at the exact same height.
I placed the table agaisnt the wall where I wanted to hang the panel, stood the panel on top of it and then measured how far away from the corner it was, so I could make sure to hang the one on the opposite side accordingly.
Then I just marked the spot where the L-Brackets should go using a pencil, and that’s it! Time to drill the holes and screw the L-Brackets to the wall.

The last part was easy; Using the same coffee table, I stood the panel against the wall again and ran a screw through the brackets into the wood, making sure I didn’t crack the wood, of course.
Again, make sure to leave at least a small airgap between the panel and the wall.
Now for the “fun” part…
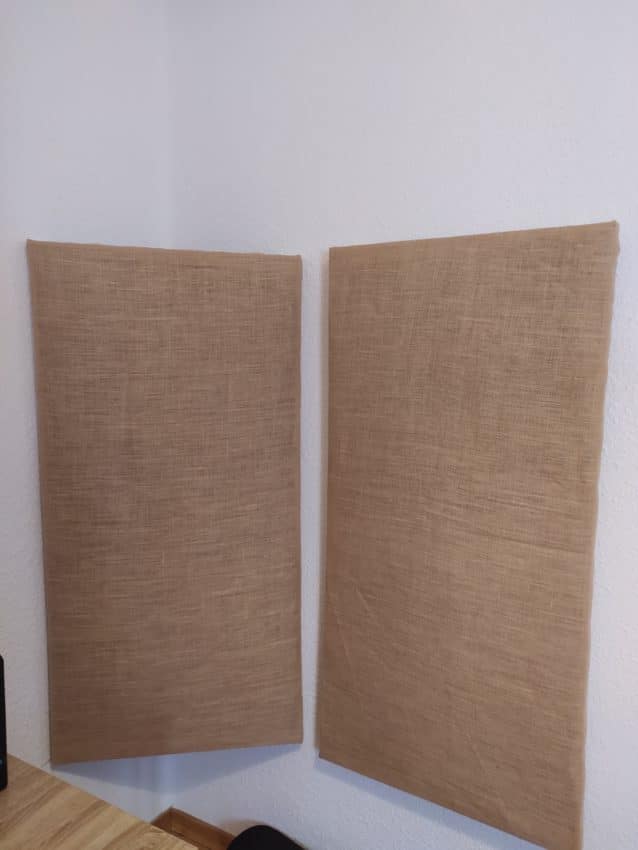
How to Hang Acoustic Panels on the Corner of the Wall
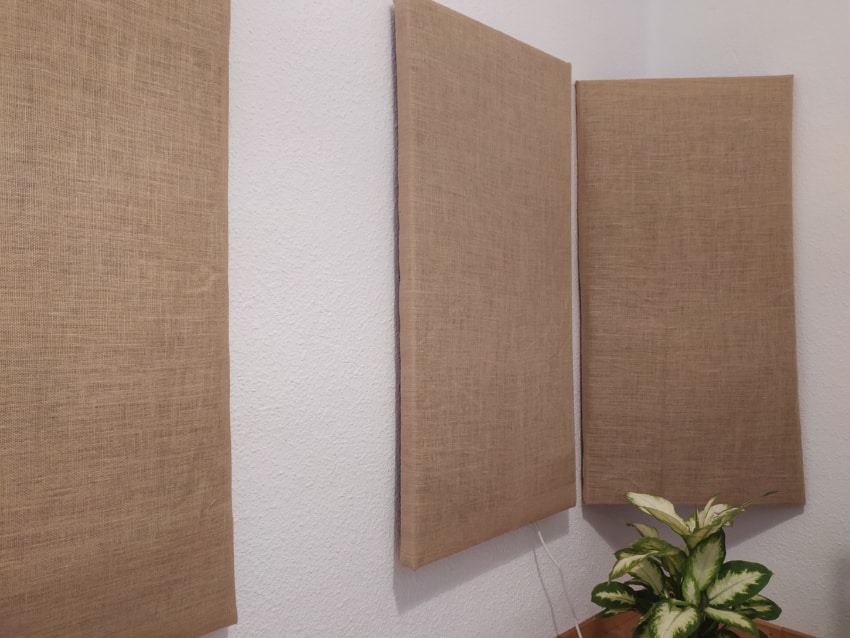
Now, this was way more complicated than simply hanging the panels from the wall like I just described.
The hardest part of hanging the panels on the corners of the room is making sure that they are at the same distance from the corners on each side; basically, when you look behind the panels, they should form a “right-angled triangle” with the wall.
The distance from the corner to where the panel meets the wall needs to be identical on both sides, and while you can try and wing this, there’s a simple way of finding out the distance using simple math;
Just take the length of the panel divided by the root of 2, and that’s it!
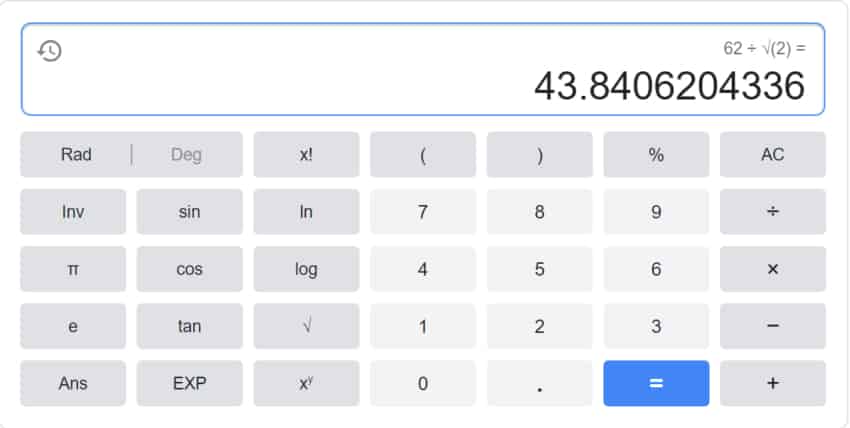
Now just measure the same distance from the corner to the sides, mark it, and hopefully, the panels will fit perfectly.
Example: In my case, the length was 62cm, so I took that and divided it by the root of 2 and got 43.8cm.
Then I measured between 48- and 49cm to each side from the corner, marked that on the wall et voila; the panels are angled perfectly.
You can use your phone’s built-in calculator to do this, or just Google “Scientific Calculator” and do it that way.
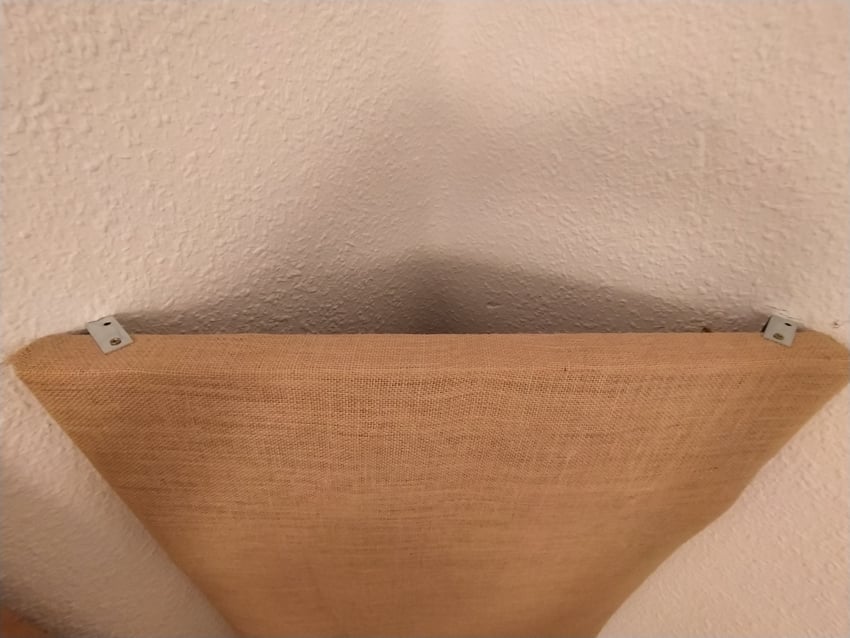
Again, I used L-Brackets to accomplish this, but in this case, I had to use one bracket on each wall, like I show in this picture:
Before and after Audio Examples of how the room sounds with- and without insulation
Of course, I will include audio samples to show you how the room changed, since it really changed…
First let me tell you that the room is pretty small and definitely not ideal as far as acoustics go, which is why I was pleasantly surprised with the results.
Before hanging the panels, I couldn’t even talk on the phone without people saying “Hey! You have a lot of echo going on in there”, and now it’s completely changed.
Here are the Audio Samples;
Single Clap
Without Acoustic Treatment
With Acoustic Treatment
Acoustic Guitar
Without Acoustic Treatment
With Acoustic Treatment
As you can see, especially with the clap, without acoustic treatment the sound just keeps on going, but on the one with acoustic treatment it dies down extremely fast, and that’s the whole point.
Here are two screenshots of the sound waves of the clap before and after installing the panels:
Clap without Acoustic Treatment

Clap with Acoustic Treatment
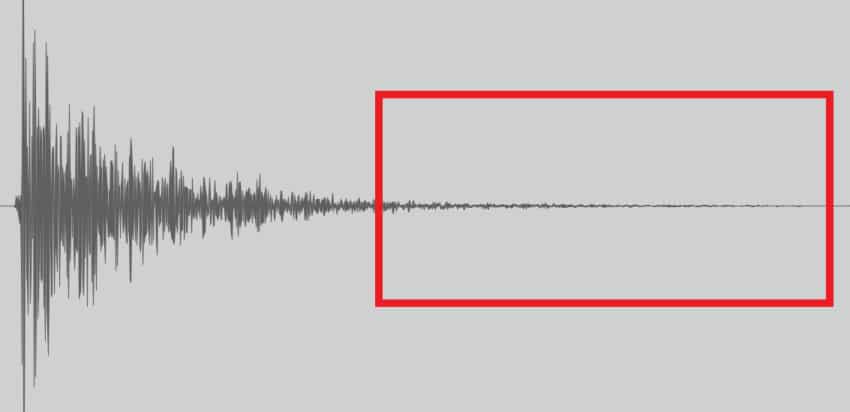
As you can see, the soundwave recorded without acoustic treatment has a much longer tail than the one with AT, which is basically the sound bouncing all over the room and getting picked up by the mic.
Here is a short Summary on how to do all of this;
Conclusion
Making your own panels is, at least in my opinion, far better than purchasing them for the simple fact that you can make about 7 or 8 panels for the price they charge you for just one.
Plus, you get to decide what color you want them in, the exact size, and more.
It took me quite some time to make these 9 panels, but as you can hear in the audio samples it was definitely worth it.
If these are too expensive, then you could always make smaller ones using old towels for the insulation material, but using thick slabs of rockwool is simply much better for sound treatment overall.
If you have any questions or suggestions, please don’t hesitate to leave a comment!
Have a nice day!
I see that Rockwook has several kinds of insulation product (SAFE’n’SOUND, COMFORTBATT, COMFORTBOARD, etc). Which did you use for this?
This idea occurred to me when I was thinking about a bar I know that has music events but terrible acoustics. Great to see you’ve made it work!
My only criticism is with the woodwork – you shouldn’t put screws into endgrain: a block glued and screwed inside each corner will be far stronger – and frames that size need some bracing bars so you can tighten the fabric without bending the sides in.
Yes, I absolutely agree, but I wanted to make them as quick and cheaply as possible, but yes, that would’ve been the best way to go about it.