
Last updated on February 27th, 2020 at 04:03 pm
I’ve always been a Cubase fan, but recently I decided to try Reaper and I have to say, it’s a great DAW. Not very appealing visually, but it’s absolutely fantastic and it can do everything the other DAWs can.
I’ve put together a list of 10 tips and shortcuts for Reaper that you probably will find useful!
I’ve also written a post where I show you 11 tips and shortcuts for Cubase. I highly recommend you take a look at it if you also like Cubase.
Let’s get right into the tips!
Tip 1: Create track Groups/buses.
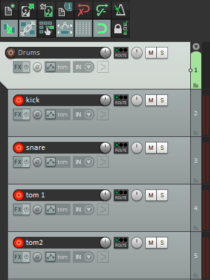
In reaper you can group tracks together, it works similar to the Cubase Folders but it’s actually easier to do in reaper.
If you have all the tracks for e.g. the drums laid down and you want to group them, all you have to do is create another track, which will be the drum bus and drag the drum tracks on top of it.
Now they will be sort of “indented” to the right.
You can adjust the levels of the drums as a whole, mute or solo them, add effects, etc. while only controlling that one “bus”.
- If you’re looking to build your Home Studio, then here is a list of the Essential Home Studio Components.
Tip 2: Volume and fades with a simple click.
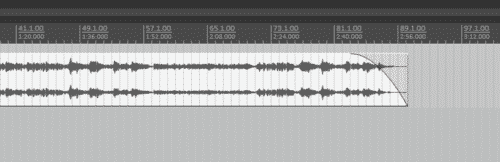
Move your mouse right to the upper edge of the event. Now simply click and drag your mouse down to reduce the volume of that event alone. You can do this on more than one track at the same time.
Simply select all the tracks you want to lower the volume on by Ctrl+Left Clicking them and doing the same thing again.
The same method can be used to create a fade; Select the event and then go to the top right then click and drag to the left. You will create a fade out this way.
Same can be applied for a fade in, repeat the same process but do it from the left side (beginning) of the track.
Right clicking on the fade will let you change the type of fades that you can use.
Tip 3: Metronome Settings:
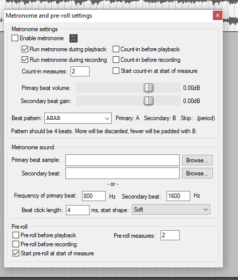
Here I actually have two tips that I think are great.
First tip; in the metronome settings, which you can access by clicking on Options>Metronome/pre-roll, set the pattern to ABAB, it comes as ABBB by default.
After doing this you can select also select sound samples to replace the traditional Tick and Tock sounds. I’d suggest you go with a Kick Drum for A and a Snare drum for B.
This will make the metronome feel a lot more natural, as if you were listening to an actual drum.
Second tip; Again, go into the metronome settings and check the box for “count-in before recording” and then choose how many measures you want it to play before it actually starts recording.
Related: Are you interested in some awesome free plugins to use with Reaper? Here are some posts I wrote about the best Free Plugins available;
- Best Free Orchestral VST Plugins
- Best Free Drum VST Plugins
- Best Free Guitar VST Plugins
- Best Free Bass Amp VST Plugins
Tip 4: Using the render queue.
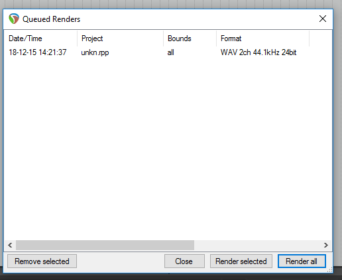
This one is quite useful because it can help you save time, instead of rendering each song when you are done with it and having to wait until it’s rendered, you can add it to a queue.
You can place as many songs in this queue as you want, and when you are ready to render them you can do so and render them all together! This will free up a lot of time during your workflow.
How do you use this?…
Once your song is ready to be rendered, click on File>Render. The render screen will pop up and now you click on “Add to render queue” on the bottom left side.
Should you want to render everything you placed in the queue, simply click on File>Open Render Queue and then click on Render All.
Tip 5: Dragging instead of Duplicating.
In Shortcut nr.5 I will explain how to duplicate an event, but there is one other way which works great especially for MIDI files.
What you do is, you lay down the MIDI event. Let’s say you’re creating some drum patterns.
The way to go about it in most DAWs is creating a small pattern and then you simply duplicate it as many times as you need.
In Reaper there’s a simpler way.
While you can certainly duplicate that event like I will show you in Shortcut nr.5, the easiest way is to go to where the event ends and you will see that the mouse pointer will now change into a double-sided arrow.
Now all you have to do is click and drag to de side.
Where the event you created ended, as you drag it to the side, Reaper will loop it for the whole length that you choose.
You will see some small indentations on the top of the event which represent each “loop” or “duplicate”.
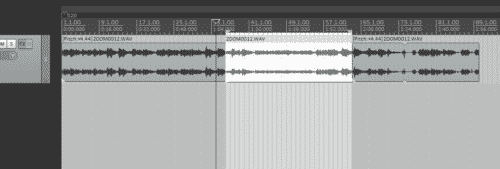
Tip 6: Slow or speed the events up!
Reaper does a great job at easily changing the speed a certain event is being played back at.
Note: This won’t affect the pitch at all! It may sound a little weird though, should you slow it down too much!
How do you use this?…
It’s a fairly simple procedure, select the track you want to speed or slow down and Alt+Click right at the end of it… Now you can drag it to the right to stretch it out, making the playback slower!
If you want to speed it up simply drag it to the left side.
Tip 7: Heal split Items and Glue!
There is an option called “Heal Split Item” under the Item menu, which if you cut up certain parts of the event, it will let you put them back together as if nothing happened…
BUT, should you have created a split and sped up one of the resulting events, or maybe you changed the pitch, you will NOT be able to “Heal” them back together.
This is because Reaper knows that the audio is being changed.
If you want to be able to use the Heal Split Items Option, the audio of the events needs to align.
There’s where the Glue Function comes in.
If you split a track and changed the audio of one of the splits, you CAN put them together no matter the changes, this is achieved by using the Glue Items option under the Item menu.
Tip 8: Dragging the audio position inside the sample!
We all know how easy it easy to move an event around, by simply clicking on it and moving it to the desired position.
But there’s a trick you can use in reaper which will allow you to move the Audio within its “placeholder”.
You can do this by holding the Alt or Option key down, which will make the arrow on the mouse change to a black double-sided arrow.
Now you can move the audio left or right within the sample, without actually moving the sample.
This is useful for finetuning!
Tip 9: Slow Fading!
This is an option that most of the DAWs have today, but if you are not that familiar with Reaper, it’s a good thing to have in mind.
Did you know that you can decrease the amount of distance a fader travels by holding down the Ctrl Key and then adjusting the fader with your mouse?
Why is this useful?…
Well, one of the most essential things while mixing is setting the levels properly. When holding down the Ctrl key and moving the Fader up, you will increase the volume but at a much slower rate than if you didn’t hold the key down.
This is especially good when you need to be precise and fine tuning this way is a lot easier.
Tip 10: Use the routing matrix.
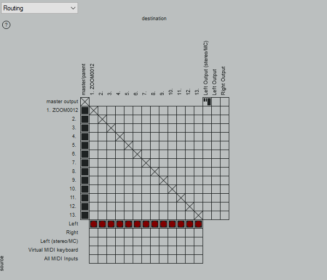
The routing matrix is Reapers way of moving audio signals from one track to another. It makes routing things a lot easier since it’s a very visual process, unlike clicking on every single track and selecting their ins and outs, sends, etc.
With the routing matrix you see everything as a grid, allowing you to simply select with one click where the signal goes.
Want to send the guitar to an effects bus? You can do this very quickly through the matrix!
You can access it either by clicking on View>Routing Matrix or by pressing Alt+R.
Now let’s take a look at a couple of shortcuts that you could use!
Shortcut 1: Changing the pitch!
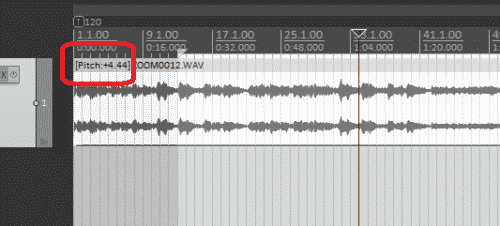
Reaper has a pretty cool feature which allows you to change the pitch of an event with a simple Command.
The Shortcuts for this are;
Shift+9 and Shift+0: Which will change the pitch quite noticeably. You can use this to get close to where you want it to be.
Shift+7 and Shift+8: Using these commands will allow you to fine-tune, only changing the pitch slightly.
Shortcut 2: Changing the layout!
Another feature that I really like is being able to change the layout of the whole DAW and then simply switching between them while pressing some keys.
Should you want one for recording where the mixer is barely visible and you have all the tracks in front of you so you don’t get distracted, then you simply need to adjust it the way you like and then press Shift+F7.
If you want another one for mixing you can do the same, increase the size of the mixer, open up the media explorer and place it where you want it to be and next press Shift+F8 to save it.
There are many combinations you can use, it all depends on what you really need in each preset
To switch between them just tap on F7 and F8.
If you don’t like using those specific keys, you can always change them by clicking on View>Screensets/Layouts. This will open the Screensets/Layout window.
Next click on edit shortcuts to change them!
Shortcut 3: Access the project settings.
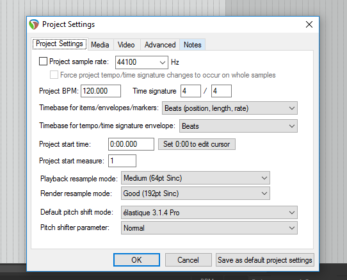
Should you need to view all the settings of your current project, like Sample rate, BPM, Bit-Depth, video settings and more, all you have to do is press Alt+Enter and the Project settings window will open.
I normally don’t use this one to check the sample rate etc. BUT it has a “Notes” tab which I actually find very useful.
I like using the Notes tab to write down information about my tracks, such as the pitch changes done, levels of the preamps, the key of the song, etc.
Shortcut 4: Jumping to the start of the project.
This is an easy and short one. Instead of clicking on the “Back Arrow” to go back to the beginning of the project, you can do this by either pressing the Home or W keys.
Shortcut 5: Duplicating the track.
One great thing about duplicating an event in reaper is that it doesn’t create a second file that is going to use up storage, so you can duplicate any event, edit it as much as you want, chop it up into lots of pieces and still, the original piece of audio will remain intact.
You can do this by selecting the event by clicking on it, then you press the Ctrl or Command Key and simply drag the event to the side, effectively creating a “duplicate” version.
Reaper will automatically apply crossfade if the tracks are overlapping, you can de-activate this if you’d like.
Shortcut 6: Time selection split.
You probably already knew how to split an event right? By selecting the exact spot where you want the split to happen and the pressing the S key.
But there is another option you can use, which will split a whole section from point A to point B. You just need to select the portion of audio you want to split and press Shift+S.
This isn’t really that essential, since you can do two splits separately, one at point A and another one at point B, but it’s faster and more efficient!
Shortcut 7: Open Effects.
You can see all the effects you have on a certain track by clicking on the FX button and checking the list that drops down.
But imagine having a 25-track project and needing to click on the FX button and then scrolling down to find the effect to open it on every one of those tracks, this isn’t the most efficient way to go about it.
You can use shortcuts to do this for you, allowing you to open the effect that you want on that track.
This doesn’t come as a default shortcut though, so you will have to create them manually.
Go to Actions>Show Action List. You can also access this by pressing the “?” key.
Write “open close” into the filter. Next, scroll down until you find “Track:Open/Close UI for FX on last touched track” and create a shortcut for each specific action, since you can create one for the first, second, etc. effect on the track.
Shortcut 8: Insert effects into tracks.
This is similar to the 7th shortcut on this list in many ways. It’s great for saving time and you need to manually add those shortcuts since they don’t come as a default!
But this is really useful since the usual way to add plugins is by clicking on the FX button and then scrolling through all the available ones, which can be time consuming.
Of course, you won’t be needing a shortcut for every single plugin, but EQ, Compressor and a Gate are very common ones and you will most likely be applying at least two of them to each track.
Note: You need the latest version of Reaper to be able to use this, make sure to download it from the official website Here.
So, how do you create these shortcuts?…
Click on the FX button and look for the effects you want, then right click on let’s say ReaComp (compressor) and select “Create Shortcut”. Next you can select the shortcut you’d like it to have.
You will notice that the shortcuts don’t appear on the effects list. Should you want to be able to see which effect has a shortcut, simply right click on the lower bar, where the “Clear Filter”, “OK” and “Cancel” buttons are, go to Show in FX List and click on FX Shortcuts.
Now the shortcuts for each effect will be shown on another column to the right.
Shortcut 9: Record.
While you can start a recording by clicking on the record button, wouldn’t it be easier to just assign a Record command?
By default, you can do this by pressing Ctrl+R, of course, you could change it to whatever you like!
Shortcut 10: Using the mouse wheel to zoom and move around.
There are a couple of ways to move around the project which are fairly simple to use.
If you want to move sideways, press Alt and move the mouse wheel up and down.
To scroll up and down the track list, you need to place your mouse over the actual tracks, not the events, and the scroll up or down.
If you want to zoom in, simply select the exact place where you would like to zoom in and scroll up!
I hope at least some of these were useful to you, I tend to use them quite a bit!
See you on the next one! Have a great day!
Great little guide, everything you mentioned is immediately useful.
Sometimes with Reaper people tend and delve really deep on a single feature, I think your overview is more useful to get stuff done.
This is the ONLY useful guide I’ve found in 45 minutes of searching and watching useless tutorials. Thank you for including the ACTUAL BUTTON PRESSES to perform actions, which is THE MOST IMPORTANT PART OF A TUTORIAL.
The general reaper community is horribly elitist and useless. “Read the user guide.” The user guide is hidden behind way too many website clicks, and absolutely sucks. It doesn’t make any sense to newcomers, and the organization and ux are CRIMINAL!
The reaper community’s inability to help newcomers may be its downfall. All “underdog” software communities have this issue. It’s why I switched from the Lightworks video editor to Adobe Premier. I’d rather pay 1000 per month to have Premier than to have to interact with Lightworks’ toxic community or useless software ever again.
Facundo, you are the most helpful and intelligent person in the entire Reaper community. You are a hero! Thank you!
Hi Facundo, thanks for the great shortcuts!
Allow me this: when you say “Shift+9 and Shift+0: Which will change the pitch quite noticeably.”, I think it would be more useful if you put “by semitones”, which is what happens.
I’ve recently switched from a total analogue world to a hybrid one using Reaper and I’ve got to say that these shortcuts and tips are absolutely fantastic as they’re helping me to speed up my (so slow it needs to be seen to be believed) workflow. Whether I’ll switch to working totally in the box or continue with my hybrid set up will be decided over the coming year, but I just wish to thank you for making my life a little easier. Thank You.