Last updated on December 31st, 2023 at 06:04 pm
This is definitely something I wondered years ago when I was just getting started with music production; Do you really need an Audio Interface to be able to record with your MIDI keyboard/Controller?
In this article, I will explain if you need an Audio interface or not, how to connect your MIDI controller to an audio interface as well as how to use it if you don’t have one, and how to deal with latency when recording with a MIDI controller.
So, without any further ado, let’s get started!
In short, do you need an Audio Interface for recording MIDI? MIDI Devices, such as Keyboards, generally have MIDI inputs and outputs which are used to connect them to an Audio Interface, but most of them also provide USB connectivity, and this can also be used to connect the devices straight to the computer, negating the need for an interface.
There are some benefits to owning an Audio Interface, however, and not just to record analog equipment but also to reduce latency as well as to improve the audio quality coming out of the speakers, but I will get into more detail about this in minute.
How to connect a MIDI keyboard to an Interface
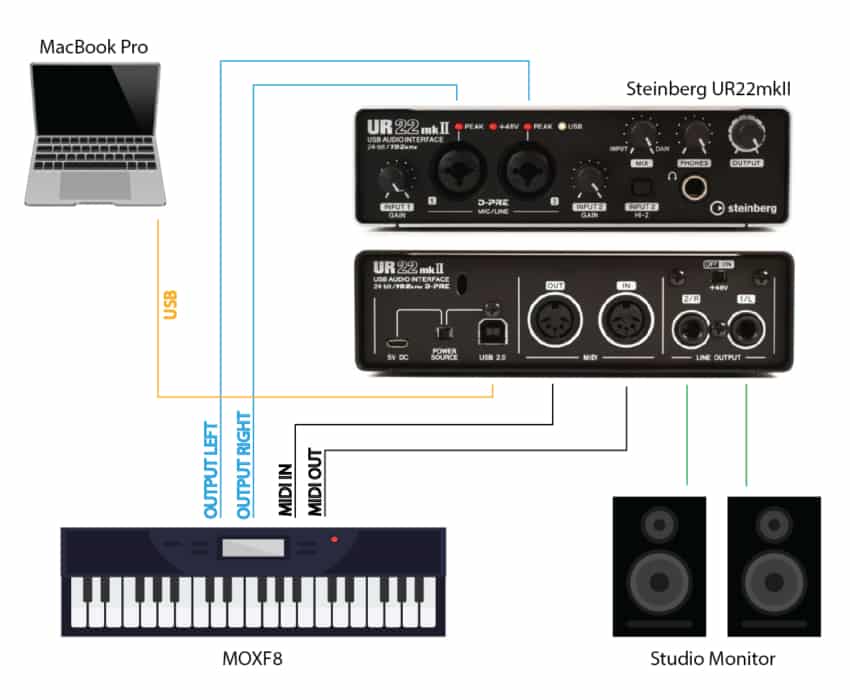
You first need to make sure that both your Audio Interface and your MIDI device have MIDI I/O ports, and then you can proceed to connecting them like this;
- Connect one end of a MIDI cable to the MIDI Out port of the device (Keyboard) and the other end to the MIDI In port of the Audio Interface.
- Connect the other MIDI cable to the MIDI Out of the Interface and the other end to the MIDI in of the device.
- If needed, install the MIDI drivers for the device and check that it appears under the DAW’s MIDI settings.
That’s really it as far as it comes to hooking up a MIDI keyboard to an Audio Interface and have it ready to record, assuming you already installed the drivers for the Audio Interface, that is.
How do I connect your MIDI keyboard without an audio interface?
Like I previously mentioned, if your MIDI keyboard, or any other MIDI device in general, has a USB port, you should be able to connect it to your PC by just using one USB cable (generally USB type-B), here’s how to do it:
- Connect the corresponding end of the USB cable (Usually USB type-B) to the USB port on the MIDI keyboard, then connect the other end of the cable to any free USB port on the computer.
Yes, it’s that simple!
However, what if the MIDI controller doesn’t have a USB port?
In this case, getting a MIDI to USB cable can solve your problem and the great thing is that these cables are really affordable.
Now, there’s one common problem that happens when recording via MIDI, especially when connecting the MIDI keyboard directly via USB, which is that you may have to deal with high latency (Essentially, when you press a key on the keyboard but the sound doesn’t come out instantly but rather a fraction of a second later).
So, let’s fix that shall we? Or at least reduce it as much as possible.
How to reduce Latency when using a MIDI keyboard (both USB and MIDI)
Generally speaking, using an audio interface and connecting your MIDI devices that way should result in a lower latency than connecting via USB, and this is mainly due to the interface’s drivers, but there will always be at least some latency going on.
If you’re using a dedicated Audio Interface, then you have two options; Install the latest drivers for both the Audio Interface and the MIDI device (if needed), and reduce the buffer size (more on how to do this in a second).
If you’re hooking up your MIDI device via USB on the other hand, since you’re not using the Audio Interface’s drivers, you’ll need to download the Asio4All driver for Windows which will allow you to handle latency a lot better.
How to adjust the buffer size to reduce Latency:
Here I will give you a quick overview of how to do it on the most used DAWs, but it’s generally the same principle no matter which one you’re using.
Once you get to the actual buffer size settings you should be able to see a dropdown menu that generally goes from 32 samples all the way up to 2080 and you can choose any of them, as seen in the example below:
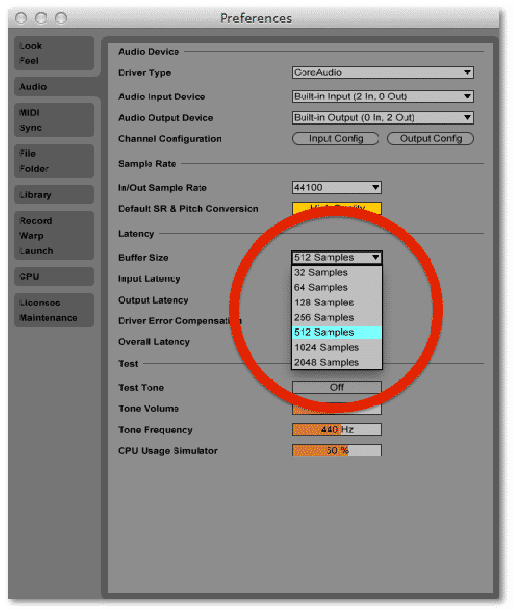
The lower the better as far as latency goes, however, if there are many tracks, effects, VST instruments, etc., being used, this will strain your CPU by quite a lot and if the buffer size is too low, you’ll start hearing pops and clicks.
Essentially, record with the lowest buffer size possible and mix with a higher one.
Adjust the Buffer Size in Pro Tools
- Go to the Setup tab and click Playback Engine.
- Choose the buffer size from the drop-down menu.
- Your session will restart.
Adjust the Buffer Size in Cubase
- Go to Devices and select Device Setup.
- Choose VST Audio System on the right.
- Make sure your interface is selected in the drop-down menu at the top.
- Select your interface under VST Audio System from the list on the right.
- Click Control Panel and choose your buffer size from the drop-down menu.
Adjust the Buffer Size in Studio One
- Choose Song, select Song Setup, and then click Preferences in the lower left-hand corner of the window.
- In the Audio Setup tab, simply choose your buffer size from the drop-down window labeled Device Block Size.
Adjust the Buffer Size in FL Studio
- Go to Options, then select Audio Settings.
- Choose the buffer size from the drop-down menu.
Adjust the Buffer Size in Ableton
- Go to Setup, then select Playback Engine.
- Choose the buffer size from the drop-down menu.
There’s another way you could do this which can be useful when just playing guitar with a standalone amp sim, for example, where you’re not going to open a DAW or anything.
How to change the buffer size directly in Windows
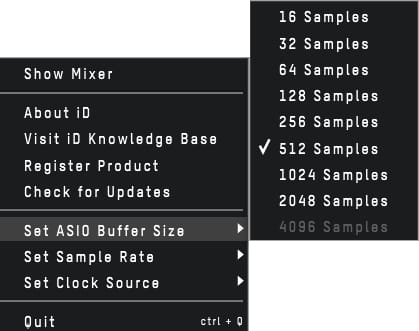
- Go to your system tray.
- Right click on the Audio Device you’re using (Asio4All also appears here if you have a program using it).
- Go to the buffer size settings and adjust them.
This last step may vary depending on the Audio Interface and driver you’re using, but it’s one more easy way to do it.
Is a MIDI interface the same as an audio interface?
An audio interface is designed to convert analog audio into digital data and to send it to the computer, and vice versa, while a MIDI interface simply carries event messages (data that specifies the instructions for music, like notation, pitch, velocity, etc.) and doesn’t transfer audio like an Audio Interface does, just digital data.
In simple terms, MIDI doesn’t carry an Audio signal and can’t really record audio but it can be used to trigger sound from software, such as VST Instruments.
Conclusion
If you have a MIDI controller and were thinking about getting an audio interface to be able to record with it, it’s worth considering whether or not you’ll actually be able to take advantage of what an audio interface has to offer since even though the interface’s drivers will help achieve a much lower latency while recording, there are other free drivers available that can allow you to record via USB with no problems.
In general, I’d recommend everyone who is interested in making music to get an Audio Interface, and if you’re someone who wants to be able to use MIDI then also consider purchasing one that comes with MIDI I/O.
I hope this information was useful!
Have a great day!
Frequently asked questions
Does MIDI require a sound card? Most MIDI keyboards and devices nowadays have a USB port that allows them to be directly connected to a PC without the need of a soundcard or audio interface.