Last updated on April 13th, 2021 at 08:35 am
Cubase is an incredible DAW, with many options and a whole lot of stuff available on it! I’ve been using it for quite some time now and while I still don’t know every single detail about it, I’ve found a couple of tips as well as shortcuts that ended up being really useful to me.
In this post I will be going over 11 tips and shortcuts for Cubase that might be of use to you.
Let’s get right into it…
Tip 1: Return the transport to the starting position.
One thing I used to like better about Nuendo, before switching over to Cubase, was that the transport would automatically go back to the starting position as soon as I pressed stop.
In Cubase you have to check this option manually by going to File>Preferences>transport>Return transport to start position.
This really comes in handy when you want to play the beginning of a certain part over and over without the need to loop it.
This obviously comes down to your own personal preference, but I think it’s very useful to know.
Tip 2: Use folders to get organized.
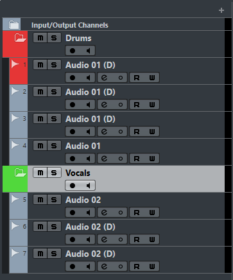
Creating folders allows you to organize your tracks into groups. You can name and color the folders, which will also apply the same color to the tracks inside those folders.
Once you place the tracks inside their respective folders, you can collapse them, opening up a lot of visual space in the project.
The ability to sort the tracks this way allows for a neater and less confusing workflow. This will let you focus on the tracks you really need to, without getting lost or distracted.
To create a folder track select Project>Add Track>Folder or right click on the track window and add a Folder track.
Now to move the tracks into the folder simply drag and drop them in.
- If you’re looking to build your Home Studio, then here is a list of the Essential Home Studio Components.
Tip 3: Create Project templates.
What is the point of opening Cubase and having to start from scratch every single time?
This isn’t efficient, using templates will allow you to work faster.
Of course, loading a whole project with EQ, Compression, and all the effects you could use on every track, is exactly as inefficient since every song you mix will be different.
But there’s some common elements that you will probably load every time.
For example, tracks, track names, Folders, busses, markers, etc.
How do you create one?…
Simply open a new project, create all the tracks, folders, busses, markers, etc. you need, then click on File > Save as Template and save it.
Next time you open Cubase and it prompts you to open Templates, recent files, etc. Click on more and you will find a list with all the templates you created.
Tip 4: Use cycle markers.

A lot of people use markers to mark certain locations in the mix, which allows them to quickly jump to that specific location. But most people don’t use Cycle markers and I find that they are actually more useful!
What is the use of adding cycle markers to the Cubase project?
It allows you to organize the song, by changing the name of the markers and the color (it colors the entire section, instead of just the small marker).
The different parts of the song become easier to identify, you can see clearly where for instance, the intro starts and ends, where the verse starts and ends, and so on.
Another benefit of adding Cycle markers over regular markers is that, it allows you not only to jump to that specific marker, but to also have it loop the section.
So, if you need to listen to the Verse A multiple times to play around with EQ, or whatever it may be, it’s really easy to set it to loop so you can work on it without having to manually start it every time.
One tip is to put some markers into the templates that you create, adding the typical sections: Intro, Verse A, Verse B, Chorus, etc.
Also, I always but the at the top of the project so they are more visible.
You can also create a Cycle Marker for the entire song, so this means that you have each individual one for each part and one for the whole song, which enables you to go from looping a certain part to looping the entire song in no time.
To select each Cycle Marker simply double click on it, and you can use the Shift+B and Shit+N commands to jump to the previous or next one.
Related: Are you interested in some awesome free plugins to use with Cubase? Here are some posts I wrote about the best Free Plugins available;
- Best Free Orchestral VST Plugins
- Best Free Drum VST Plugins
- Best Free Guitar VST Plugins
- Best Free Bass Amp VST Plugins
Tip 5: Use some track presets.
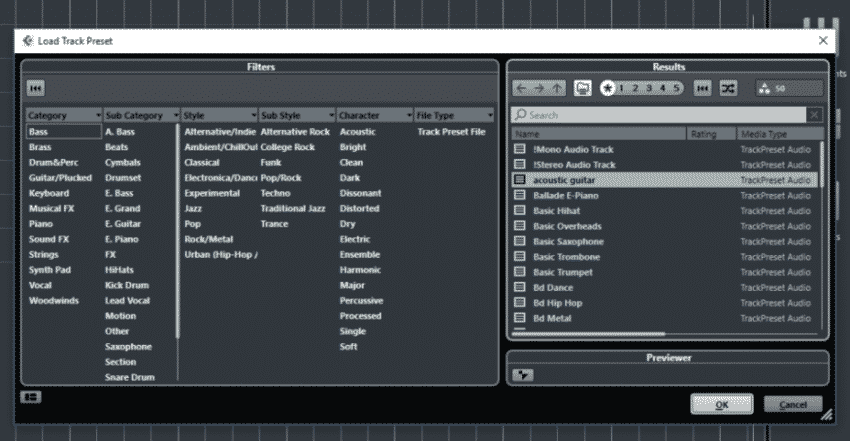
This goes back to the same point I made when talking about Project templates.
You can do a similar thing with tracks, by saving the whole Effects Chain as a preset.
The great thing about this is that it allows you to use the same effect that you used on another mix, without having to dial it in again. This saves you a lot of time and makes for a smoother workflow.
Of course, you will probably have to fine tune the effects a bit, but it’s easier than doing it all from scratch!
This is also extremely simple to do;
To save the preset simply right click on the track and click on Save Track Preset, and should you want to load a preset, it’s exactly as easy! Right click on the track and choose to load a preset, then select the one you want from the list, and that’s it!
Tip 6: Use the Mediabay.
What is Mediabay? It’s a tool that helps you keep your loops, midi files and samples, etc. organized in certain categories, sub-categories, styles, keys, etc. which will allow you to produce tracks faster and more efficiently.
It allows you to import any of the files into your session with just a double click.
To find the files that you want to load into the Mediabay, if Cubase hasn’t automatically done this already, you can do it from the left side panel where you will be able to see your PC’s storage units, Folders, etc.
Simply select the folders where you know that there is some useful media, VST samples, etc. then click add and name it any way you want.
If you can’t see this panel click on the button down to the left called “Set up Window Layout”, also accessible using the Shift+F2 command, and click on “Define Locations”.
How do you access the Mediabay?
Click one Media>Mediabay or you can press F5, which will also open it!
You could also access these files through the File browser, which is located on the right side of the project, under the media window.
You might also be looking for some Reaper Tips and Shortcuts.
Tip 7: Use the Virtual Keyboard.
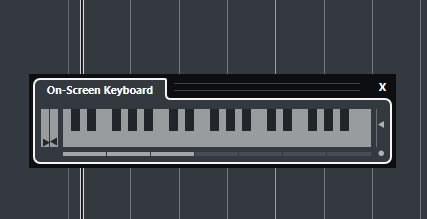
Sometimes you don’t own a Keyboard that you can use as a MIDI Input device. They are expensive and take up some room.
Luckily, you can use the virtual Keyboard and control it with you PC’s Keyboard.
In Cubase 9.5 you open this one by clicking on Studio>On-Screen Keyboard or by pressing Alt+K.
You can offset the octaves of the Keyboard by using the side arrows. You control the white keys with the upper row of letters (Q, W, E, etc.) and the black keys with the numbers above.
By loading a virtual instrument and then opening the Virtual Keyboard, you are now able to play through that Virtual Instrument using your PC keyboard.
Tip 8: Use the Listen Bus.
This is a pretty new one for me. It’s very similar to the solo button but it has some key differences.
It works by isolating certain channels in the mixer, the ones that you activated the listen button on, but without muting the rest of the channels altogether, actually dimming those that are not listen enabled.
The ones that are listen enabled will have their regular volume level, allowing you to listen to the tracks in the context of the mix but only accentuated.
This will not work on MIDI tracks, they don’t have the Listen Option.
Also, you can click on the listen button on more than one track, to accentuate a couple of them, while still being able to hear the ones you didn’t use the Listen option on.
Tip 9: Edit the Title bar.
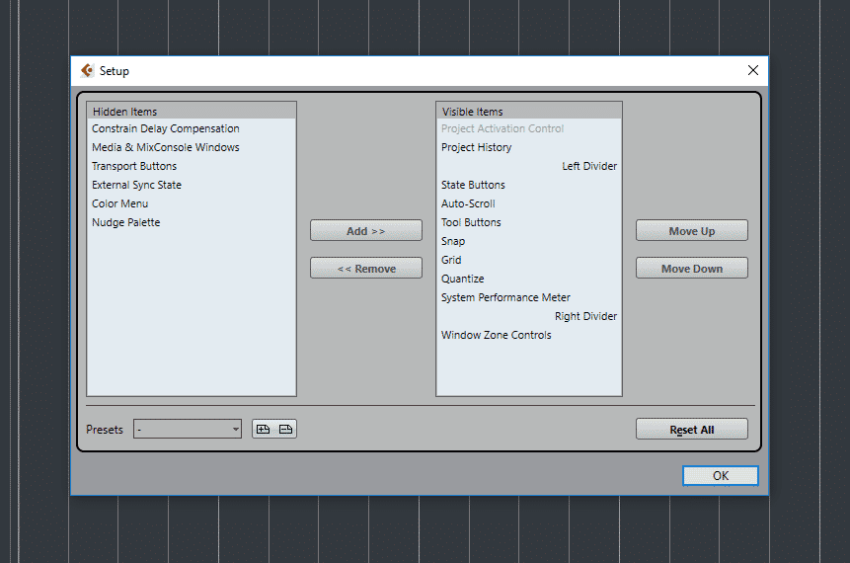
This tip can be useful for everyone, since it allows you to configure the area on the top of the Project, adding or removing certain items that may be useful specifically to you.
You right click on any empty area of the title bar and click on Setup, this will open the setup window.
Now you can choose from a list which items you want to be visible or not on the title bar, plus you can choose the order they appear in.
You can also choose presets to be able to switch between tools.
Tip 10: Moving an event around using Ctrl + Arrows.
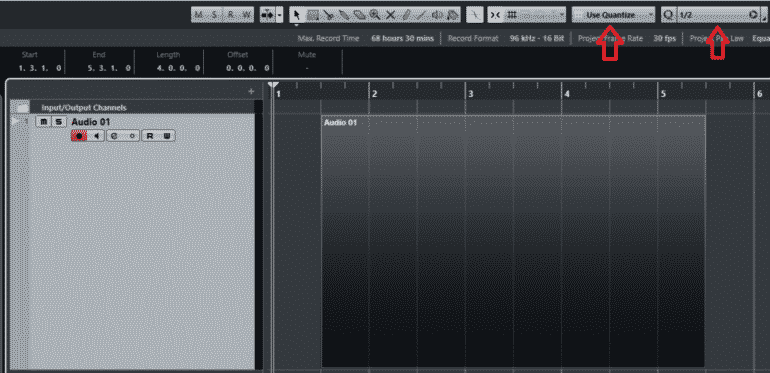
One way to move your event around the quantize path is by dragging it with your mouse, but there’s another way which I find much better.
Simply select the event and press Ctrl + the side arrows to move it around. Make sure to change the grid type to “Use Quantize”.
Then if you select 1/8th notes, every time you use the Ctrl+ side arrows to move the track, it will move 1/8th note in that direction.
Tip 11: Matching Midi to audio.
This is a trick that I started using not so long ago which helps if for instance you lay down a MIDI Drum track and then record some Guitars on top of it, but at one point the guitar comes in a bit late and you don’t want that to be as noticeable.
You could quantize the guitar, but that can make it sound a bit sterile.
One way you can try to makes this sound better is by matching the MIDI track to the audio track.
How do you do this?
You need to go down to the track control settings (the gear on the bottom of the tracks tab), once it opens you go to instruments and add the Edit In-Place option.
Now you will have this Edit In-Place button on the MIDI track.
Next you select the part that you want to edit and click that button. You can now move the MIDI part exactly to the point where the guitar hits.
Note: Make sure that Snap is OFF.
Finding these tips useful? Make sure to check out my 11 tips for a better Headphone Experience!
Now let’s get into the Shortcuts!
Why are shortcuts important? Well, whenever you are working on a project one key part is saving time, and being able to work quickly without getting distracted is definitely of great importance.
Shortcuts will save you a lot of time in the long run, plus they make the workflow a lot more pleasant.
Shortcut 1: Using the record button!
When is was just starting out I used to click on the record button with my mouse… yes, this isn’t very practical, I know!
By default, you can start a recording by pressing the “*” key on the Number Pad.
If you are using a laptop that doesn’t have a Number Pad, then you should re-route that shortcut to another key, since it’s really useful to have.
Shortcut 2: The “+” and “–“ keys.
Did you know that you can move left and right in the project using the “+” and”–“ keys?
By pressing the “+” key, this will move the cursor to the right, the ”–“ key will do the opposite.
You can also press Shift and the “+” or “-“ keys to move around even faster. It all depends on what you need.
Shortcut 3: Zoom and move around using the mouse wheel!
Let’s start with the zoom option:
If you want to zoom in or out you simply press Ctrl and then scroll the wheel up or down. It will scroll in on where you have your cursor currently set.
If you want to move left or right, just like using the “+” and “-“ keys only faster, you can Shift + scroll up and down.
This will allow you to easily move around the project without wasting any time!
Shortcut 4: Using Shift + F to view full project.
What this shortcut will do is zoom out completely until everything in your project is visible. You could do this by using the Ctrl + Scroll option also, but this one is faster!
Shortcut 5: Using the P command.
Select an event and press the P key.
This will move the locators to the event, from start to finish of what you selected. Using the 1 and 2 keys on the num pad will go to each of those two locators.
This is especially useful for playing a specific part of the song without having to select it with the mouse, plus you can just click the loop button, which is the “/” key right beside the record key, and it will loop the whole event.
Shortcut 6: Use the “A” key to apply a fade on all selected events.
You always want to create a fade for all audio events right at the end, to avoid any unwanted noises, clicks or clipping.
Here you can use the range selection tool, either by clicking on it or by pressing “2”, to select the parts of the events that you want to fade and press “A”.
This will create a fade on all the parts of the tracks you selected.
Shortcut 7: Make the tracks bigger.
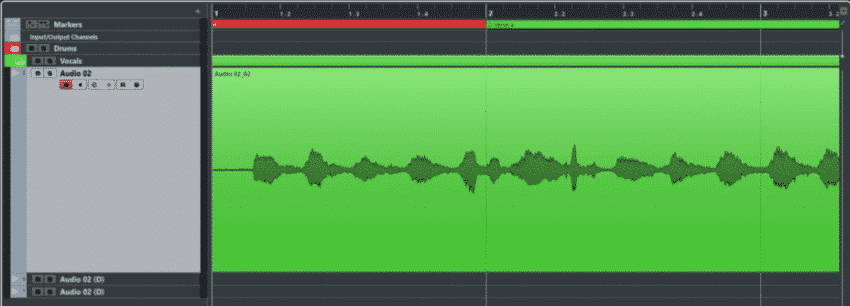
Being able to increase the size of the track to be able to also see, not only hear what’s going on while working on it, can be helpful.
There are two options I will describe… I know you can click on the bottom side of the track and drag it to make it bigger, but this isn’t the fastest or best way if you need to do it every time you want to increase the size of a track.
First option; You select the track/tracks you want to work on and press the “Z” key. This will increase the size of the tracks by quite a lot!
The Second option; You can automatically enlarge the selected track. Just go to File>Preferences>Project and Mix Console and click on Enlarge Selected Track.
After checking this option, each time you click on a track it will automatically enlarge. Next you can click on the bottom of top of the track and drag it to enlarge it as much as you want.
After doing this, every track you click will adopt the size that you chose.
Shortcut 8: Opening the Mixing Console.

The mixing console is a key part of Cubase and there are two ways to access it quickly.
First Option; Simply press F3.
This will bring up the full Mixing Console. The thing I don’t like about this one is that the full Mixing Console will take up almost the entire screen.
Second Option; Press Alt+F3.
This will bring up a smaller version of the Mixing Console in the lower part of the screen, without cluttering it.
To the left you will be able to switch between the “faders”, “inserts” and “sends” tabs, while also being able to select the “mixconsole”, “editor” and “chord Pads” tabs on the bottom.
I like the second option a lot more since the Mixing Console won’t clutter the whole screen.
Shortcut 9: Duplicate command.
We all know how the copy and paste commands work, this is basic computer knowledge, but there’s a great way to go about this in Cubase which is simply duplicating the selected events.
You do this by pressing Ctrl+D.
Duplicating will simply create a duplicate of the event/events you selected in the same track.
I found this to be really useful on MIDI tracks since they will always keep in time perfectly. You only need to put a pattern down and then you duplicate it for as long as you need.
But you can also do this with Guitar or Bass parts, or whatever it is you want to duplicate.
Just make sure to cut the events in the right spots and to have snap enabled. If the events are the right length and are timed properly, you won’t have any issues while duplicating them.
Shortcut 10: Crossfade Command.
When duplicating an event, or when recording one and then adding another one after it, you will probably get some overlapping. You are going to want to use a crossfader for this, so the transition from one to the other is as smooth as possible.
Simply select the events that are overlapping and press the “X” key, and done!
Shortcut 11: Auto Scroll.
You can active or de-activate this by pressing the “F” key.
What this does is, when activated and you press the play button, the transport starts moving on the screen, once it reaches the right end your screen will jump over, this means the transport is always going to be visible.
If you turn it off, the screen will stay fixed while the transport moves, even when it goes off screen.
When can this be useful?
When editing; If you are really zoomed in and all you want is to listen to a tiny part of the song, to see if the waveforms of two tracks align, if every time you press play the screen starts following the transport, you will have to manually go back to that specific point to be able to see it.
I prefer to have the screen stay still, so I can actually look at the wave form and also listen.
Conclusion:
Being able to move around the project in a fast and easy manner is key! There’s no use in wasting time when you don’t need to!
So, spend some time learning all the tips and shortcuts, this will make your workflow a lot smoother in the future, because as soon as you stop thinking about how to move around the project and how to use certain functions, you can focus on what really matters!
Should you want to add different Key Commands, or should you want to change the ones you already use, you can always do this going into the key command section and configuring them manually.
I hope this information was useful! See you on the next one!
Great stuff. Do you have one for Zone Controls. My button for this is missing in Cubase elements 8. If not, thanks for the above tips. Ray
Great, really cool of you guys 🙂 picked up a few to up our GAME!
Thanks for these useful tips! Appreciated