
Cymbal Bleed can completely destroy a drum recording, especially once compression is added since it raises the noise floor.
In this article, I will go over the multiple methods you can use to remove Cymbal Bleed, from using plugins specifically designed with this purpose in mind, to more creative ways (some of which are free as well).
TLDR: How to Remove Cymbal Bleed
- Use a Noise Gate that is specially designed to deal with Cymbal Bleed (such as deBleed).
- Create a Copy of the track, invert the polarity and put a compressor on one of the tracks.
- Use a Multiband Compressor in Expander mode on the higher frequencies to trigger on the transients with a quick release.
- Use a traditional Noise Gate and fine-tune the Sidechain Filters.
The Audio Example I will use (Snare with a lot of Cymbal Bleed)
This is the recording of a snare drum with with a ton of hi hat bleed, which is extremely difficult to remove without completely butchering the tone of the snare drum.
I will also be showing how every different way of removing cymbal bleed affects the audio below.
Use a Specialized Noise Gate designed to remove Cymbal Bleed
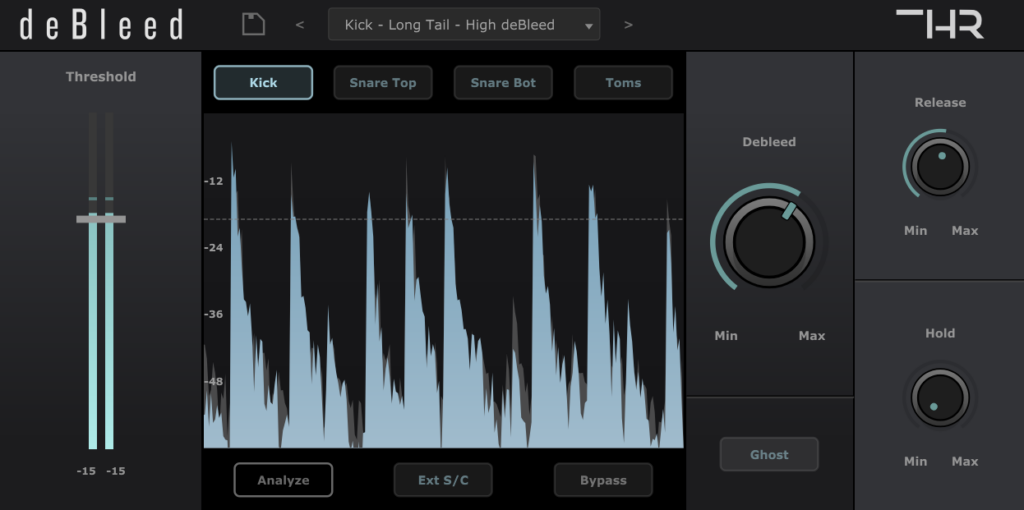
Specialized Drum Gates, such as deBleed, have been carefully designed to process the cymbal frequencies separate from the other components of the kit, allowing you to have a long release time on the kick, for example, preserving all of the body and tone of the kick drum while still removing all of the cymbal bleed.
With deBleed it’s as easy as loading the plugin on the desired track, selecting one of the four input sources (“Kick”, “Snare Top”, “Snare Bottom”, or “Toms”), and setting the threshold as well as the level of “debleed”.
Or you can choose to let deBleed set these values automatically for you by clicking the “Analyze” button.
Here’s how it sounds:
In this example, the Hi Hat is extremely intrusive and overpowering but deBleed manages to remove 99% of the Cymbal Bleed without affecting the tone of the snare at all.
This is the quickest and most effective way to solve the problem by far, but here are a couple more tips that can also work really well!
Duplicate the track, invert the polarity, and add a Compressor
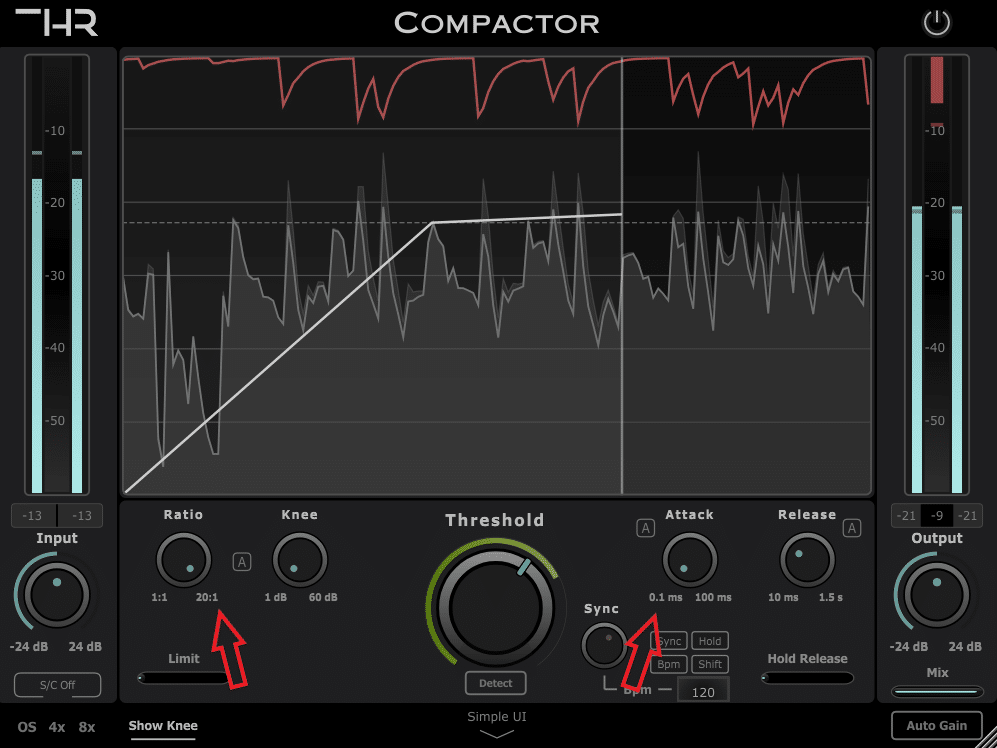
This is a very effective trick for removing cymbal bleed and it can be done with any stock compressor for free (I will be using Compactor to showcase how to do it).
You need to do the following:
- Make a copy of the track.
- Invert the polarity of the newly copied track (Flip the Phase). This cancels out the audio, you should hear nothing.
- Load a compressor on one of the two tracks (not on both) and make sure auto-gain is off.
- Set the ratio to 10 or higher (almost limiting territory).
- Set the knee to the lowest possible.
- Lower the threshold until you can hear the part of the kick you’re gating (Kick, snare, etc.).
- Use a Fast attack setting (generally as close to zero as possible).
- Use the release time to control the amount of bleed.
While this method doesn’t work as well as using a plugin like deBleed, it is still highly effective and easy to implement.
Here’s how it sounds:
As you can hear, this method will drastically reduce the amount of cymbal bleed while still letting some of it through on the transients.
Use a Multiband Compressor in Expander Mode
You can use a Multiband Compressor in expander mode and make it lower the volume on the cymbal frequencies except when the transient of the kick, snare, or toms hits, allowing the initial hit to get through retaining some of the tone of those components, but then quickly lowering the volume of the upper frequencies.
Below, I will showcase this using the Fabfilter Pro-MB:
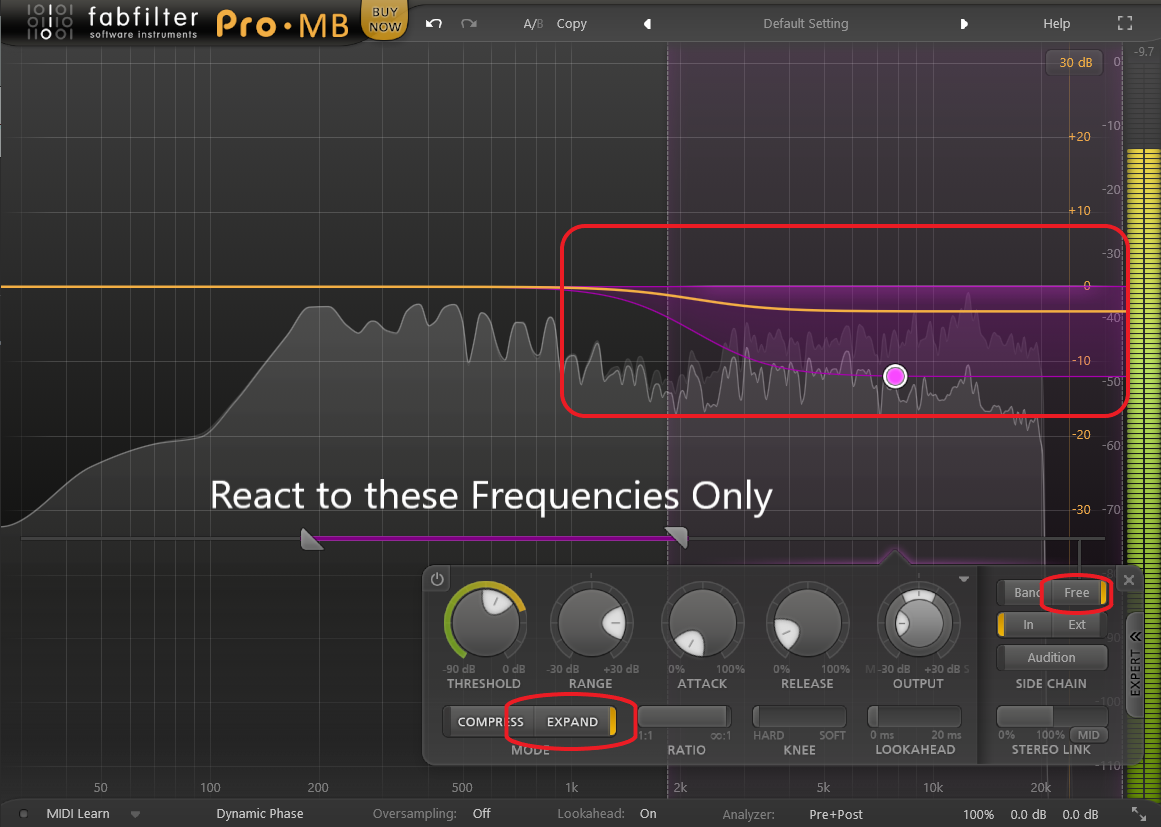
- Set the Compressor to expander mode.
- If possible, set the sidechain filters to the frequencies of the component you want to gate so that it doesn’t trigger with the cymbal hits.
- Lower the threshold to roughly -12dB (going more extreme can also work).
- Set the range to the same value as the threshold but positive (+12dB in this case) so that it lets the signal completely through when the transient hits.
- The Attack should be the fastest possible.
- Use the release to control the level of cymbal bleed (faster release times result in less bleed but may affect the tone of the components, especially the snare).
This way of removing cymbal bleed, while somewhat effective, doesn’t remove it as much as the previous two methods I described, and it also affects the tone of the snare a lot more.
In fact, it never silences the cymbals but rather just lowers their overall volume.
Here’s how it sounds:
Another drawback is that it takes more time to set up properly.
If you want to work fast, deBleed is a better tool (it also removes cymbal bleed a lot more effectively).
Use a regular Noise Gate (Stock Gate works)
Traditional Noise Gates can still work well to remove Cymbal Bleed but they need to be fine-tuned, plus they will never remove as much bleed as plugins like deBleed can (or even the compressor trick I mentioned above).
The issue with traditional gates is that they don’t allow you to process the cymbal frequencies independently from the rest of the kit, meaning that in order to completely cut out cymbal bleed, you will need to use fast release times, but this will also completely kill the sound of the drum components you’re gating.
Here’s how to set it up the right way (I’ll be doing it on a snare drum as an example):
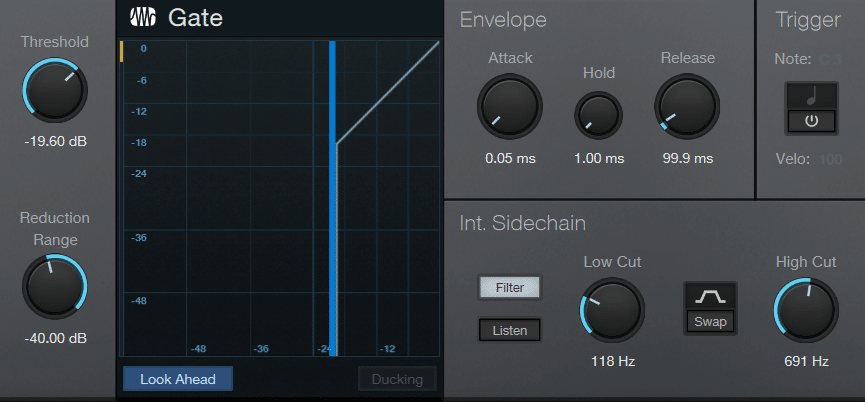
- Load any noise gate on the required track, and yes, stock gates will do (doing it on the snare in this example).
- Set the threshold so that the transients of the snare are barely above it (you only want the snare to open the gate).
- Enable the sidechain filters and set the low pass filter (or high cut filter) to roughly 1500Hz and the low Cut filter (or high pass filter) to roughly 200 or 300Hz depending on the snare (this allows the gate to only work in that frequency range so that the kick, for example, won’t trigger it).
- Set the ratio to a high value.
- Set the attack time to the fastest possible.
- If the gate has a range parameter, set it to the maximum value.
- Set the release so that you can hear the snare while minimizing cymbal bleed (usually really fast release times).
This method is the one that tends to work the least since it affects the tone of the snare a lot unless you let quite a lot of bleed through by increasing the release time.
However, this can create an even bigger problem than having a lot of constant cymbal bleed since now the cymbals can clearly be heard coming in and out, which is even harder to deal with in the mix.
Here’s how it sounds:
The pro of this method is that it’s quite easy to set up and all DAWs come with some form of stock noise gate plugin.
Summary & Recommendation
To remove cymbal bleed you can either use a dedicated noise gate designed to deal with cymbal bleed, such as the THR deBleed.
You can also duplicate the track, invert the polarity and add a compressor to one of the tracks to cancel out the cymbals while letting the rest of the signal through.
Multiband Compressors can also be used when set to work as expanders.
Lastly, and the least effective method of all, you can use a regular noise gate.
The best way by far is to use deBleed, but the compressor trick also works really well.